As it quite often happens, that one wants to take photos where tripods are not allowed (usually for some very stupid reason that just does not make sense :)), one always has to be prepared with some alternative to a tripod. And in this post, I’m will go through some of the available alternatives, and what to do when nothing is available.
1. Ask for a permission
You would not believe how often just asking is all you need to do. If you are in a place, where you can find a person responsible for the area, just try to ask. It never hurts. Also, if you know that you will be there in a certain time, try writing them before and asking for a permission. Not always, but really often they will reply and give you access. And don’t forget. Be nice and polite. Never get offensive. If you are nice to the people, they will usually try to be nice to you, and grant you your request.
It’s actually funny, that sometime they don’t see a reason why you are asking, as they think that using a tripod should be a normal thing. For instance it happened to me in the Westminster Cathedral in London, where the answer to my question on using a tripod was of course, why should it not be allowed. It was doubly interesting, as in the Westminster abbey not only the tripods, but not even photography was allowed :)

2. Use a clamp/gorrilapod
A great alternative to a tripod is a clap. If you get a good one (like the Manfrotto clamp), it’s even sturdier than a tripod, when attached to a good place. It you are at a place with thin railings, glass walls and similar, this is the way to go. Of course don’t attach it to everything, especially things that can be broke or damaged easily. Also in some places clamps are not allowed, mostly due to the possibility to damage something. Usually, if something does not look cheap, don’t attach the clamp :)
An alternative to a clamp is a gorrilapod. It gives a bigger versatility in what can it be attached to, It’s just not as stable as a properly attached clamp.
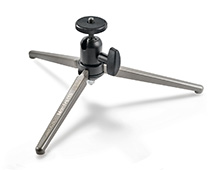
3. Use a mini-tripod
Mini or talbetop tripods are made mostly for compact and small cameras, but there are few out there, that can hold a full DSLR without problems. You can’t really use a huge lens, and the vertical shooting, without a L-bracket on the camera is not really that possible, but still, it’s much better that shooting from hand. Especially if you have those huge cement railings, where you have no problem placing one on top, or are by a small wall, which is just so high, that you cant use a tripod, this is your best choice.

4. Use a bean bag
Another alternative to a tripod, is the bean bag. This are usually very cheap, light bags, that you can even have permanently attached to your camera. I don’t think anyone will ever stop you for using one of those, and compared to a mini tripod or the clamp, there is almost no chance that you will be able to damage something with one. They are not as stable, but for shorter exposures (1-2 seconds) they are enough. Just don’t point the camera up, as the bag will sag, and don’t forget to use a timer, so you don’t touch the camera.
5. Do the shots handheld
When everything else fails, go for handheld shots. And to have a better chance to get a nice shot while doing that, here are few tips.
Hold you camera close
Hold you camera as close as you can. Brace your arms to your body. Like this, you get much less shaking in them and so you will be able to hold longer exposures. Never take the photos with your arms stretched in front of you.
Use Auto-ISO
If you use Auto-Bracketing to get brackets for HDR, turn on Auto-ISO. What it does, it, that with the brighter exposures, instead of using longer time, the camera with use a higher ISO. Like this you can avoid a lot of the movement in the final shot.
Use fewer brackets (or only one)
Take fewer brackets, by using higher differences between shots. If you can take 5 shots with 1EV difference or 3 shots with 2EV difference, go for the second option. Less brackets are much easier to align. If the dynamic range is not that big, think about just using a single shot and just getting the information you need from the single RAW.
Go wide
You maybe heard of a rule, that when taking photos handheld, the exposure time should be at lease 1/focal length of a second. So for instance on a 35mm focal length, you should have an exposure time faster than 1/35 of a second. This is not completely exact, as everyone is different and can hold the camera better or worse, but it’s a good starting point. So when taking handheld, if you use wide angle lenses, or just zoom out as much as you can, you have a much better chance to get a good result.
Use higher ISO/bigger aperture
By using a higher ISO, you will get more noise, but that’s something you can correct. A bury photo can never be corrected. Same with bigger aperture, you will get a smaller DOF, but if you understand how DOF works, and especially if you go with a wide angle lens, it still should be enough for most situations.
Take the shot more than once
When shooting handheld, always take every photo more than once (if possible). Even with the best light, you will have some of the shots blurry. Just having multiple shot, gives you much better odds, that one of them will be usable.
And if nothing works, be ready to take the shots very quickly, and than be thrown out. But I don’t really suggest that :).
To end this post, here you have two photos, both from the Frauenkirche in Dresden, one taken from the top while using the bean bag, the second one inside, taken handheld.