And we have another Process Monday here (or does it just sound silly? :)). Today I will show you one of my recent photos, that isn’t actually a HDR. But I think I mentioned it few times, not every photo needs to be HDR. So here goes:
As always, first the result and the original photos.
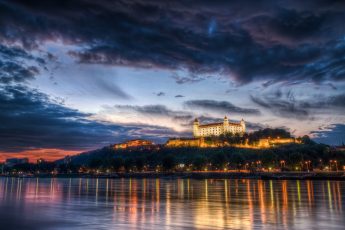
 Finished photo
 0EV exposure
As you can see, thank that I used a polarizing filter on the lens, I had enough dynamic range in the single shot. I actually took 5 exposures, just to be sure, as I always do. It’s always better to be safe than sorry. The most editing on this photo was done in Lightroom. For the 0EV shot, I changed the white to make the photo cooler, added more contrast, opened the shadows, brightened the whites, added clarity and vibrance and removed chromatic aberrations and vignetting. One note to this, if you have white objects in a photo, pushing the whites slider to the right will make them much more dominant, and less grey. Helps a lot in a lot of photos :)
 Original exposures
 After the Lightroom edit
After that, I opened the photo in Photoshop, where I did the following edits (layers numbered from bottom up):
1. The Lightroom result
2. Copy I created, to do a dust spots clean up.
3. Color Efex pro contrast, to get more local contrast from the photo
4. Color Efex glamour glow, used only on the clouds, to make them look a little brighter and softer
5. Color Efex Detail extractor, painted just on the hills, to get more detail in them
6. Brightened the top corners, as there was a little vignetting visible, and I found it distracting.

And that’s all I did with this image. To find out more on how I edit, check out the guides and before after categories on this blog, or check out my video tutorial series here: