Today, I will take a look at noise reduction and Imagenomic noiseware. Imagenomic Noiseware is currently for me the best way to remove noise in my photos. I’ve been using for a long time now, and I haven’t found one that makes cleaner photos yet.
1. Decide if you really need noise reduction
Let’s start with a general thought. Noise reduction is not always needed, and sometimes it can even make you photo worse. It very often can cause a big lose of detail and make the photo look softer. So my tip is, if you can, first look at the photo in the desired size you want to show it, and only then think about if noise reduction is needed (but always use noise reduction on full size photo).
2. Use it selectively
Continuing from the previous point, use noise reduction only on parts of a photo where it’s needed. Especially in two cases, you should think about avoiding it. First is when you have an area with a lot of small detail. Using noise reduction on that can remove all the detail and make the whole area looking just blurry. Secondly, when you have a color gradient (usually the sky) a noise reduction could cause a very ugly color banding. It’s just looks better with noise than with color banding.
3. Use Gaussian blur for a very strong noise
From time to time you will get a very strong noise, especially if you brighten underexposed areas of your photo. For noise like this, no noise reduction will work, as that will create more of a jagged blobs. Easier is just duplicate the layer, blur it with Gaussian blue, and then mask it in where you need it.
4. Remove noise before filters & retouching
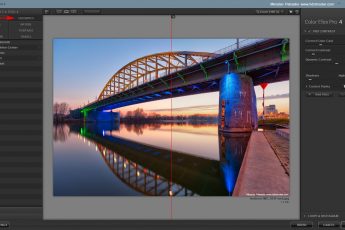
If you plan to use special filters on your photo, like Color Efex Pro, or Topaz Adjust, remove the noise first. This is because a lot of these filters work with detail in your photo, and can interpret the noise as additional detail. You don’t want them to make the noise even more visible.
It’s similar for when you do retouching. For instance if you use content aware fill to remove dust spots from the sky in your photo, having the sky noisy, will create a worse result. Photoshop is just not so great when it tries to replicate a noise pattern. It’s much better when replicating a smooth transition.
 Only luminance noise reduction
 Only color noise reduction
5. Know the difference between color and luminance noise
There are two kinds of noise that you can get in your photos. You have have luminance noise and color noise. The luminance noise is what creates the variations in brightness (the small brighter/darker dots all over your photo) and the color noise creates a variation in color (especially with longer exposure)
So when reducing noise, you have to think, if only reducing a certain type of noise, will work better. If you want to protect the detail, do only color noise reduction. If you want to protect the color, do only luminance noise reduction.
In Imagenomic Noiseware (and all other noise reduction programs) you can choose the strength separately for both, so experiment, trying to see which one work better for the specific situation.
 No detail protection
 Detail protection used
6. Use detail protection
Again, in most noise reducing programs, you can turn on detail protection. In Imagenomic Noiseware you have this option for Luminance and also Color noise. What it does, is tries to determine what is detail, and what is noise. It’s not perfect, but it does quite a nice job overall. So if you have an area, where the detail is getting lost in the noise, try this.
And that’s all for today, will show you more about noise reduction next time :)