Some time ago I wrote about how to avoid people in your photos (you can check the post here), and today I thought I will show you an example of one of the techniques I mentioned here. So today I will show you how to remove people from your photos manually, using multiple exposures.
1. Taking the photos
It’s hard to say how many photos you will need. It depends a lot on the area you are trying to photograph. If the area is filled with a stream of moving people no amount of photos will be enough. But if the amount of people is more moderate, and you can see the parts of the scene you want to photograph, you can do it.
The best tactic is to first take a shot and check it, trying to remember the spots that contain people. Then without changing the camera settings or composition, wait until one of those spots is empty, and take another shot. Wait for another spot, and take another shot. Continue doing so, until you have a photo with empty space for every spot you need. Having more photos than less is usually much better.
Let’s look at an example I took in Lyon, France. The Basilica of Notre-Dame de Fourvière has quite many people going in and out during the day. At night it was easy to avoid them, but during the day, I had to do more work. I set up for a vertorama, and while a single exposure for the top image was enough (no people there :)) I had to do multiple for the bottom. For this, I took quite a lot, 18 shots in total, just to be sure I have everything.

In the end I used only 5 of these shots, just the ones I needed for the whole image. Here I had a bit of luck that all people were moving. If there are some just standing around or sitting, you may need to retouch them out in the end.

2. Blending them
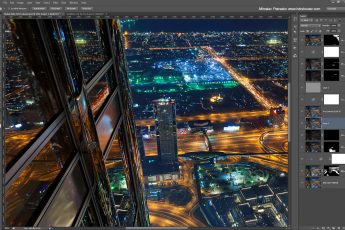
So once the photos are selected, we have to load them all into layers in Photoshop. Here using the masks one can easily blend in parts of every image, to remove the people.
Let’s look again at the example. Here, you may notice I also loaded the combined vertorama (the top combined with one of the bottom images, that had the least people) as the base. This does not change much, just one has to make sure the photos are properly aligned. Other than that, it’s the same process as by a normal image. If you don’t know how to load files into layers in Photoshop, check this guide on how to do it.

The next step is to add a black layer mask (a mask that hides everything). Either choose a layer and go to Layer/Layer Mask/Hide all or hold down Alt and click on the Add layer mask button (circle inside a square in the bottom right of layers window). Once you have all the layers except the first one hidden you can continue.

Now choose a white brush, 100% opacity, 0% hardness, with a size around 100px (depends on the size of your photo). No we can start to remove people. Just choose one area you want to work with on the base photo, look through the other layers (holding down shift and clicking on the mask will temporary disable it, so you can see the photo), where the are is empty, and then start painting with white on that layers mask, over the part you want to hide. Don’t forget, that people also have reflections and shadows, so you have to remove those also.


Continue doing this for every area you need, until you have a completely empty photo (that is if you had enough source images :))

And thats all for this guide, for more, feel free to check out the guides category of the blog.