One of the issues when creating a Panorama, are the missing areas around the sides, due to how the images have to be warped to fit each other. To correct this, one needed to either cut off the areas, fill them in or try to war the image to get rid of them. With the newest update to Lightroom and Adobe Camera RAW, there is now one more option, called Boundary warp.

Here I’m showing it to you in Lightroom, but it works exactly the same in Camera RAW. To be able to use it, you have to first merge a panorama in Lightroom. To do so, just select all the files of the panorama, right click one of them and choose Photo merge/Panorama, or go from the top menu Photo/Photo Merge/Panorama, or even faster, hit Ctrl+M.

Once you get the popup window, you will see the merged panorama. If you have Auto Crop on, you have to turn it off first, to be able to see the whole photo, including the missing areas. Now here you also see the Boundary warp slider. Move it to the right, to see how the photo will start warping to fill in all the missing areas. It will also try to straighten the image while doing that.

Here are three different situations, and how it worked out. I this first one, a scenery landscape, it worked out perfectly. The sky looks great and even the road was straightened perfectly.

Boundary warp
Boundary warp

In this second example, it was not that perfect. This is the biggest weakness of Boundary warp. If you have straight lines close to the warped borders, Boundary warp can distort and bend them. You can see it here on the right, where the bridge is just not straight. In this case, one would have to either crop this away, try to warp it back in Photoshop, or tone down boundary warp, to a lover setting, where this is not so visible. Either way, more work is needed.

Boundary warp
Boundary warp

In this last example, here again are straight lines close to the edge. But since the needed warp is much smaller, there is no visible distortion in the final image.

Boundary warp
Boundary warp

Boundary ward is a really nice addition from Adobe. It will make some quite challenging panorama corrections that much easier. And it even leave the result in RAW DNG format, which makes it even better.

In this second part, we will look together at what camera modes are available, and which one to use when. Before you start reading, please be sure you understand how exposure works, and what are Aperture, Shutter speed and ISO (all covered in the first part).

There are six basic camera modes that I will cover here, and when to use them. These modes are :

  • Automatic (mostly a green square or AUTO) – the camera chooses everything for you
  • Program (P) – the camera chooses the aperture and shutter speed for you, you can select the ISO
  • Aperture priority (A or Av) – the camera chooses the shutter speed for you, you can select the Aperture and ISO
  • Shutter priority (S or  Tv) – the camera chooses the Aperture for you, you can select the Shutter speed and ISO
  • Manual mode (M) – you have to set up everything, nothing is automatic
  • Bulb mode (B) – is a special manual mode for long exposure photos

Please note that most cameras offer a setting for Auto-ISO. When set, the camera will choose the ISO for you, regardless of the mode selected.

Automatic

A mode best used for snapshots. You just want to take a picture, and you don’t really care how it will look. In automatic, most cameras are set up to use a bigger aperture and higher iso, just to be sure you get a short enough shutter speed, so the photo is not blurry. So if you are not in a really well lit space, or outside during a sunny day, this can easily result in out of focus, very noisy images. If you are at least a bit serious about photography, you should move away from this mode rather quickly.

Program (P)

Program mode is a bit similar to Automatic, but it already gives you access to some settings. Better said, its everything except aperture and shutter speed (there are more settings available then the basic one, like white balance, focus points and similar, but here I will just stick to the basic ones, all others will have their own articles).

Program mode is a good point to start. As you can change the ISO, you can already influence the photo in quite a strong way. You can also observe what settings the camera chooses for you, and since you already understand what they do, you can easily then move on to more advanced modes.

Aperture priority (A)

Probably the most useful mode. You choose the ISO and the aperture and the camera will choose the time for you. Like this, you have direct control about the DOF (depth of field) of your photos, and an indirect control of the shutter speed. You just:

  • choose a big aperture (1.2 – 2.8) when you are going for a small DOF and you want to blur out the background
  • choose a medium aperture (5.6-8) for normal photos, where you want sharp detail, but not need that much of a DOF
  • choose a small aperture (11-22) when shooting wide view, like architecture or landscapes, in situations where you really want to maximize your DOF.

Aperture priority works wonderfully in a combination with Auto-ISO. If you shoot hand-held, you can set  the aperture to an acceptable value for the DOF you need, and the camera will try to increase the ISO so you get short enough times for a hand-held shot.

Shutter priority (S)

Shutter priority is the opposite to Aperture priority. You choose the ISO and the shutter speed, and the aperture is chosen by the camera. This is mostly meant to be used when you really need to have a specif shutter speed. You want to freez motion, you choose a short one, you want to blur movement you choose a long one.

While this all works as it should, I never once used this mode. As it take away control of the aperture, it takes away control of DOF. And having the DOF you want, is really important. So usually, it’s just bettor to go to full Manual mode, where you have the control of both, the aperture and the shutter speed.

Manual mode (M)

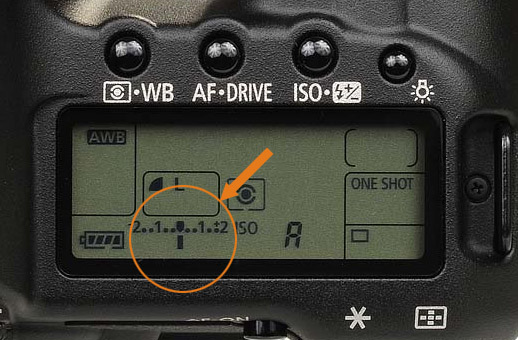
exposureManual mode is the most advanced. It gives you control of everything. You can choose your ISO, shutter speed and aperture. The camera will change nothing for you. But it will still meter the proper exposure of the scene, and indicate this on the screen. You will see an exposure scale, usually from -3 to +3 with a dot marking what exposure will the current settings result in. If you don’t see it, you have to first hall press the shutter and the indicator will show up.

Manual mode is great, if you have time to set up your camera (landscape photos) or you are shooting a series in which you know you want the exact same settings in each photo (shooting at a party, with the light being constant, you can just set up the camera once, and just leave it).

Manual mode is not preferable when you are encountering quick variations in available light.  Since you would need to tweak your settings all the time, the Apperture priority is much better for this.

Bulb mode (B)

Bulb mode is a special version of the manual mode. On some cameras its available as a separate mode, on some it’s activated when you try to change the shutter speed to a time longer than 30 seconds. In bub mode, you choose you ISO, your aperture and the shutter speed is determined by how long you hold the shutter button down. So when you press it down, the camera opens the shutter, and when you let go, it closes it.

This mode it used for long exposure photography, when you need times longer than 30 seconds. With the bulb mode, you can go as long as you want. It’s best to use this together with a remote, and most camera remotes can lock the shutter button, so you don’t have to hold it down all the time. Most cameras show a timer on the screen during this.

Scene modes

A lot of camera offer also scene modes. This modes are meant for specific situations and each mode is also represented by an icon, fro what situation it is. So there are modes like portrait, landscape, night and similar. They are in really just specific settings applied to the camera that you can do in other modes with much more control. For instance:

  • portrait mode – is usually just aperture priority, with a bigger aperture selected
  • landscape – again, aperture priority, with smaller aperture selected
  • nigh – aperture priority, with bigger aperture and higher iso selected

And so on. Once you understand what effect different aperture, shutter speed and ISO have, you will never ever need one of these modes again.

Which mode to use?

If you are just a beginner, I suggest skiping the Automatic mode completely. Start with the Program mode, play with the ISO and see what settings the camera uses. As soon as you can, move over to Aperture priority and star controlling the depth of field in your photos. And in special occasions when you need it (bracketing, long exposure, repeating photos ans similar) or when you already feel the need for complete control go into full Manual mode.

Today I’m starting a new series on the blog, Photography Basics. In this series I will go through the basics of photography, especially meant for those of you, who are just beginning. If you are an advanced or expert photographer, you will probably find this boring :) But if you are just a beginner, this might be exactly what you need. I will try to explain things as simple as I know, to make them easier. So lets start.

Part 1 – Exposure

Photography is about light. When you are capturing a photo, you let light hit the sensor (or film) in you camera. So the most important thing that you have to set up on your camera, is the amount of light it lets in when you take a photo. You can of course let the camera do it all for you, but then you loose control over the look of your photo.

The amount of light that gets onto the sensor, is determined by three parameters. Those are:

  • aperture – how big is the opening through which the light gets into the camera
  • shutter speed – how long is the opening that let’s the light in, open
  • ISO – how sensitive the sensor (film) is to the light.

There three parameters determine if you get a properly exposed photo, and few more things about the photo (which we will take a look shortly). Knowing how to set them up and when to use what values, is probably the most important thing you need to know when trying to take a photo.

Exposure triangle

Aperture, Shutter speed and ISO are usually shown forming a triangle. The reason for this is, that they are all connected. When one of them is changed, one or both from the other have to be compensated, to keep a proper exposure.

For instance, if you change the aperture, making the opening smaller, you either have to use longer time, or bigger sensor sensitivity (ISO), or both, to compensate. If you choose smaller sensitivity (ISO), you have to have a bigger opening, longer time or both, to get a proper exposure. And so on.

Aperture

Aperture, determines how big is the opening in the lens, that lets in the light. A very important thing here to remember is, that bigger apertures (bigger opening) are noted with small numbers (starts at 1 and goes up from there) and small apertures are noted with higher numbers. So if you change the aperture for instance from f2.8 to f16, that means you made it smaller. There main effects of different apertures are:

  • the bigger the aperture, the shorter shutter time and lower ISO you need to get a proper exposure
  • the bigger the aperture, the less DOF (depth of field – the distance between the closes object in focus to the furthers object in focus) you get, and most of the photo will be out of focus (object in focus are shown as sharp on the final photo, out of focus are blurry)
  • the smaller the aperture, the more of a star effect you will get on light points.This is an effect, where light points are captured as small stars, with rays going from them in all directions (see example to the right)
  • aperture also influences sharpness, with each lens having a sweet spot, an aperture where it is sharpest. The difference here is not that huge, and in the most of the time you can just ignore this.

So when you are choosing the aperture, you have to think about, what you want to archive and what you require. You choose a bigger aperture, when you are shooting from hand, so making the exposure time shorter, or when you want to have a shallow DOF, for instance in portraits. You choose a smaller aperture, when you want a longer exposure time, or when you want a big DOF to have everything in focus.

Here are two examples for you, one with shallow DOF (big aperture used) and one with huge DOF (small aperture used)

Photography basics
Photography basics

Shutter speed

Shutter speed determines, how long the lens opening is open and allows light to hit the sensor. Most cameras allow this to be set from 1/8000 of a second, up to 30s (the times may wary between cameras). There is a way to go over 30s, but that will be covered in camera modes. The main effects of different shutter speeds are:

  • shorter shutter speed freezes motion. The longer the shutter speed is, the more blurred the moving objects are, until the completely disappear by very long shutter speeds.
  • faster shutter speeds are much better for handheld photography, as the shorter the required time is, the better chance of being able to hold the camera without moving it.

When choosing your shutter speed, usually you want to go for the shortest that you can. The exception is if you are trying to get a specific long exposure effect. In that case, the time you need varies. For instance getting a bit of softness info flowing water, you need few second, for making flowing water look almost like ice, you need 30s or more.

Here are another two examples. In one the short shutter speed froze the cars in place, in the other the long shutter speed blurred them out, and only light trails remained.

Photography basics
Photography basics

ISO

The last parameter is the sensitivity of the sensor (film). ISO starts at 100 (with few professional cameras being able to go lower) and goes up from there up to 100 thousands. This is more of a complimentary parameter, as normally, one changes it only when really needed. Mostly the goal is to just keep it at low as possible (at the camera default setting). The main effects of ISO are:

  • the bigger the ISO, the shorter time and smaller aperture you can use, to archive a proper exposure
  • the bigger the ISO, the more noise you will get in your photos. So having a lower ISO will result in much cleaner photos.

So the main reasons for using a higher ISO is, to get a shorter shutter speed. Either you are shooting in a dark place handheld, or you are trying to capture something that changes really fast. Going with a higher ISO is usually the last step in setting up a proper exposure, as except for artistic reasons, one prefers a cleaner photo result.

You should experiment with your camera, too see what highest ISO you can use, what is the biggest amount of noise you are willing to accept in your photos. Also note, a high ISO can result in the loss of detail, as the noise becomes more dominant than small detail.

Here are two examples for ISO. First one was taken handhold inside a church, where I had to use a high ISO of 1600. The second one is taken from a tripod, so I could use an ISO of 100 without problems.

Photography basics
Photography basics

So this covers the basics of exposure, and in the next parts we will take a look at camera modes and when to choose which mode, RAW vs JPEG, white balance, focusing and much more :).

There are many video tutorials available on the Internet, but it hard to say which are worth it. So today, I will show you some of them I liked the most. Be warned, these are not free tutorials and they are mostly not meant for beginners. Also they are all about landscape photography, HDR and luminosity masking, as those are the areas that also interest me. I would like to mention here also my series Master exposure blending, but probably those of you who visit the blog regularly, already heard about that one :)

Photographing the World by Elia Locardi

There are actually two parts to this, “Photographing The World: Landscape Photography and Post-Processing” and “Photographing the World: Cityscape, Astrophotography, and Advanced Post-Processing“. Both are massive, with 12 and 15 hours of content respectively. Both created by a great photographer Elia Locardy, with the help of Fstoppers.

They are not the cheapest, but you get what you pay for. Lots of content, lots of great informations, and photos from some of the most wonderful locations.

Video tutorials by Sean Bagshaw

Wonderful resources for landscape photographers, with detailed explanations of luminance blending and usage of TK actions panel. Sean offeres tutorials for advanced photographers, but also ones if are only a beginner. They can all be found on his web-page www.outdoorexposurephoto.com.

Video tutorials by Jimmy McIntire

Jimmy like to show many different blending methods in his videos, and he even has his own Photoshop extensions to help. He has separate videos for Luminance masking and HDR, so you can choose what interests you. All can be found on his web-page www.shutterevolve.com

Video tutorials by Trey Ratcliff

Trey provides many different video tutorials, mostly for photographers that are beginners or intermediate in their skill. The videos are focused on HDR, and you can also find specific video tutorials for the newest HDR software Aurora HDR. You can find all the tutorials in the Stuckincustoms stoere here store.stuckincustoms.com

The Ultimate Landscape Photography Course by Jay & Varina Patel

Another huge tutorials series, with videos covering everything from the gear, through the shooting up to post-processing. The series focuses on Landscape and nature photography only. Both Jay and Varina are great teacher, so you will learn a lot from them. The turorials can be found here visualwilderness.com/product/ulpc

Video tutorials by Julien Grondin

Also known as Beboy, Julien creates stunning cityscape and landscape photos. The only problem here is, all his videos are in French. So if you don’t understand, they are hard to follow if you don’t have a very good knowledge of Photoshop. Still, if you do understand French, you should check them out, as they are a great source of information. All can be found under www.beboyphoto.com

Video tutorials by Chip Phillips

Another mostly landscape photography focused series of videos. The topics covered go from luminosity selection, through orton effect to sharpening. There is even a from start to finish video available. They can be found on www.chipphillipsphotography.com.

And there are of course many more, but I think this is enough for this article :). They are all great sources of information, and should be considered if you want to improve you photography skills.

One should always include copyright info in all published photos, so today I will show you how to apply it easily in Lightroom, and also direcly by the import. There is an even simpler method, by settings it right in the camera settings, but since not all cameras support this (for instance the Sony a7r does not have this option, the a7r II does), you sometime have to do it later on.

But still if you have this setting in your camera, you should definitively use it. Just search for Copyright info in your menu. But back to Lightroom.

First you need to create a new preset with the copyright info. To do this in the Library module, search for Metadata on the right. Under it, you will see a drop down menu with the name Preset. Click the arrow to open it and choose Edit Presets.

A new popup will open. Here scroll down to the categories IPTC Copyright and IPTC Creator. Here fill in all the info you want to have included in your photos. There has to be a check mark next to the lines you want to include (btw. there are ways to write the copyright symbol, but I always find the simplest way just to search for “copyright symbol” in any search engine, and then copy it from the first results :)).

Once this is done, click on the arrow to drop down the menu next to Preset and choose Save Current Settings as New preset. A new popup will show, where you can enter a name for this preset. Then just click Create and Done to close both popups.

How to apply copyright info in Lightroom

Now the preset is created, you can star using it. You can either select in under the Metadata preset in the Library module, and then sync it across other images with Sync Metadata. Or the other option, is to just choose it as the Metadata preset right at the import dialog of Lightroom.

If you do this, all your photos will always include the needed copyright info.

Page 10 of 26« First ...910111220... Last »
FREE EBOOK!!!
Subscribe to my newsletter and get a free Capturing fireworks ebook. 
Subscribe