Free HDR video tutorial

Free HDR video tutorial

MASTER EXPOSURE BLENDING

Find the best ones

Find the best ones

TOP PHOTOGRAPHY SPOTS

Free wallpapers

Free wallpapers

HIGH-RESOLUTION WALLPAPERS

pano03

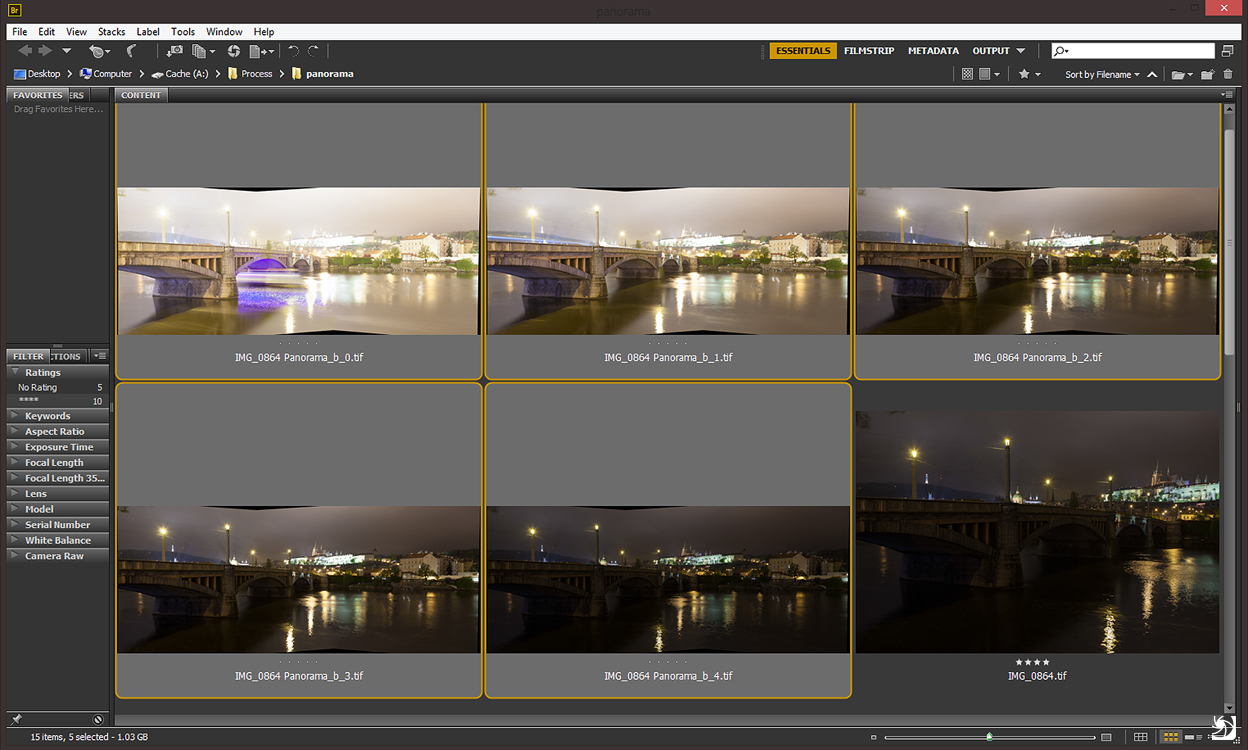
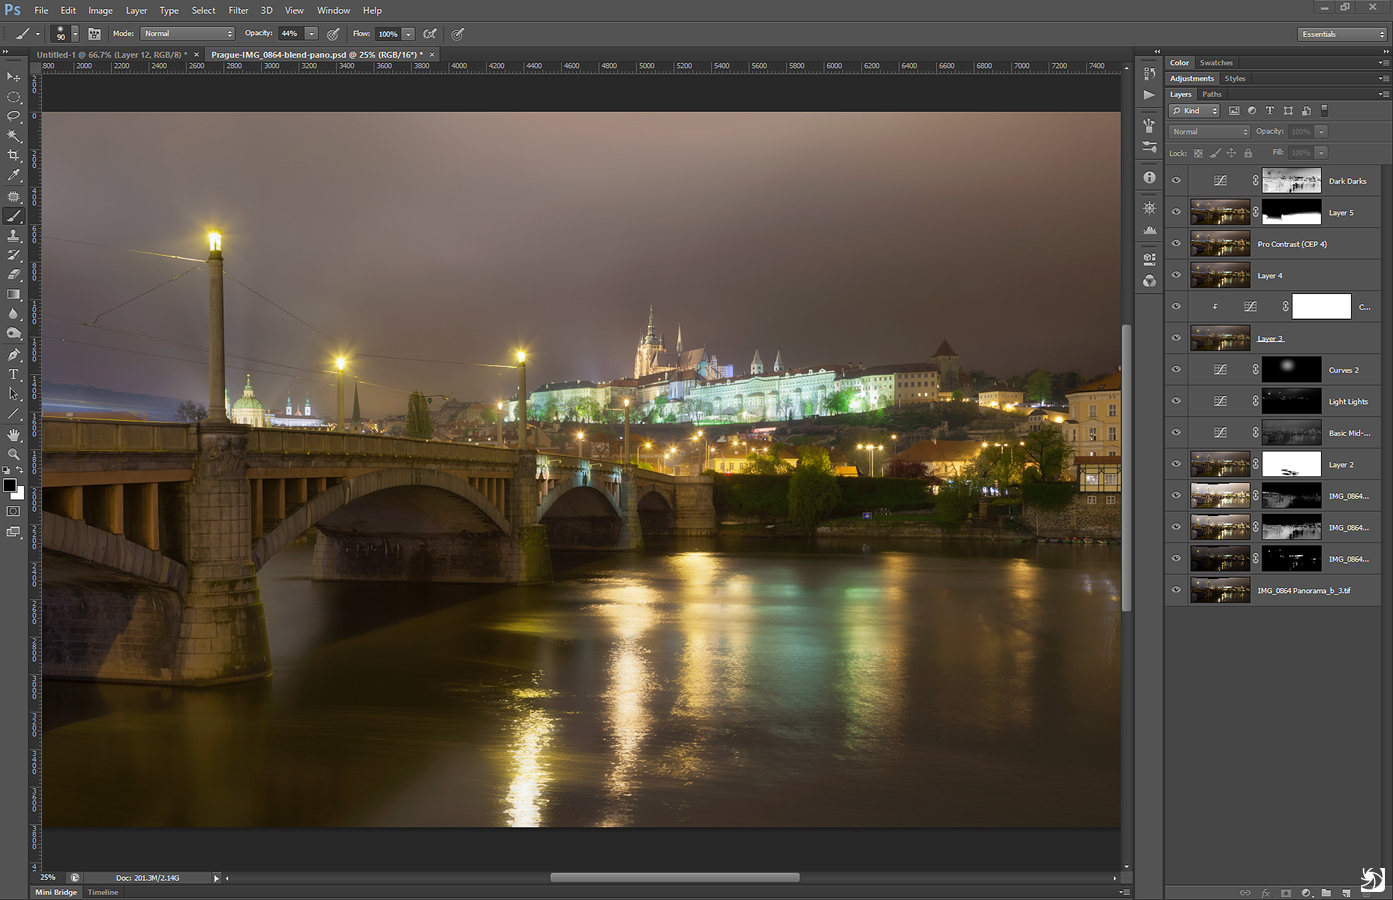
New guide on the blog

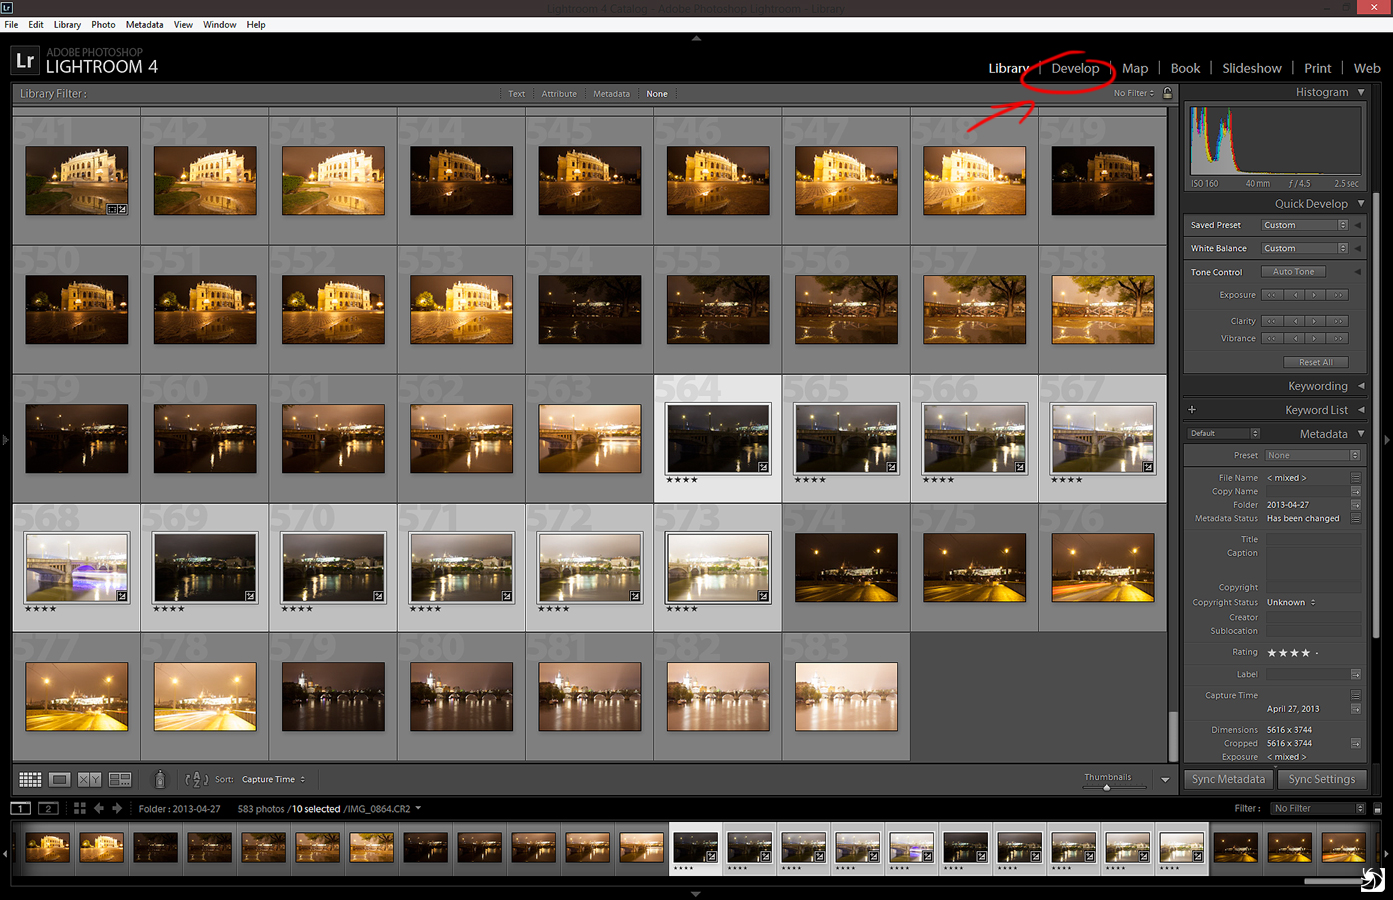
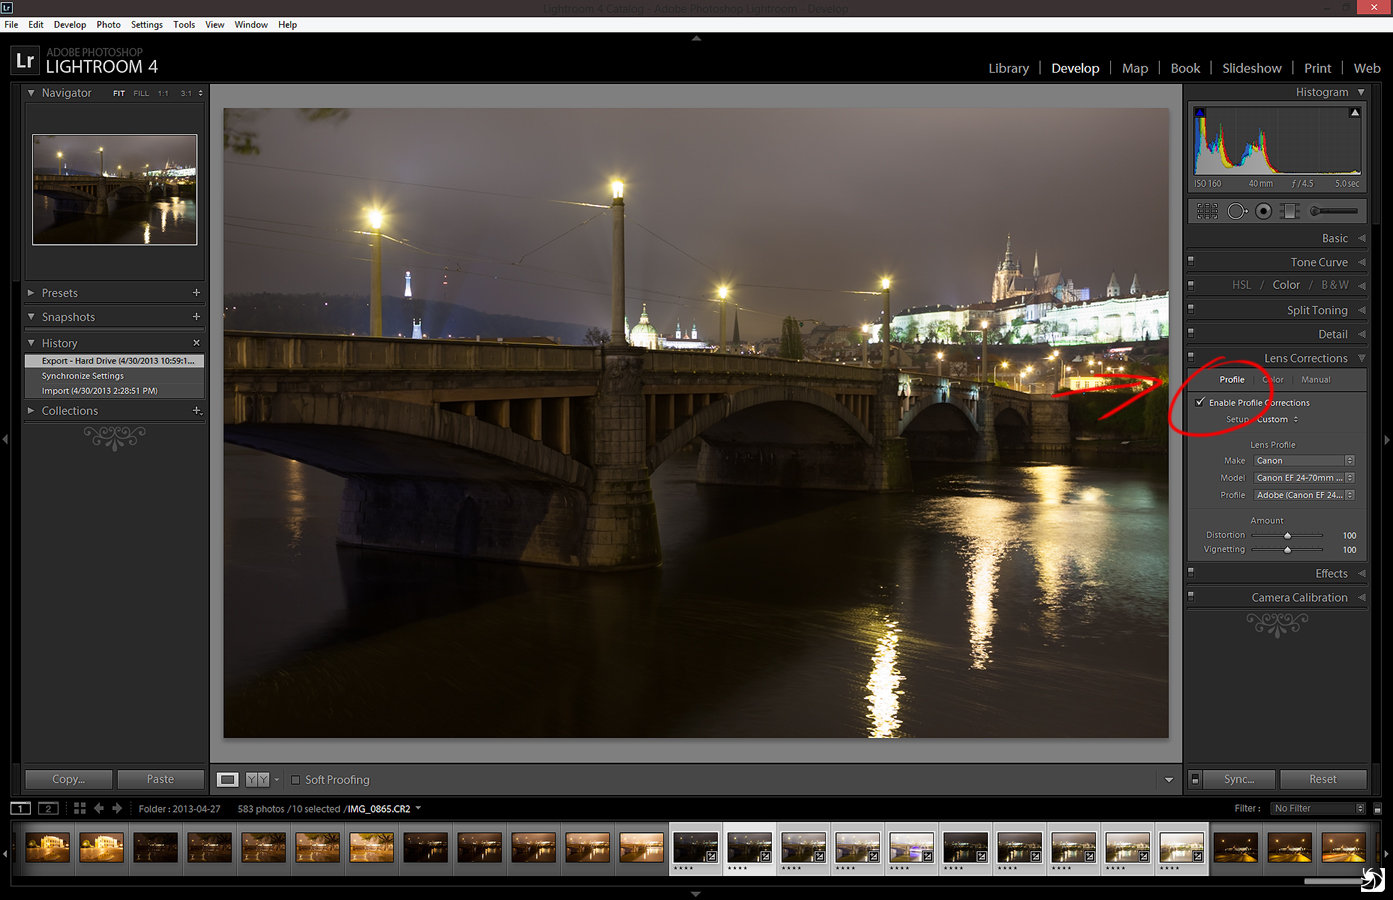
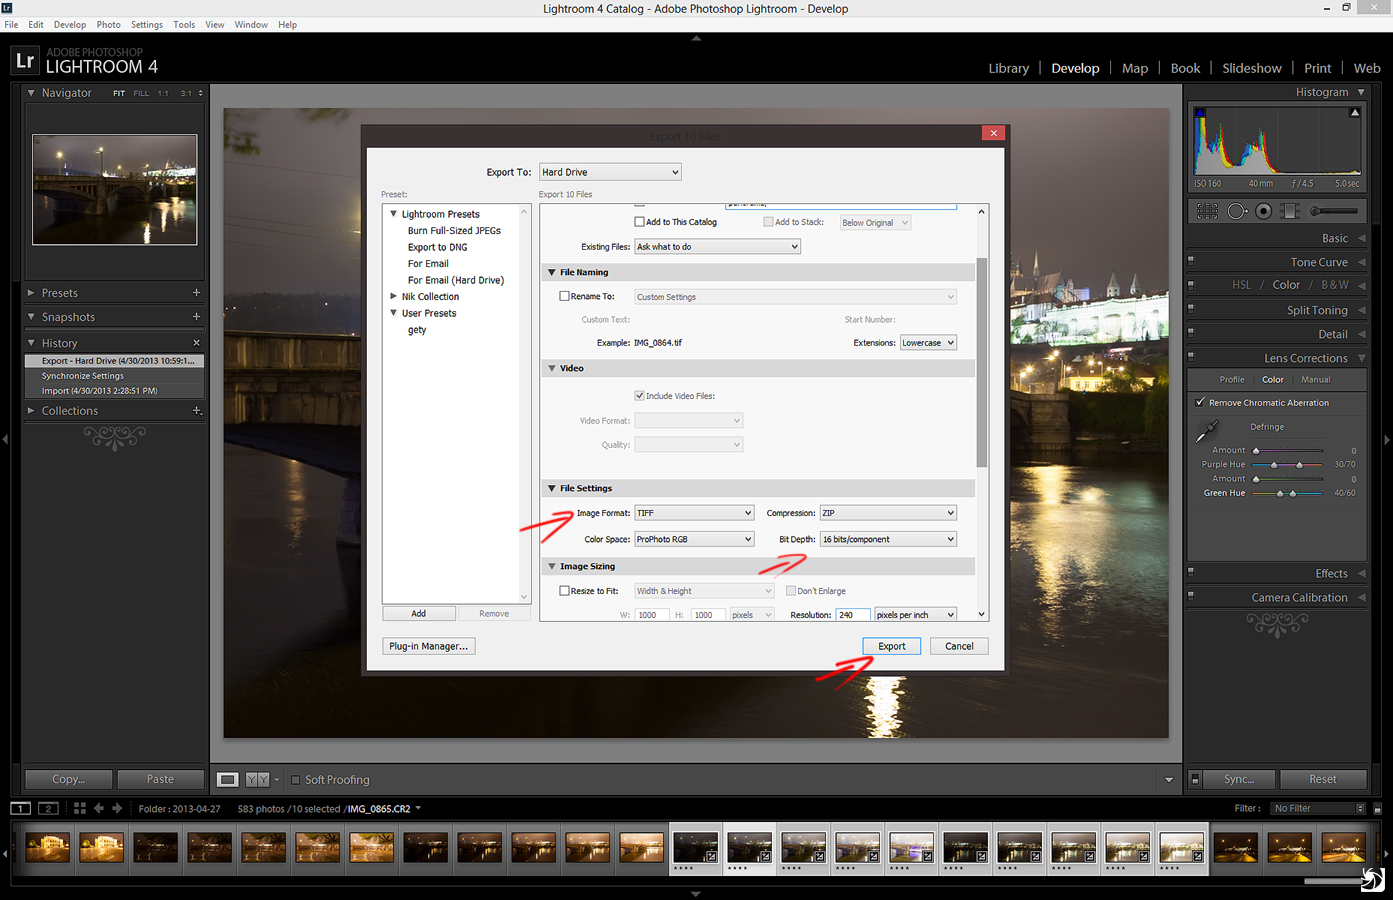
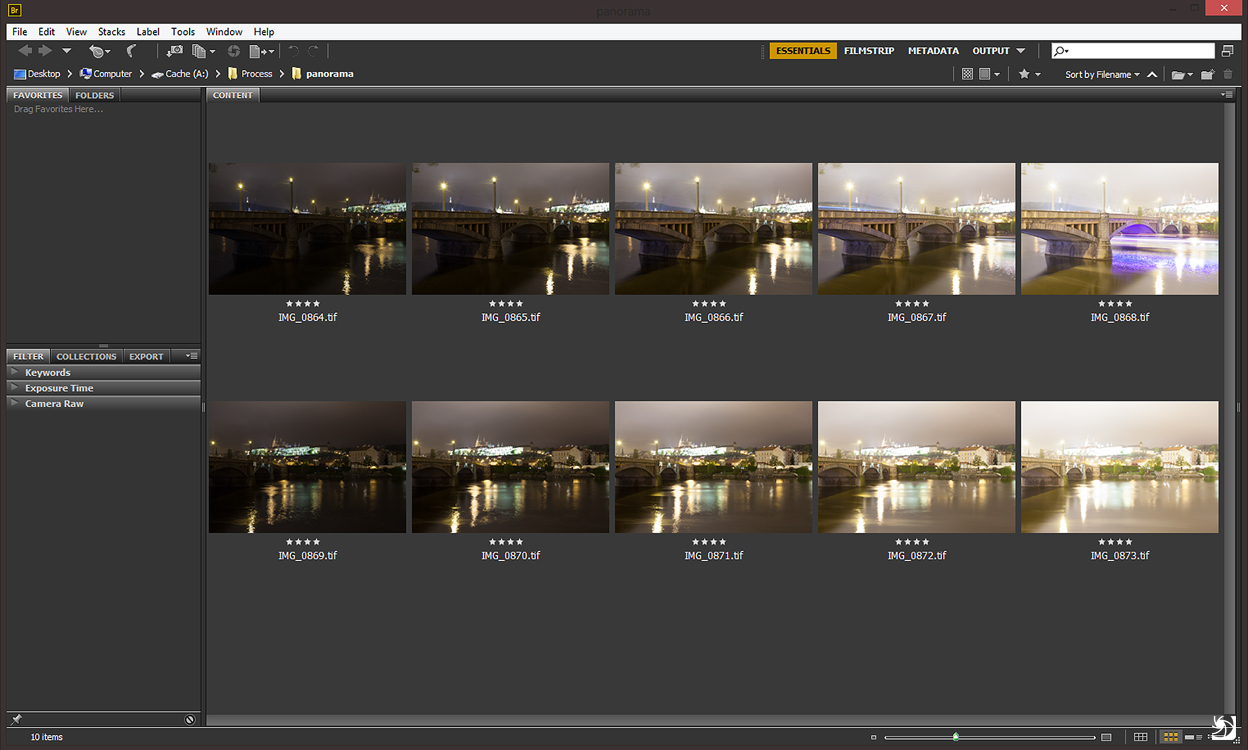
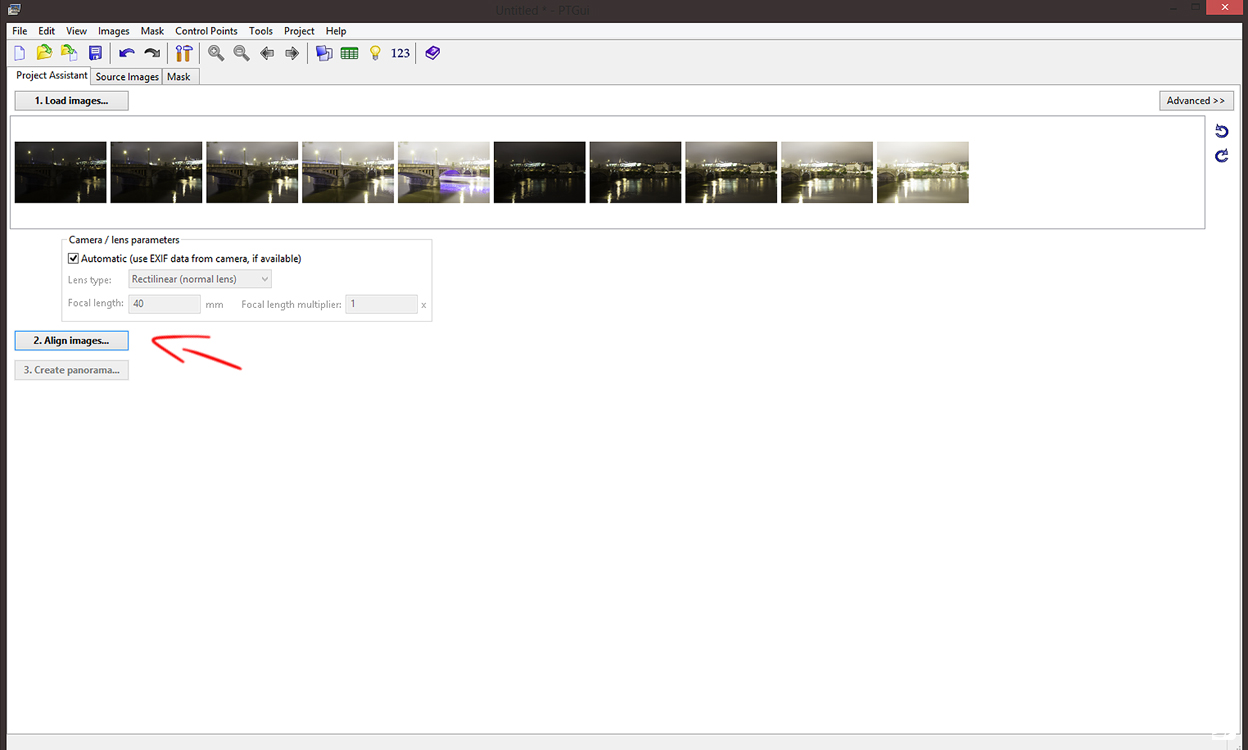
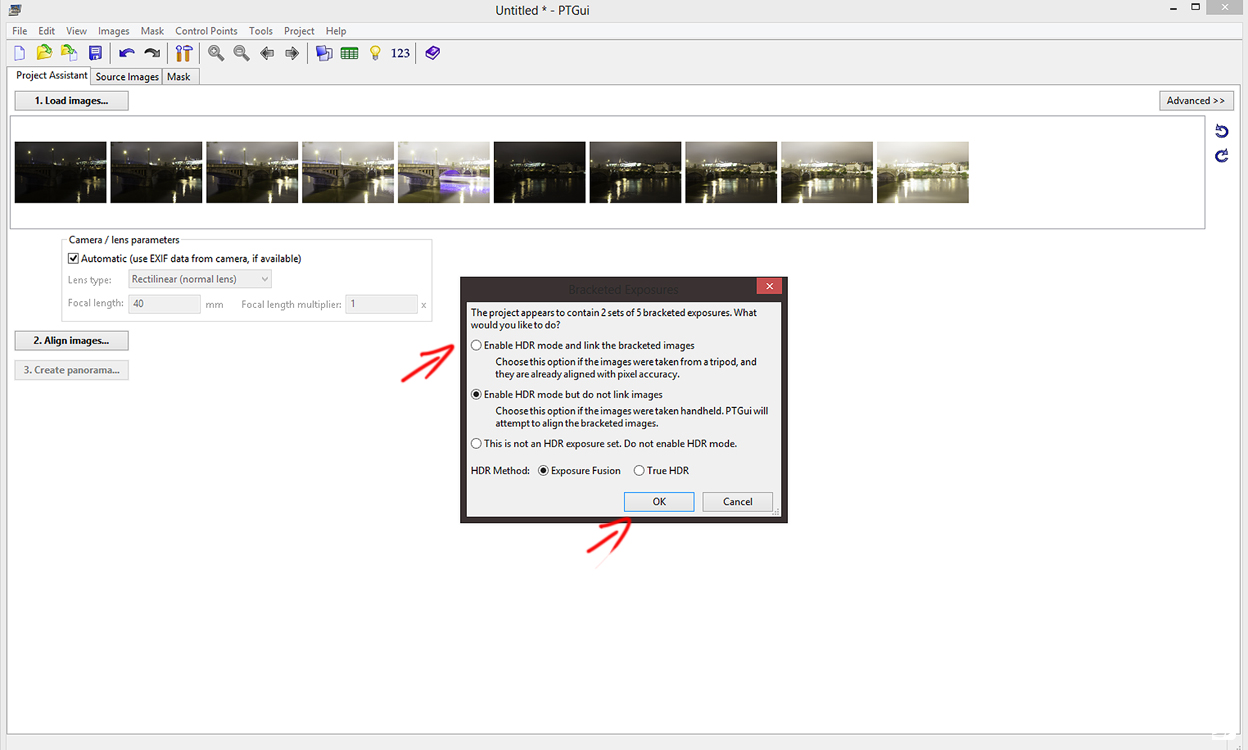
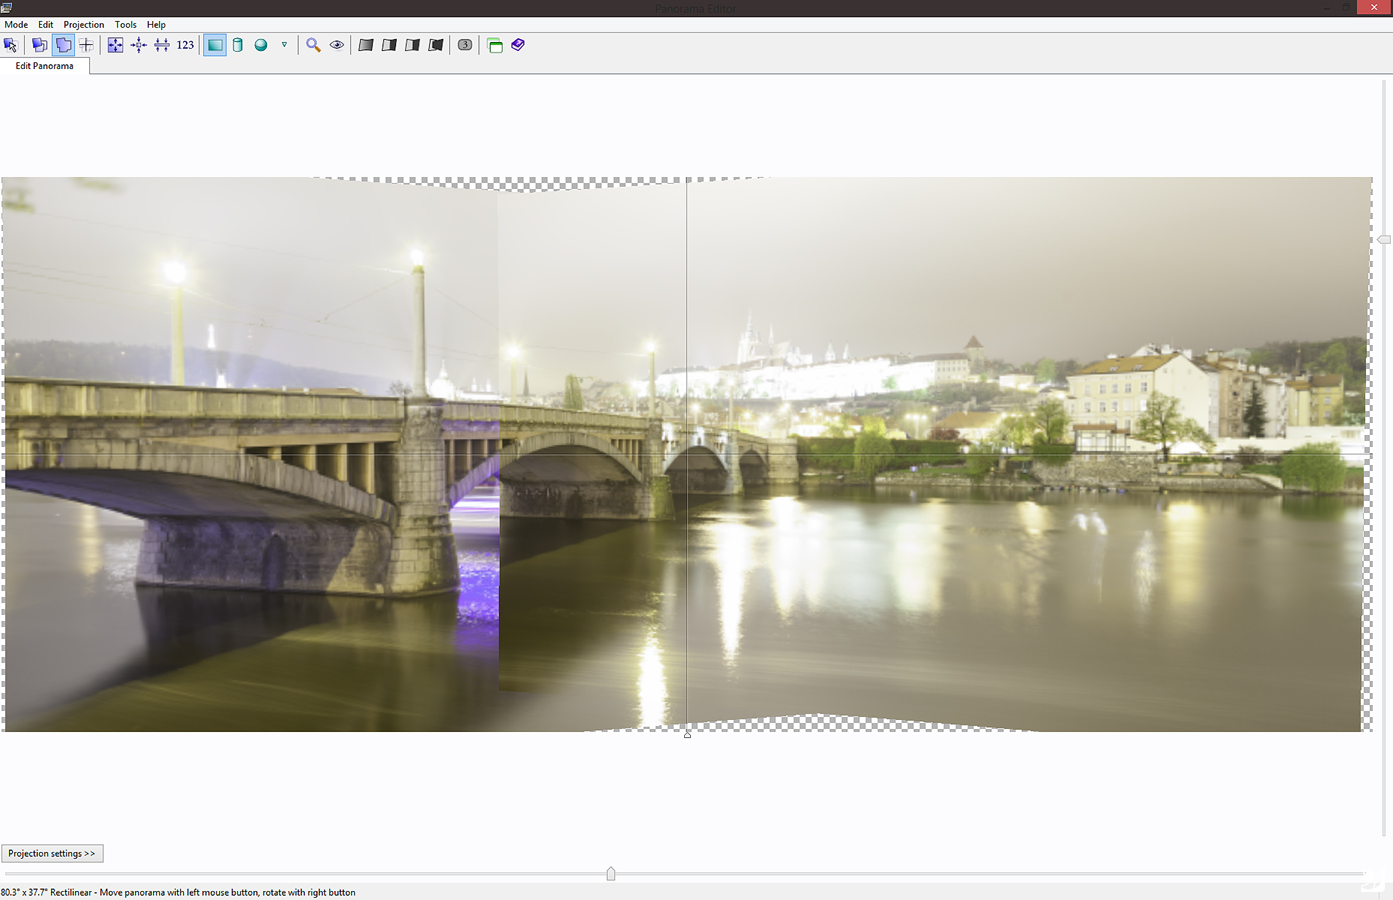
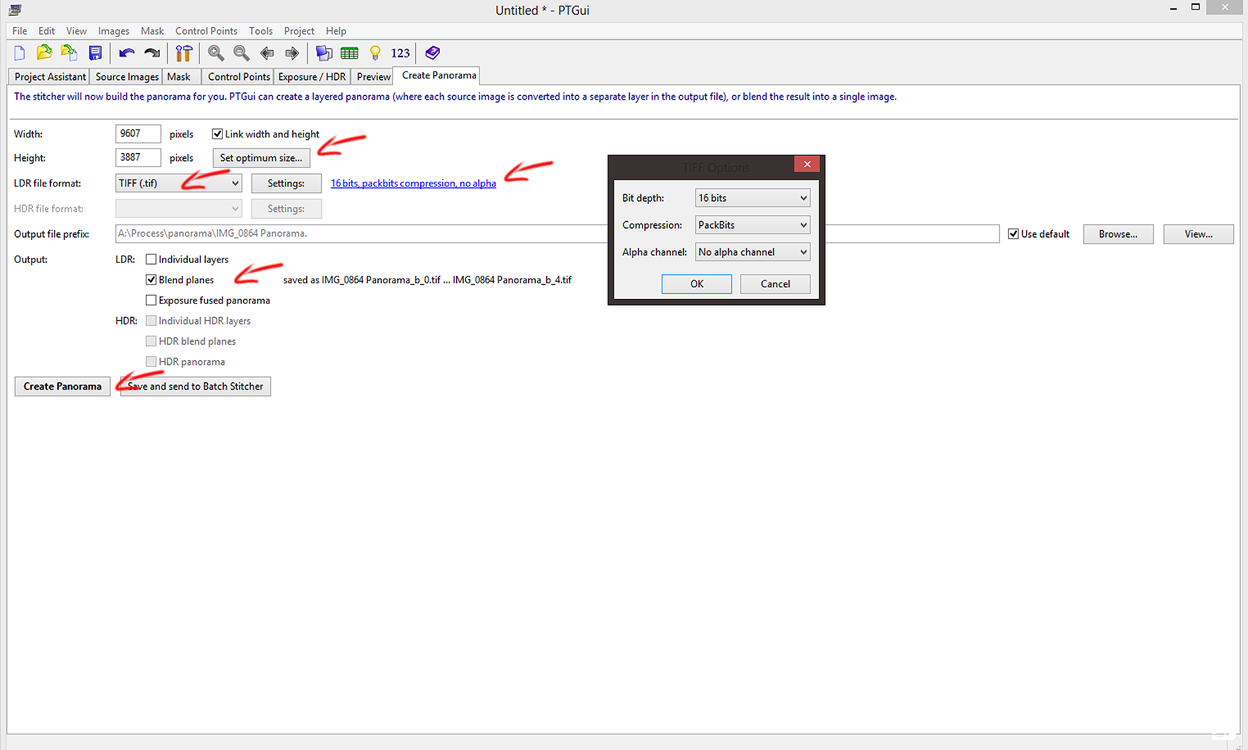
I added another guide to this blog. This time is all about how I combine photos into panoramas, before I combine them into HDRs. I hope some of you will find it helpful. You can find it in the menu on the right, or go directly to the page here.

Morning bus

Morning shooting is so great. You have the whole city for yourself. Even in such a big city as London, you meet very few people out at 5am. And as a photographer, you know that’s great.
I took this photo at the Westminster bridge. I was there completely alone. And as the sky was quite boring, I player more with long exposures and capturing the passing doubledecker buses. Was able to get this one on the first try :)

This is a manual blend from 5 shots, both buses in the shot are actually one bus, taken from different exposures.
Morning bus

HDR panoramas

As I started shooting panoramas and HDR panoramas, I was trying to find the best workflow how to combine the photos into a panorama. I seen two main approaches to do this. First one is to first merge/blend the HDR image for each part of the panorama, the second is to first combine the panorama and do the HDR processing later. After a lot of experiments, this workflow worked the best for me.

I will be using Lightroom and PTgui in this guide. If you want to know how to do the same thing using Autopano, please view this HDR panoramas with Autopano guide.

Select the photos you need

First find all the photos from the panorama, you want to use. Select them all in Lightroom and choose develop.
pano01

Enable profile correction

In the develop module modify any settings you need (noise reduction, white balance and similar) and then under Lens correction/Profile select Enable profile correction. This will remove lens distortion and lend vignetting, which will make the the blending of the panorama shots together easier and you will avoid having shadows where the blends are.
pano02

Remove chromatic abberations

Under Lens correction/Color select Remove chromatic abberations. This is not required, but it’s much easier to remove them now, than to try to do it later. After that, choose the Sync button and sync all the settings to every selected photo.
pano03

Export the images

Now you can export the images. Choose File/Export. I suggest choosing a new folder, where all your images will be stored. Then so you have the best quality export, choose Image format as TIFF, ProPhoto RGB and 16bit colors. Hit export.
pano04

you will end up with all your images exported as 16bit TIFF files in the folder you selected
pano05

Load the files into PTgui

Now open PTgui and load all the exported images into it
pano06

Choose Align images

You don’t have to wait until all the image previews are loaded, just hit Align images
pano07
Now you will be given an option if these are HDR brackets or not. If you don’t get this options, there could be multiple reasons for it. Either you don’t have all your brackets loaded (e.g. you have one 5 bracket series and one 4 bracket series loaded) or the exif data does not match (e.g. one series +2ev is 20s, the second is 25s). In this case PTgui will not be able to combine them. Just try to add the missing brackets, or remove the ones where the exif does not match and you are good to go.

If you shoot your brackets from a tripod, choose the first option, if handheld, choose the second. You can have any HDR method selected, as we will not use PTgui to merge the HDR.
pano08

Correct your panorama if needed

Once the alignment is complete, you will see a preview of the panorama. Here you can correct the alignment of it. I suggest looking through the PTgui tutorials on their page to learn more about it. But usually you don’t need to do anything. Once you done here, close this preview window and choose Create panorama.

Btw. don’t worry if the photo here looks strange. PTgui can’t display 16bit files, so the colors and contrast will be quite bad. But our goal here is just to get good panorama alignment, nothing else.
pano09

Save blended planes

Once you hit Create panorama, you will be presented with this dialog. Here you have to choose how you want to save your panorama. You should select:

  • click Set optimum size and choose Maximum size
  • select TIFF as file format
  • click the format settings and choose 16bit, Packbits compression and no alpha channel
  • choose blend planes
  • click on Create Panorama

pano10
Now PTgui will save your panorama. We have chosen blend planes, so each brightness level is saved into separate file. This takes usually a lot of time, but after it’s done, you will end up with the same number of panoramas as you had the number of brackets for your HDR.
pano11

Continue with your HDR

Now you can continue as if you combined a normal photo. You can use any technique to combine this shots. Tonemapping in Photomatix, manual blending in Photoshop or any other. Just be prepared that if you have a slower PC, this will take a long time, as these panorama photos are very big.

I personally finished this photo with manual blending in Photoshop
pano12
and got this final image
After the rain in Prague

Hope you find this guide helpful and feel free to ask any questions

As usually when I’m in Prague, at least one day it has to be raining. But I tend to take my camera with me to the city, even if it raining. You never know. And it was same that evening. After about two hours of a quite heavy rain (which I spend in a pub with friends :)) I could go out and take some shots. The light is different after a rain. Some of the best sunsets can be seen right after it. This was a little later, so I got a more yellowish night shot, but I still like it.

This is a 2 shot panorama, each shot blended from 5 exposures, taken by the Manes Bridge in Prague.
After the rain in Prague

I wanted a horizontal photo with the Shard, but as it it so hard to fit it into a photo together with all the surrounding building, I ended up with a panorama. Too bad the weather was how it was, hopefully when I’m there next time, it’s better :)

This is two row panorama from 6 shots, each one blended from 5 exposures. Taken in the center of London.

Around the Shard

Camera collection

This probably happens to every photographer. Once you start taking more and more photos, you start to like all these beautiful old cameras more and more. Until now I only bought some, haven’t tried to take any photos with them. But as they are all functional, I think I will do that sooner or later :)
classic camers

Path around the Bojnice Castle

The photo of Bojnice castle I posted a week ago is currently the most popular of my photos. It’s not really a big surprise for me as the castle looks really like something from a fairy-tale. So here is another one. I only took 2 steps back, to get a completely different composition :)

I had to do two bracket series for this shot. The +2EV photo was just not enough to get any detail in the wall in the foreground. There were just no lights there. So in the end I took one classic series, with a low iso to get the bright areas and than a second series, where I changed the iso to 1600 and did a +0 to +4 series, to get detail in all the dark areas. And with this setup, the lights of a nearby road were enough to brighten the wall.

This is a manual blend from 7 shots, taken in Bojnice, Slovakia
Path around the Bojnice Castle

FREE EBOOK!!!
Subscribe to my newsletter and get a free Capturing fireworks ebook. 
Subscribe