Free HDR video tutorial

Free HDR video tutorial

MASTER EXPOSURE BLENDING

Find the best ones

Find the best ones

TOP PHOTOGRAPHY SPOTS

Free wallpapers

Free wallpapers

HIGH-RESOLUTION WALLPAPERS

30 000

This blog reached 30 000 views yesterday :) Thank you very much everyone for visiting :)

Wooden Betlehem

I took only few photos during Christmas, but most of them came out quite nice. So here you have another Christmas themed photo, the wooden betlehem in Bardejov.

HDR from three shots, taken with Canon 450D with Sigma 10-20mm lens, from a tripod.

Wooden BetlehemI took only few photos during Christmas, but most of them came out quite nice. So here you have another Christmas themed photo, the wooden betlehem in Bardejov.HDR from three shots, taken with Canon 450D with Sigma 10-20mm lens, from a tripod.

Returning to old places

Capture HDR photos

So first thing first. If you take a bad photo, HDR will not help you. Composition is really the most important part of a photo. You can have a great subject, with great HDR treatment but without a good composition the photo will not work.

If I want to have better composition I use my tripod. Why? Because it slows me down, and I think more about the photo.  Also I don’t have to crop much, if I take more time to setup my shot.

So always first think about the composition, than about the post processing.

In this HDR tutorial I will show  all the steps on this photo, with few examples from other ones.


My setup

What do you need?

The only thing you really need for HDR photos is a camera. Any camera will do fine. You can use HDR process on any photo you take, even with your phone. But the results may wary based on the camera you use.

So in the best case you need:

  • a camera – any camera with manual mode or AEB (Automatic Exposure Bracketing) will do, if you want to take HDR’s handheld AEB is a must. I will assume you have a DSLR in the tutorial, as there is little to set up on a compact camera. If you want to create HDR’s from a single shot, you can use any camera.
  • tripod – you can make HDR’s handheld, but to get the best results you need a tripod.
  • cable release – not really mandatory, but can help
On the left you can see my setup, but that’s after two years of taking HDR photos, I started with a compact, taking handheld photos.


Taking the shots from a tripod

Bracket settings

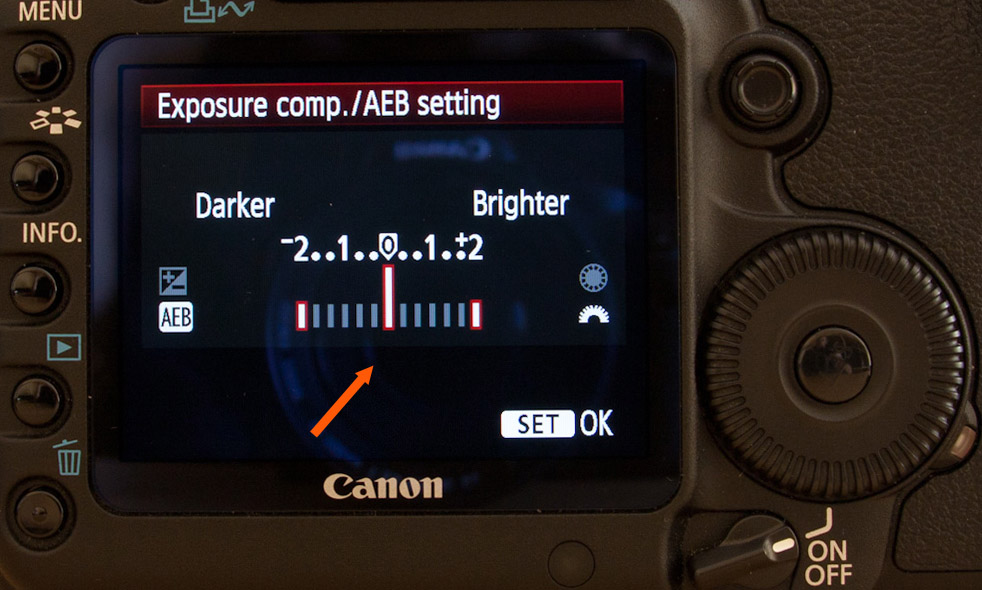
So after you set up your composition, you need to set up your camera. Turn on AEB and set it so you take shots at -2,0 and +2 EV (or -2,-1,0,+1,+2 if you have a Nikon camera). Switch your camera to AP mode (aperture priority mode) and using a self timer or a cable release take you shots. On the right is how the AEB setting looks on a 5D mark II, most cameras have a similar menu.

The ISO on your camera should be left as low as possible (100-200) if you want to avoid noise in your final HDR.    Also the aperture should be lower (F5.6 – F11) if you want to have the whole image sharp and in focus. When you set this up you should check the time, the camera shows you for the first shot (0EV). This exposure time should be 8s or below. This is so the brightest shot is still below 30s. If it shows you a longer time, choose a higher aperture or a higher ISO (or both), until you have the required exposure time.

If you need more than three shots, the simplest way is to move you middle exposure. So you can just take shots at -2,0 and +2EV and then underexpose by one stop and take shots at -3,-1 and +1 (or overexpose, based on the situation). Like this you can take quickly quite a lot of shots.

Look at your camera manual, to find out how to turn on AEB and under/over-expose a foto on your camera.

Taking the shots using a Promote Control remote

An advanced way of taking your shots from a tripod, is using the Promote Control remote. Most of the steps are the same, but to take the photos you just set up the starting time and number of shots on the remote, and it does most of the work for you. You can find out more on my Promote Control remote review page.

This is the sample bracket series I took from a tripod, with the help of the Promote. I could have had the same result, if I took three separate series at -3,-1,+1, the second at -2,0,+2 and the third one at -1,+1, +3,  it just takes longer, and you have a much bigger chance, that your photos wont align properly. If I wanted to have a bracket with a time longer than 30s, the only way to get it is by using a Promote.

Taking the shots handheld

You want to get the same result as if taking from a tripod. So you have to have the exposure times as short as possible, so the photos align better. Use burst mode on your camera, this way you can take multiple shots simply by holding the shutter button, use a higher ISO, based on you camera an ISO 400-1600 is still acceptable, use a bigger aperture and try to hold the camera still. Don’t forget, that you can correct noise, but not an out of focus, blurry photo.

A good practice is to lean on something, or to place your camera on an even surface, hold it down and take the photos using a self timer. Also try to have your slowest exposure time faster than 1/the focal length you are using. So if you use a 50mm lens, the slowest exposure should be not more than 1/50s. This is that your shots should be max 1/50s, 1/200s and 1/800s if you take your photos at +2, 0 and -2.

This is a sample series taken handheld. It’s really much simpler when there is enough light. You can see the resulting HDR from these brackets here – Toledo reflection

Taking shots without AEB

When you need more than three brackets or you just don’t have AEB, you can still do it manually. You have to

  • exposureset your camera to manual mode, set your ISO and aperture
  • find the normal (0EV) exposure (half press your shutter button, so the camera meters the scene and then change the time, until the small line is under 0EV, as in the photo on the right)
  • decide what range you want to have, for each step, half the exposure time. If you 0EV is 1s and you want to start with -4EV, your starting time should be (((1s /2) /2) /2) /2 equals 1/15s  (it’s really 1/16, but you can not set it on a camera :) )
  • set up you camera for the darkest shot and take it
  • double the exposure time and take the shot, repeat this until you have all the brackets you need. Each time you double the exposure time, you move your photo by 1EV

A little tip to make this simpler :) A lot of cameras can be set up, so you change your settings in 1/3EV increments or 1/2EV increments. This is usually in custom settings. If you change this from 1/3EV to 1/2EV, you have one step lees between two exposures, so you can change your settings faster. On Canon 5D this setting is called “exposure level increments”

I really suggest doing this only from a very solid tripod, and best with a cable release, so you touch your camera as low as possible. Also you should be really fast, so if there is anything moving, or the light is changing, you have similar condition in all shots.

Don’t forget to align images taken this way, as there can be differences in between them. You should look at them the same way as at your handheld images.

Here is a video showing different ways of taking your brackets

Always shoot in RAW

This is a really important point. There are many reasons, but just to name a few:

  • you don’t have to worry about white balance, you can change it at anytime and as often you want
  • you get better results, when creating a HDR from a single photo. RAW has much more information than a JPG file.
  • even if you have overexposed areas in your darkest photo, you still can recover them if you shot in RAW
The only argument against using RAW is the space it takes on your card and HDD. But with the falling prices per megabyte, this is a very bad reason. And it’s better to be safe than sorry.


How many shots do you need?

This is a very common question. Most of the time you are fine with three shots, at -2, 0 and +2 EV. Taking more can help you to have cleaner color transitions in your photo (for instance in a sunset sky), but most people will never notice the difference. But when you definitively need more brackets, is when you shoot into the sun. Sometimes you can go as low as -4EV and it’s still not enough.

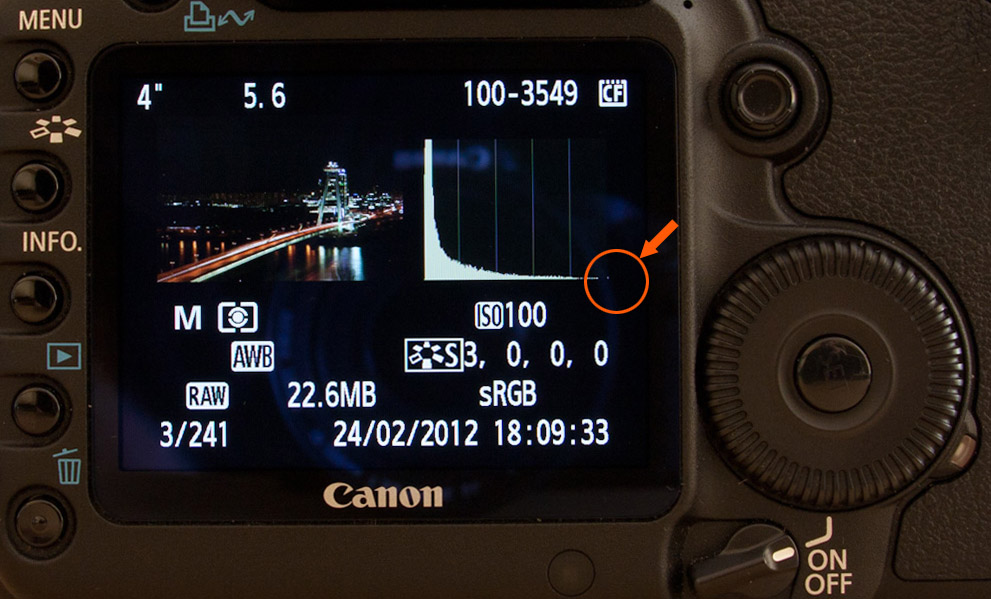
You can simply check your photos directly on your camera. The brightest photo should have no (or very little) complete black areas (histogram doesn’t touch the left side) and the darkest should have no (or very little) overexposed areas (histogram doesn’t touch the right side).

Light Bracket   Dark Bracket 

Organizing your photos

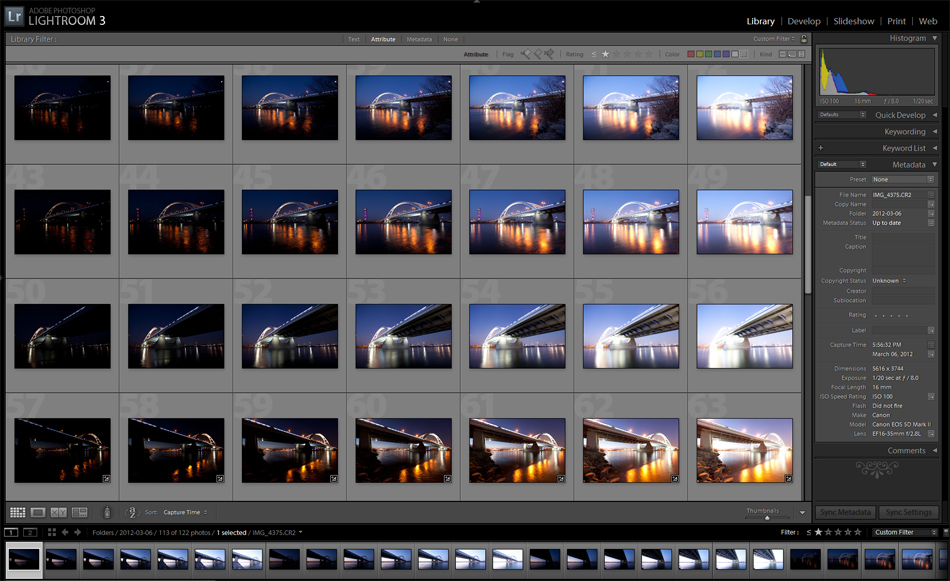
After I’m done taking my photos, I import them into Adobe Lighroom, where I make first few adjustments. I will do a separate tutorial on my organization workflow later on. But for everyone it really depends mostly on what program u use for it.

Lightroom Screenshot


This is all for the first part, the next part will be about preparing your shots in Lightroom and merging them in Photomatix.

Fireworks over Danube

So I tried again to take few photos of the midnight fireworks. For the last few years they were accompanied by a heavy fog, which hid most of them. But luckily, this year the weather played along, and I got some nice shots :) (so there will be a few more this week :))

This photo was taken from the Bratislava Castle, you can see the New Bridge over Danube in it.

HDR from a single shot, taken with Canon 450D with Sigma 10-20mm lens, from a tripod.

Fireworks over DanubeSo I tried again to take few photos of the midnight fireworks. For the last few years they were accompanied by a heavy fog, which hid most of them. But luckily, this year the weather played along, and I got some nice shots :) (so there will be a few more this week :))This photo was taken from the Bratislava Castle, you can see the New Bridge over Danube in it.HDR from a single shot, taken with Canon 450D with Sigma 10-20mm lens, from a tripod.

My favorites from 2011

Another year has passed. And since I managed to add a new photo every day, there were 365 new posts this year :). So to the next 365 photos and a better 2012. Happy new year :)

And here are few of my personal favorites from this year:

After sunset in the Sunflower fieldI really wanted to take a show with the sun still above the horizon, but we were traveling on a highway, and could not stop by any of the fields, and by the time we reached this one, the sun was already down. But I still like it :). Everything is a little more blue, but still fine :). Photo taken somewhere between Trnava and Bratislava (I have no idea where exactly :))HDR from three shots, taken with Canon 450D with Sigma 10-20mm lens, from a tripod.

St. Peter and Paul's Cathedral after sunsetI couldn't hope for a better sky after the sunset, the broken up clouds, with this gorgeous colors. I was so satisfied :). This is the St. Peter and Paul's Cathedral (Katedrála sv. Petra a Pavla) in Brno, Czech republic.At first I took photos only during the day, but  I had bad luck. A small group of tourists always moved, so they interfere with my shot. And when I moved away to a new place, they followed me. It was so annoying. So I decided to go back to the cathedral later on, and i had luck :). I was the only one there.HDR from three shots, taken with Canon 450D with Sigma 10-20mm lens, from a tripod.

Boats and the CityThere was such a lovely sunset this Friday. I went to the Strkovec lake in Bratislava as it's not really far from my flat. This great clouds first gave me great photos and then a nice walk in the rain, as I was returning home :). But as it was a warm summer day, I didn't mind at all :)HDR from 4 shots (-4 to +2), taken with Canon 450D with Sigma 10-20mm lens, from a tripod.

PortalI think to most of the people who ever visited Prague, this is a very well known place :) For everyone else, this is the elevator and stairs in the Old Town Hall Tower (the one with the astronomical clock on it :) ) It's really great for HDR photos, and nobody minds if you use a tripod in there :)HDR from three shots, taken with Canon 7D with Sigma 10-20mm lens, from a tripod.

The beauty of NatureI just love this one turned out. It even is my current desktop wallpaper (and I never use my own photos as wallpapers :) ). This was such a lovely sunset last weekend. All the green colors, with the sun shining through. It was just beautiful. The only thing I regret, that I forgot my IR filter, because I think that It would create great results in such light. Maybe next time :)HDR from 7 shots, taken with Canon 7D with Sigma 10-20mm lens, from a tripod.

Blue carAs each year, around this time, there are carousels in Bratislava. And for the second time, I was taking photos there :). Last time I didn't had the courage to go with my tripod into the middle of this. But in a year a lot has changed :). All the people around me didn't bother me at all anymore. And a great thing about taking shot at night, you can't see any of them :)I took quite a few shots, so there will be more from there :)HDR from three shots, taken with Canon 7D with Sigma 10-20mm lens, from a tripod.

Prague TwilightJust got back from Prague. I spend the whole weekend taking photos there, and I think some of them look quite alright :). So here is the first one, of the Staromestské námestie (Old Town Square), taken right after the sun hid behind the horizon. HDR from three shots, taken with Canon 7D with Sigma 10-20mm lens, from a tripod.

Inside the Church of the Visitation of the Virgin MaryThis photo was taken inside the Church of the Visitation of the Virgin Mary in Postorna, in Breclav (Kostel Navštívení Panny Marie v Břeclavi). I had really luck with timing with this one. We were passing throught Breclav, when I noticed this church (I will upload a photo from the outside som time later, as it's really beautiful), so we stopped, to take few photos. There were some people standing in front of the church, with the priest standing by the entrance. We were not sure if its open, but when we entered, nobody stopped us. So I took few photos form the center of the church, and when I moved to the side, a wedding started :). Then was the first time I noticed that there are some extra decorations in the church :). We just quickly moved to the side of the church, waited till everyone entered, and quietly left :)HDR from three shots, taken with Canon 450D with Sigma 10-20mm lens, from a tripod.

St. Egidius ChurchTwo days ago I uploaded a photo taken from the tower of the St. Egidius Church in Bardejov. This time I'm uploading a photo of the church :). I took this shot last weekend while visiting relatives there. This was taken around 1 hour after the sunset, so still in the blue hour. The church was already lit up, but all the clouds have vanished. So I tried to use the best sky color from the original shots, to make it at least a little bit interesting :)HDR from three shots, taken with Canon 450D with Sigma 10-20mm lens, from a tripod.

Sky after the stormThe weather here last week was was a combination of really warm weather during the day and strong storms in the evenings. So the sunsets were just beautiful. HDR from three shots, taken with Canon 450D with Sigma 10-20mm lens from a tripod.

and a bonus one :)

Almost full moonMy plan for last weekend was also to take photos of the stars, as the 7D has quite nice performance on higher ISO levels. But I didn't account for the very bright almost full moon. It was so bright, that the stars were almost not visible. So I took photos of the moon instead :)I actually felt quite stupid when I took this. The reason was, that the setup I used, the 7D with a Celestron telescope, could only capture something above half of the moon and you couldn't zoom out. And it took me quite a while to remember, that I can create a panorama from multiple shots, to capture the whole moon :) This is not a HDR shot, I took multiple exposures, but the didn't align properly and the HDR from a single RAW didn't look right to me. So I just created a panorama from two shots, removed the distortion and did few steps I usually do in HDR post-processing.Panorama from two shots, taken with Canon 7D and Celestron CPC 1100 GPS telescope.

Christmas tree in Presov

How about another Christmas tree. This time from the city Presov.

HDR from three shots, taken with Canon 450D with Sigma 10-20mm lens, from a tripod.

Christmas tree in PresovHow about another Christmas tree. This time from the city Presov.HDR from three shots, taken with Canon 450D with Sigma 10-20mm lens, from a tripod.

FREE EBOOK!!!
Subscribe to my newsletter and get a free Capturing fireworks ebook. 
Subscribe