Since there is currently a contest running, where you can win a copy of Oloneo Photoengine (more here), I though in this process post I show a photo where I used Oloneo Photoengine. This is one of the photos I took in Dubai, from the top of the Burj Khalifa.
So we look at how I got this result:

I took 4 exposures, from -2EV to +1EV (usually one does not need the +2EV, and it just takes too long, so I sometimes skip it). I loaded them all into Lightroom, where I corrected the white balance, applied lens corrections and chromatic abberation removal, and corrected the horizon line. Then I export all in full size as 16-bit tiff files. I usually don’t compress them at all, as I will delete them when I don’t need them anymore, and I use the ProPhoto RGB for color space.

Here you can see the original 0EV exposure:

From there I loaded all these brackets into Oloneo Photoengine. I actually changed only two things. The strength and the HDR contrast. That actually all I change most of the time there :)

And here you can see the Oloneo Photoengine result (also saved as a 16-bit tiff)

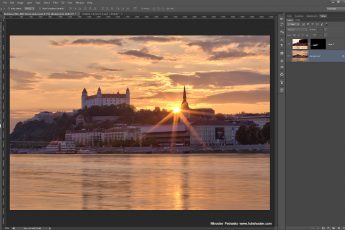
From there I loaded everything into Photoshop. The Photoengine result and also all the original brackets. There I did the following edits (layers numbered from bottom up)
1. the Photoengine result
2+3+4+5. the original exposures. What I did was select the light parts and blend in the moving cars into the HDR, so I remove ghosting. In few ares I also hand painted small parts that I found too strange in the HDR
6+7. added glow to the photo (check out the glow tutorial here)
8. high pass sharpening
9. added more contrast to the whole photo using curves
10. changed the color balance for highlights (made them warmer)

And that’s all I did with this image. To find out more on how I edit, check out the guides and before after categories on this blog, or check out my video tutorial series here:


Leave a Comment