There is a lot of software one uses in photo editing, and in todays post, I will go through the ones that I use all the time, and will try to bring links to all the articles I posted over the last years about them into this one post :)
I will also put them in order in what I use them, and will include the alternatives that you can use, or that I use some of the time. There are of course more alternatives, but one can’t know everything :)
Additionaly, if you are interested to know, if you are able to install the respective software more than once with a single license, check out this article Can you install it more than once?
1. Lightroom
I can’t imagine starting with a different program than Lightroom. Over the years I tried few alternatives, but none of them can replace Lightroom in my opinion. It’s just so great for organizing, quick edits, edits on multiple photos and similar. It of course can be slower, but what can I expect when I have over 100 000 photos in my library. Still, if you are just starting with photo editing, this is the place to start. As the features are all in one place, you wont have to search for hidden stuff as in Photoshop. And with just few sliders, you can make your photo much nicer.

To make you start easier, here are few guides I wrote specially about Lightrom:
– Organizing the Lightroom catalog – how I organize my Lightroom catalog
– Quicker process in Lightroom – how to apply the most basic edits right by import
– 11 tips for Lightroom – 11 various tips for Lightroom
– 11 more tips for Lightroom – more various tips for lightroom
– HDR in Lightroom – how to edit 32bit files in Lightroom (a little side note, this guide needs an update, as you can now merge the files into a 32bitt file directly in Lightroom)

2. PhotoMe
This is a small tool that can be very helpfull sometimes. PhotoMe allows for the editing for RAW files exif data. This is needed if for instance you are doing a HDR bracket series panorama, and you made a mistake in one of the files exposures and now you can’t combine the shots. For more check out this post Editing the RAW exif data and you can download the program for free here.
3. PTgui
Third software I use regularly is PTgui. Of course I don’t use it all the time, only by panorammic shots. From my experience, it gives me the best results in combining shots into panoramas, while still supporting HDR brackets. I prefer it to others mostly for it just being more straight forward and easier to work with. Also the speed is a big plus.
For PTgui I posted these two articles:
– Few tips for PtGui – various tips how to make your work easier in PTGui
– Combining photos for HDR panoramas – how to make HDR panoramas in PTgui
You can find more about PTgui on their homepage ptgui.com and also get a trial version there.
The biggest alternative here is Autopano Giga. While it gives more fewatures and more options, it’s also more complicated and harder to start with. Of course both can create great results, but both work a bit differently.
For Autopano Giga I posted this guide HDR panoramas with Autopano on this blog. You can find more about it on their Kolor website.

4. Oloneo Photoengine
Next on the list is my HDR tone-mapping software of choice. Again I choose Photoengine, due to the quality of result, speed and ease of use. It’s perfect for beginners, as you really get most results just by sliding one slider (more on this in my Photoengine review). Realy the best place to start with HDR.
You can find the following articles on Photoengine on this blog:
– Few tips for Photoengine – various tips for Photoengine
– Batch process in Photoengine – how to batch process photos in Photoengine
– More detailed Photoengine workflow – my personal Photoengine workflow
For more info and a trial version, you should go to the Oloneo website.
The biggest alternative here is Photomatix Pro. It’s also a great HDR tonemapping software, but can be a bit harder in the beginning and can overwhelm you will all the sliders and features it supports. Still, with some practice, you can get really great results from it. Check out my review for more about it.
You can find my guide on how to use Photomatix pro as a part of my HDR tutorial here Combining and tonemapping your HDR photos and get more info and a trial version on Photomatix website.
5. Bridge
Bridge is more an addition to Photoshop, that some photographers use more as a Lightroom replacement, as it has some organization features. For me it’s more an entrance to Photoshop, as it allows to use multiple photos as input to Photoshop. Either its batch processing or loading files into layers, it just makes it easier.

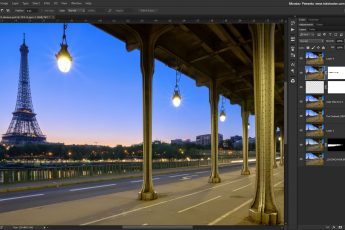
6. Photoshop
Sooner or later you will just have to go with Photoshop. It just is the standard for photo editing. Especially if you start getting into layers and luminance masking. Not the easiest software to master, as it just has so many features, but with time you get the hang of it. You can check out the post about my beginnings in Photoshop for how I started.
For more check out these articles:
– How to use Photoshop masks – the basics of Photoshop masks
– Few tips for Photoshop – various tips for photoshop
– Loading exposures into Photoshop layers – how to load multiple exposures into photoshop
– Most useful blending modes in Photoshop – blending modes I find most useful when editing photos
– 11 my most used Photoshop shortcuts – what shortcuts I use the most
I looked around for a Photoshop alternative, but I don’t think any of them are on the same level. Still, you can check out Gimp, Afinity Photo or Photoline, if you want to try something else.

7. Nik Color Efex
Let’s continue with the plugins. The Nik Color Efex pro is the most used in my editing. It gives a huge range of filters and presets to edit your photos. It’s a part of the Nik Collection, and you can find out more in my review of Color Efex Efex (and you can find review of other parts on the Review page). It’s a little sad that after Nik was purchased by Google, it looks like all development stopped and there was no update in a very long time. Still, get it while you can (I don’t trust Google not getting rid of pro tools in favor of more amateur stuff). You can find it and more info about the Nik Collection on their page here.
You can also find Few tips for Color Efex Pro article on this blog.
The biggest alternative to Color Efex Pro is Topaz Adjust from Topaz. It also can be bought as a part of a bigger collection, or separately. Some of the filters it offers are very similar to the ones in Color Efex, but in my usage, it mostly fits better when you are going more for artistic edits, instead of realistic. You can check out my review of Topaz Adjust here, or have a look at their website for more information.
Another possible alternative is the Macphun Creative kit, but this, as the name states, is only if you are using a Mac computer. You can find information about that on the Macphun website.

8. Imagenomic Noiseware
So let’s continue with another plugin. This one, is my favorite to use to remove noise in my photos. There are of course many more ways how to do it but this is the one I’ve been using for years, and been very happy with it. You can read a bit more about it in my review or in the post Few tips about noise reduction. For more information, you can also visit the company website here.
There are many alternatives, and almost each plugin collection includes one. There is Dfine in the Nik collection, Noisless in Macphun Creative kit or Topaz DeNoise from Topaz. Most offer trial version, so you can easily try them all out and choose the one that best fits your work-flow.
9. TK actions
While not technically a software, I still thought I should mention it. TK actions are a set of Photoshop actions with their own panel, made by Tony Kuyper. There are very helpful if you are using luminance masking and other, quite advanced techniques of photo blending. They also include actions for web sharpening, which I’ve been using for all my photos for years. You can find much more about them on Tony Keuper web page here.
The biggest alternative here is the Raya Pro actions panel from Jimmy McIntiere, which while it provides most of the same features, does it a bit differently. You can find more about Raya Pro and other Jimmy’s tutorials on his web-page Shutter Evolve.

10. Caesium
Another of the small programs I use on every photo. Caesium is a program that can compress you images greatly, without loosing much of the quality. I don’t use it directly on the photos you see, but on stuff like embedded thumbnails, the big header and similar. So in places where I want the loading to be quicker and I don’t require the maximum quality. You can find more about it in this post How to quickly compress your photos and download it for free from the creators website.
One of the alternative is JPEGmini which provides very similar functions. You can find about it on JPEGmini website.
11. Picasa
The last software I use in photo editing is Picasa from Google. Not that I use the organization par of it, I just use the quick photo viewer. In my experience it has been the fastest photo viewer and I really like that that is the only thing it does. I don’t need any special function when just looking through image files. The only big downside is that it only sorts photos by date, so no change for going through them by name. You can download Picasa for free from their website here.
The most popular alternatives are either InfranView or AcdSee, but as I mentioned, both provide much more functions, which I don’t need, and it just makes them slower. But feel free to give them a try :)
And that’s all for this list. Sorry for it being a long post today, but there is really a lot of stuff. You can of course be using quite different software, and leave a comment if you have some great tips.


Wonderful and thank you very much for sharing these other editing programs. I do use the majority of them in some way or another but there are 3 or 4 that I am not familiar with that may help me improve my photos or workflow in some way or another. And, I too, use Picasa as my primarily photo viewer and have so for several years. I use Onone Browse some, it’s faster than Lightroom, especially during upload but Picasa is hard to beat for a quick view without having to open up any other software.
Great to hear it’s useful :) It’s more of a list for beginners, but with all the stuff on it, I hope that even photographers who already know they way around, find few new things.
Hello Sir.I need your guidance on one of my main problem.I do landscapes and also architectural works for my clients..I work on colors and contrast in Photoshop and it’s preview looks fine.But after exporting it as a Jpeg or Tiff when i open them in a picture viewer.It looks different in color and contrast.It affects my commercial work.I saved the pictures in sRGB color space but still its differs.I used Windows Picture Viewer and Windows 10 Photo app.Both gives different results.I work on 16 bit images.What could be the problem sir? Please help me..
HI Daniel. Could it be that you did not include the color profile in the photo? As I show here https://www.hdrshooter.com/guides/how-to-save-photos-for-web/ one has to include Embed Color Profile, not just convert into sRGB. If it’s not embedded, it sometime can result in bad colors. Hope this helps.