Luminosity masking

When I finished my series on luminosity masking, in the last one I mentioned a technique called exposure matching. And today, I will try to explain what it is and how it is done. I will presume here, that you have already seen my luminosity masking series as I will use techniques from it, and not explain them here.

Exposure matching

The idea behind exposure matching is to first blend two RAW images together using luminosity masking and then once this is done, go back into the RAW files, and edit them to look more similar. This will result in a photo blend, where all parts are used from the photo that is properly exposed, and also the transitions are clean and not visible.

This is done in Photoshop only, as one needs to use smart objects, to be able to return into the RAW files and edit them. Let’s look at this example on how this would be done with these two photos.

Example blend

1. Open the images in Photoshop as smart objects
You start with the RAW files. Select them and drop them inside photos. Adobe Camera RAW will open, and you can do some initial tweaks, like removing chromatic aberration and lens distortions. Make sure you have all the files selected on the left when doing so, that all the files have the same edits. Once done, click on the open objects button.

Photoshop will open the RAWs in separate files, so drag the layer from one file into the other file, so you have both in the same Photoshop file. You can then close the other one.

2. Blend them together
For this photo, we want to blend the sky from the darker exposure into the brighter one. So arrange the layers, so the darker is on the top. Hide it, add a black mask to it, select a Bright 2 mask, and paint in the parts where the sky is. Detailed explanation on how this is done, can be found in Blending photos using luminosity selections article here.

This is how the file looked once this was done, and how the mask looked like.

3. Edit the RAW files to make them similar
The blending looks fine, but you will quickly notice that the area around the blend lost contrast and it’s a bit grey. This is because when you blend together a dark and bright area, they will average into a medium grey one. So to fix this, we need to make the bright photo darker and the dark photo brighter.

What we don’t want to do, is to affect the areas of the photo, that we are using for the final photo. Let’s first look at the darker exposure, that was used for the sky. For this exposure, I opened the shadows completely. Since that was not enough, I also added a bit of exposure, and then toned down the highlights. This made the shadows even brighter, but had almost no effect on the sky. Now the photo looks much more similar to the blend we want to achieve.

Now we can look at the bright exposure. Here we do the complete opposite. Tone down highlights completely, and then lower exposure and open the shadows a bit. Again, we had very little effect on the dark areas, but we completely recovered the bright ones. Once this is done, we again have a photo similar to the result we want.

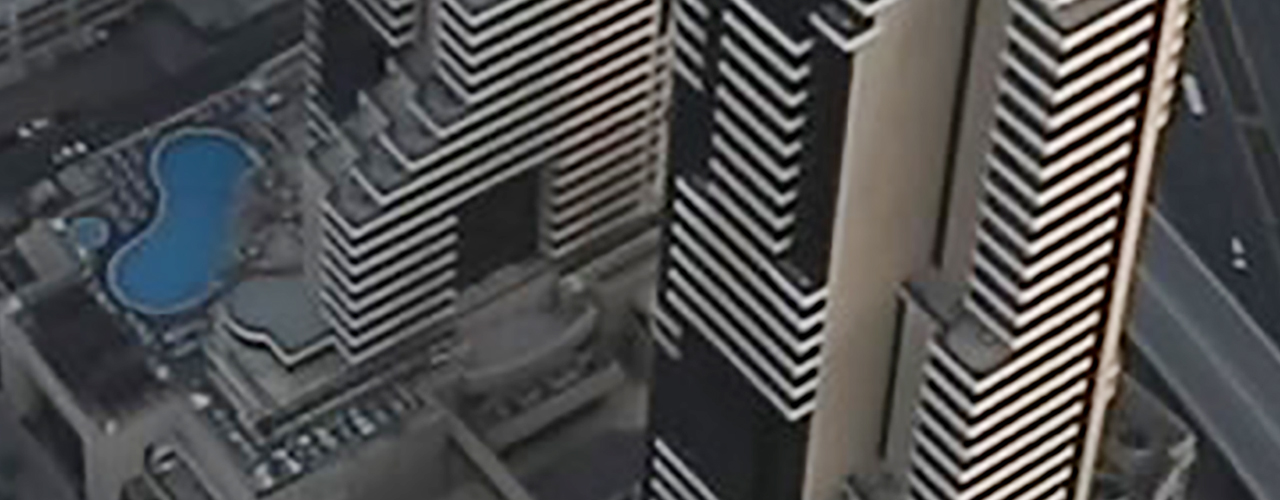
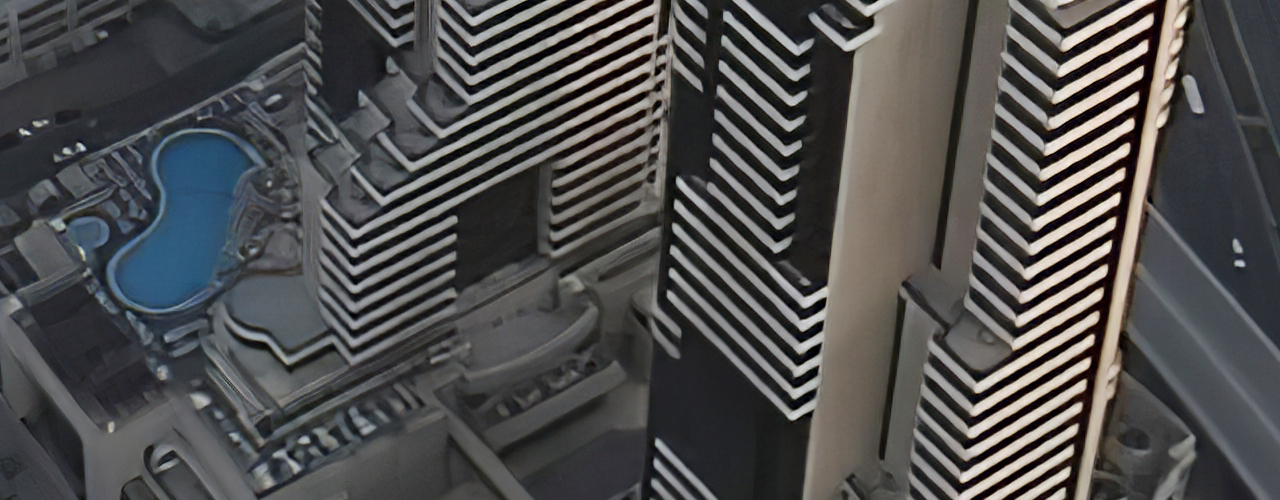
Before and after matching

Now let’s look at what the difference is here. This is the final photo before and after matching is applied.

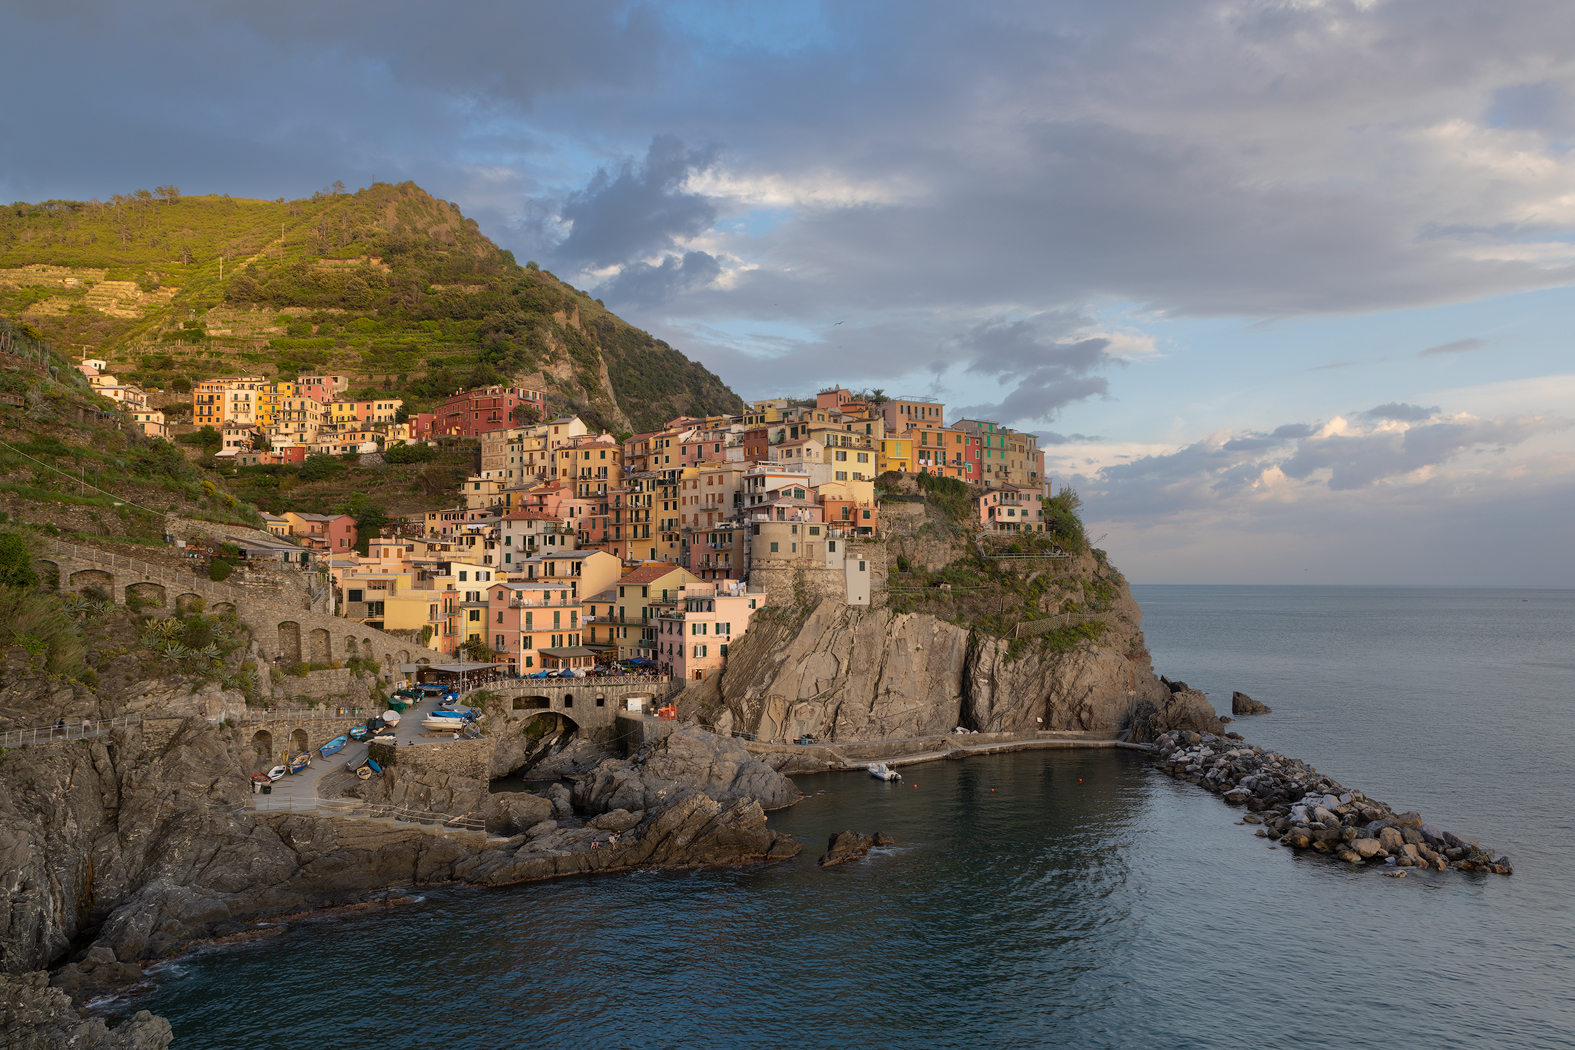
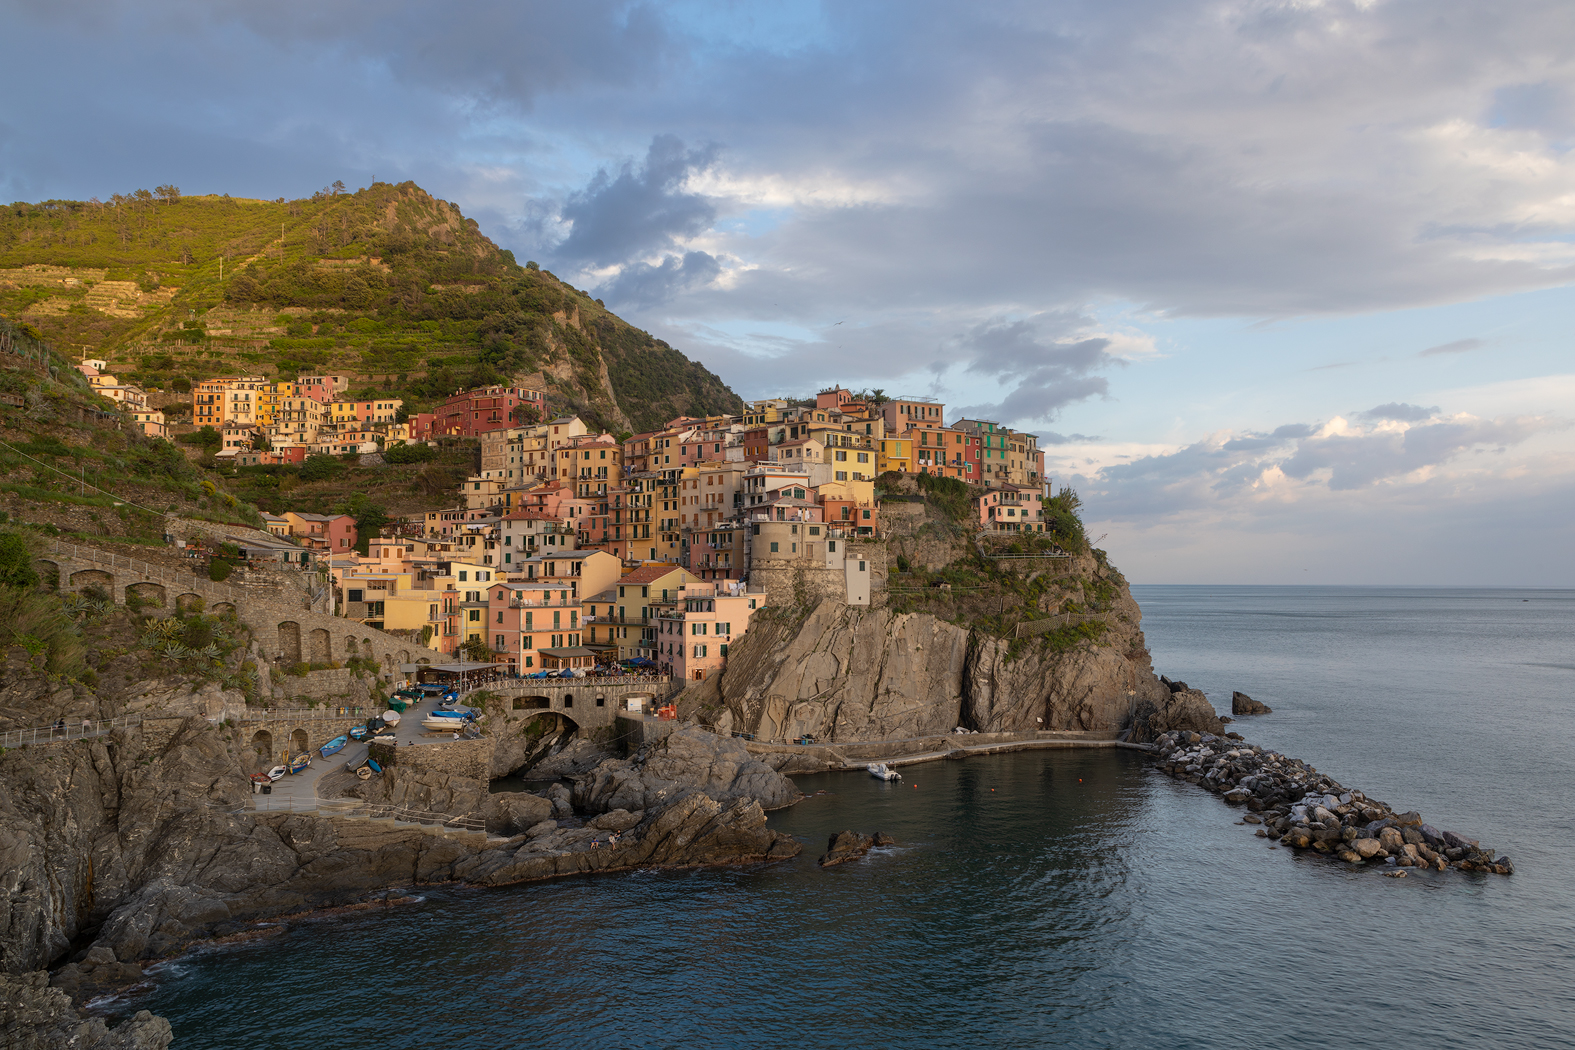
Not much difference on first look, but let’s zoom in a bit.

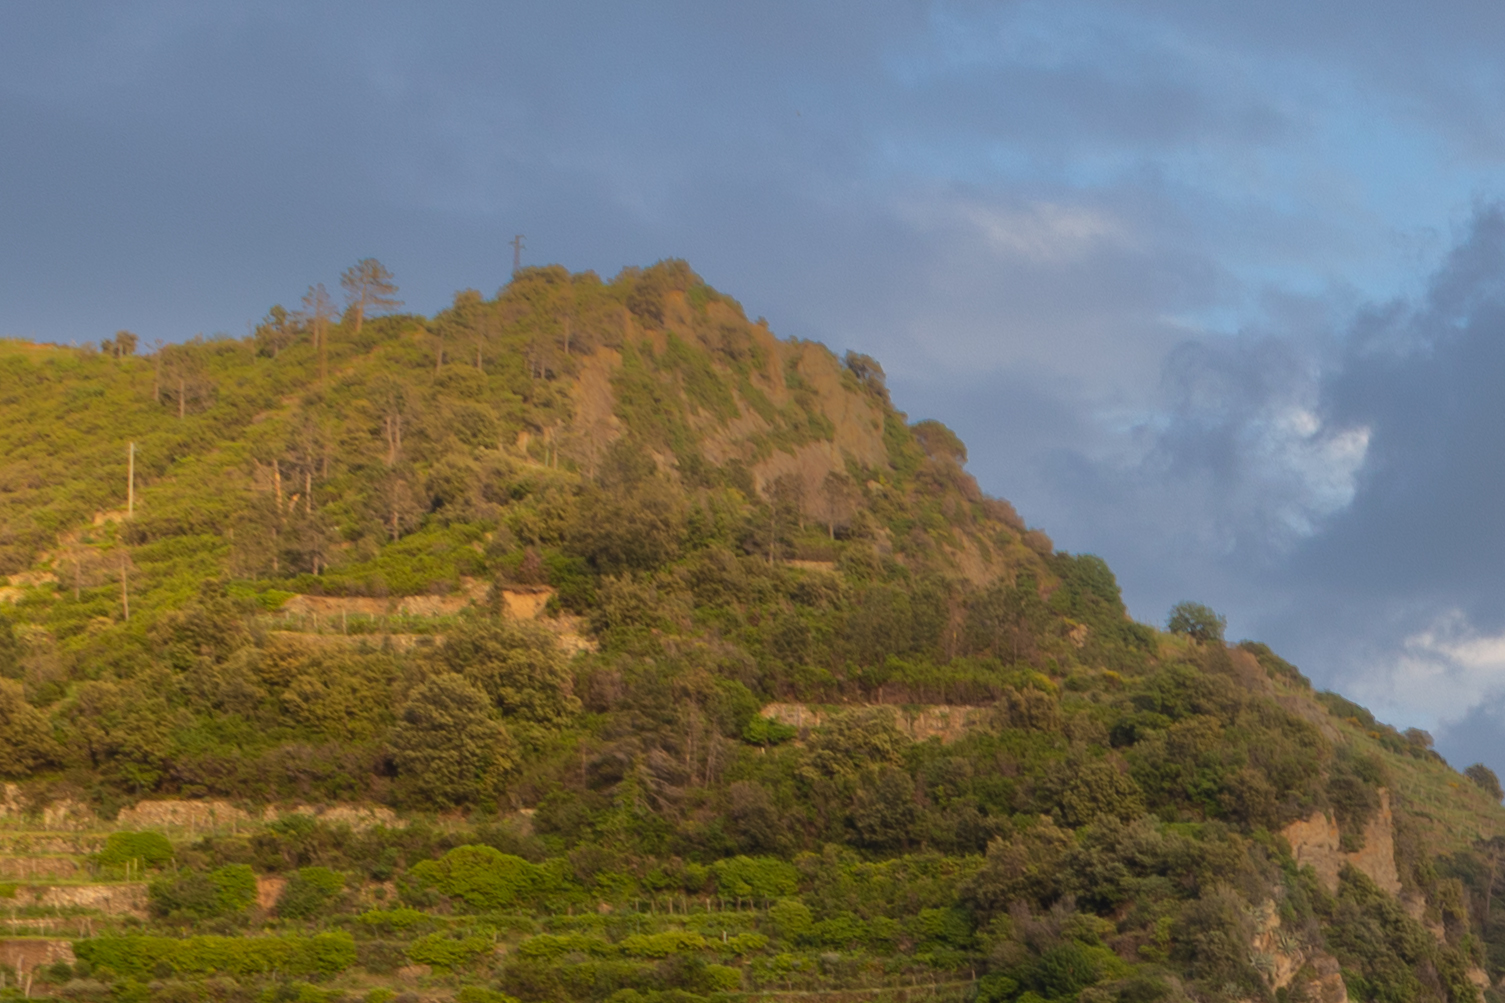
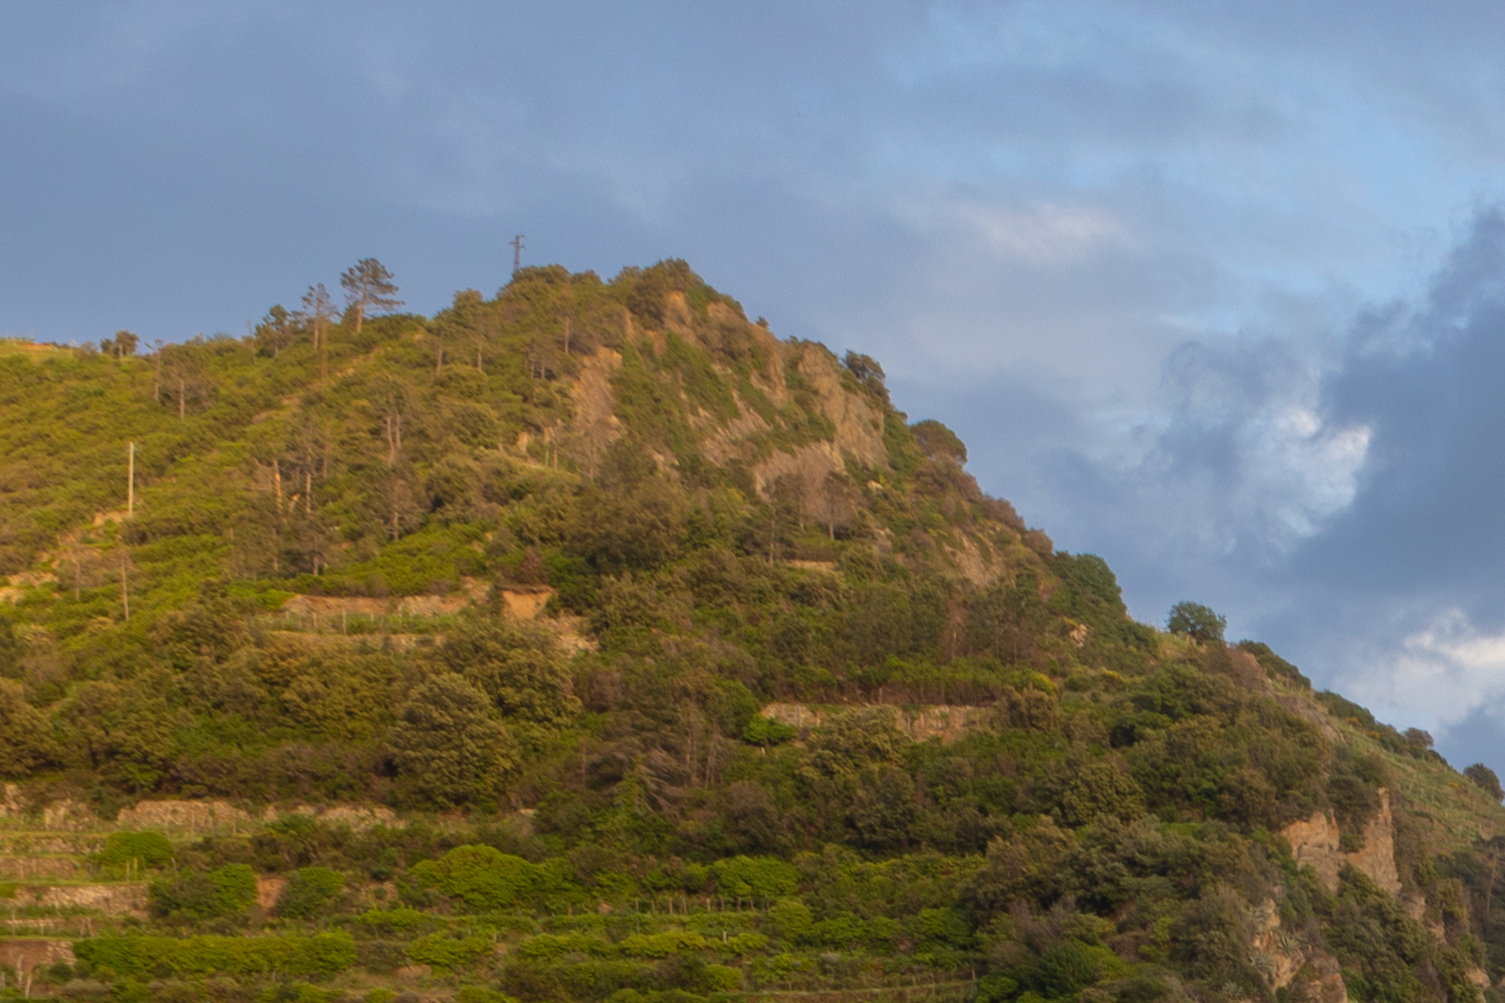
Now you can see the change. The blend is much better and more natural. There are no grey areas, and the local contrast is restored. Now the photo is ready for additional edits.

Why use this?

You may wonder, why this is better than just recovering the shadows or highlights from a single photo. There are two reasons here. Firstly, you can’t recover them in every photo. Secondly, a sky that was properly exposed from the beginning, will look better and cleaner than a sky that was recovered. Same with shadows or any other part of a photo. A properly exposed area will always look better than one that was recovered.

Do you keep your Photoshop files?

It’s a simple question. Do you keep your Photoshop (or other software, if you use that) files once you are done with photo editing? I do and I’m curious what other photographers doo. It takes quite a lot of hard drive storage to keep them, and I almost never need them. Let’s look at some reasons why to keep them or why not.

Takes too much storage

Ok, the biggest reason again, is just the size. I even had to switch to PSB from PSD files for my photos, as the PSD is limited to 2GB in size and most of my photos will not fit into that. And with adding more and more photos every day, this gets into terabytes over time. And of course, you have to at least double this, as one needs a backup all the time.

This became a smaller problem over the years, as the price for storage is going down all the time, and even 8 and 10tb hard drives are quite cheap now. Still, it’s a huge amount of storage, that you have to deal with.

You will almost never go back

I keep a full JPG version of my photos, a web-sized JPG version of my photos and a PSD version with all the editing layers. Do I ever go back and re-edit the PSD files? I can’t remember a time I did that. I could probably just flatten them and save that as a much smaller PSD, a TIFF or something similar.

Since they are also so big, they open quite slower, and a lot of programs can’t even show a preview of them at all.

https://photos.smugmug.com/Blog/i-crNvSVB/0/57cce14b/X2/files-X2.jpg

Always backing up RAW files

I, and I think you should too, always back up your RAW files. Being able to go back, and re-edit a file you took years ago, with new software and new techniques you learn is just great. But in this case, you would start from the beginning, with the RAW file. One would not go back to the PSD and try to re-edit from an already finished version.

You can see and show how you edited a photo

Probably the biggest reason I keep the files for myself. Here and there I show sometimes how a photo was edited, and in the past, I did that regularly on the blog here. But I stopped doing that, as in reality, you can’t really learn that much from that. One does not need to know how a photo was edited, but which techniques were used to do so. What works on one photo does not have to work on another.

In the end, I keep them, as I have enough storage to do so. But I have no real use for them or reason to do so. Maybe it’s just because I spend so much time working on them in the first place.

What do you do? Do you keep all the files or just get rid of them and keep the result?

Topaz Gigapixel AI

I did an article about Topaz Gigapixel AI before, but with all of the recent updates, I thought I do one more. I am quite impressed by the results and have been using it right from when it was available. The ability to enlarge a photo by a lot, and still have a great result is just priceless.

Topaz Gigapixel AI

Today, I will go through some of the uses for it and will add a few more comparisons against photoshop at the end.

Different uses

There are few different uses for Topaz Gigapixel AI so let’s go through them.

  • Enlarging photos – Of course the most basic one is what it was made for, to enlarge photos. It works great for this and now, if I need to print one of my older, smaller, photos, I first enlarge it here. With the latest update, it also detects faces, to make the enlargement even better.
  • Enlarging drawings – While it works great on photos, the results with drawings are even better. Anything with sharp lines and bigger color areas is upscaled perfectly. Can’t really show an example, as I don’t draw and don’t want to use anyone else’s image, but if you try it out, you will be impressed.
  • Oversampling images – For this I did a guide here. By upscaling the image in Gigapixel AI and then downsizing it back to the original size in Photoshop, you will end up with much cleaner and sharper image.
  • Creating high-resolution photos form videos – I had few occasions recently, where I needed to make a printable photo from a video clip. I like to use Media Player Classic as my main video player, and in that one, I just hit Alt+I to save an image of the actual frame. Upscaling that in Gigapixel AI crates a very good quality image to further work with.
  • Upscaling videos – And while we are at upscaling one frame, you can upscale a whole video like that. Just search on youtube for Gigapixel AI upscaled videos. The process here is to first break up the video into frames, upscale those and then combine them back into video. I will not go through detail on this here, but here is one of the ways to do this.

As you can see, you can use it in quite a lot of cases.

Comparisons

Let’s look at few comparisons here. Just to show you how powerful it is. All are compared again a standard upscale in Photoshop, at 100% zoom. I upscaled smaller images here, so it’s easier to see the difference.

First one is a regular photo. Upscaled from 1580×1050 to 6320×4200. That’s from 1.6Mpix to 26.5Mpix. You can see the original file from which this was upscaled here.

The second one with a human face in the photo, as Gigapixel AI now recognizes faces. The difference here is really huge. Upscaled from 1350×900 to 5400×3600. That’s from 1.2Mpix to 19.4Mpix. You can see the original file from which this was enlarged here.

And for the last one, here is one enlarged from a video frame. So going from 1920×1080 to 7680×4320. That is from HD to 8K resolution.

As before, I would suggest you give this one a try, if you ever need to enlarge a photo. You can get a 30 day fully functional trial from the Topaz Labs website here.

Cropping photos

Some people like to crop the photos they take, some don’t. I used to be in the second camp for a very long time. I would just never crop my photos, never change the aspect ratio. Only very rarely, when I needed to clean up the edges. But I changed my mind in the end. And today, I will share with you some of my reasons and thoughts about that.

To crop or not to crop

The biggest reason I never cropped my images before was that I always felt like I was losing something. I always tried to get the composition I wanted right in the camera. But over time I just found out this is not always possible. Especially when you start using prime lenses or some ultra wider or fisheye lenses, you will inevitably capture more than you want or need. And that makes for a lot of empty space, like the extra ground, extra empty sky, extra walls and so on, that just doesn’t make the photo better.

This is an example of this. This photo was taken with the fisheye lens, and the extra ground just added nothing to it. Removing it made the composition tighter, more focused on the subject of the photo. And yes, I removed the camera shadow in post-processing.

To crop or not to crop

The second reason to not crop was that I like consistency. I like it too much. It just feels nice when you look through your photos and they all fit into a nice grid, all with a nice 4:3 ratio, perfectly aligned. I very rarely even took portrait shots, as they would not fit nicely. I know, it’s a strange reason. But then, when I started to do many vertoramas and panorama, this was no longer achievable at all. Every photo was different, everyone had a different aspect ratio in the end. So instead of my photos being consistent in size, now every single one is different. And I think it looks even better than before.

Almost each of my photos is now of a different aspect ratio.

To crop or not to crop

My last reason was the loos of quality. When you are shooting with a 12Mpix camera or even 22Mpix camera, cropping of half of the photo will degrade the quality quite a lot. But that’s really not the case anymore. Most of my photos now are 30Mpix to 100Mpix in size. I can crop away really a lot, and the quality is there. Also with the progress of the cameras and good sharp lenses, the quality of the photos is better, even if you zoom in. And with tools like Topaz Gigapixel AI, you can upscale you photo 2, 4 or even to 6 times the size, while still being of great quality. Gigapixel AI is probably the most impressive photo editing application I seen in a while.

This was a huge panorama, where I cropped really a lot from it. It’s still a huge image anyway.

To crop or not to crop

In the end, it’s everybody’s own decision if to crop or not to crop your photos. But it’s much easier decision now than it was only a few years before.

Raya Pro 4

I have been using the Raya Pro 4 toolbar to speed up my edits for a while now, so I thought I will create few guides for it. I shared one a few days ago on how to sharpen your photos with it for web and today I will show you how quickly blend two exposures. This is a quicker way of doing the same as I explain in my Luminosity masking tutorials, so if you don’t have Raya Pro 4, you can check out those here.

For more on Raya Pro 4, you can check out the official site here.

Simply blend two exposures with the help of Raya Pro 4

The whole process is very simple. First, you need two exposures you want to work with. To make the blend more realistic, they should be no more than 1-2 EV steps between them. If you have more, the transition after the blend won’t look natural (there are ways to fix that, but that’s for another guide).

These are the two exposures I will use here. One as a base and the second, darker one, from which I want to recover the bright areas.

Open both exposures in Photoshop as layers in the same file, – There are multiple ways you can do this, and you can find some of them here.
Put the darker exposure on top and hide it. – Since we need to create out a selection from the brighter exposure, we need to have only that one visible. So click on the eye icon next to the darker one and hide it.

Open the RP4 Instamask 3 panel (from the menu Window/Extensions/RP4 Instamask 3). – We will work with this panel, but only with few buttons of it.
Select the bright areas of the base photo. – Now we have to create our selection. Look at the 6 number next to B in the panel. Clicking on any of them will create a mask. 1 is the broadest selection of bright areas, 6 is the most restrictive. So just click on 1, see if it matches the areas you want to replace. If not, click on 2 and so on. In our example, the 2 matches the base photo the best.

Apply the mask. – You will see a new group with a layer in the layers window but ignore that. Instead, now just select the hidden darker layer and in the RP4 Instamask 3 panel just click on apply. This will add the mask to that layer and those extra ones will disappear.
Unhide the layer. – Now just unhide the darker layer and you are done.

What we actually did here, is to select all the brightest areas base on the bottom layer and then replaced them all from the top layer. One can go also the other way, have the darker image on the bottom, select the dark areas and then apply that selection to the bright ones.

One can use this also for more than 2 exposures, just hide all except the base one, follow this step to combine it with one. Once that is done, combine it again with another one. Since now already 2 layers are visible, your selection will be based on their combination.

If the blended areas look great, that means the difference between the photos was too big. You can try changing the opacity of the top layer, to make the transition softer. Editing the photos, so they are closer in appearance is another option. If you are working with RAW files, you can just jump in Camera RAW by double-clicking the layer and tweak them there.

Page 1 of 2612341020... Last »
FREE EBOOK!!!
Subscribe to my newsletter and get a free Capturing fireworks ebook. 
Subscribe