Raya Pro 4
I have been using the Raya Pro 4 toolbar to speed up my edits for a while now, so I thought I will create few guides for it. I shared one a few days ago on how to sharpen your photos with it for web and today I will show you how quickly blend two exposures. This is a quicker way of doing the same as I explain in my Luminosity masking tutorials, so if you don’t have Raya Pro 4, you can check out those here.
For more on Raya Pro 4, you can check out the official site here.
Simply blend two exposures with the help of Raya Pro 4
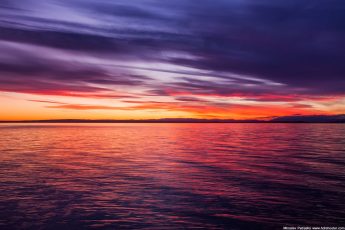
The whole process is very simple. First, you need two exposures you want to work with. To make the blend more realistic, they should be no more than 1-2 EV steps between them. If you have more, the transition after the blend won’t look natural (there are ways to fix that, but that’s for another guide).
These are the two exposures I will use here. One as a base and the second, darker one, from which I want to recover the bright areas.


Open both exposures in Photoshop as layers in the same file, – There are multiple ways you can do this, and you can find some of them here.
Put the darker exposure on top and hide it. – Since we need to create out a selection from the brighter exposure, we need to have only that one visible. So click on the eye icon next to the darker one and hide it.

Open the RP4 Instamask 3 panel (from the menu Window/Extensions/RP4 Instamask 3). – We will work with this panel, but only with few buttons of it.
Select the bright areas of the base photo. – Now we have to create our selection. Look at the 6 number next to B in the panel. Clicking on any of them will create a mask. 1 is the broadest selection of bright areas, 6 is the most restrictive. So just click on 1, see if it matches the areas you want to replace. If not, click on 2 and so on. In our example, the 2 matches the base photo the best.

Apply the mask. – You will see a new group with a layer in the layers window but ignore that. Instead, now just select the hidden darker layer and in the RP4 Instamask 3 panel just click on apply. This will add the mask to that layer and those extra ones will disappear.
Unhide the layer. – Now just unhide the darker layer and you are done.

What we actually did here, is to select all the brightest areas base on the bottom layer and then replaced them all from the top layer. One can go also the other way, have the darker image on the bottom, select the dark areas and then apply that selection to the bright ones.
One can use this also for more than 2 exposures, just hide all except the base one, follow this step to combine it with one. Once that is done, combine it again with another one. Since now already 2 layers are visible, your selection will be based on their combination.
If the blended areas look great, that means the difference between the photos was too big. You can try changing the opacity of the top layer, to make the transition softer. Editing the photos, so they are closer in appearance is another option. If you are working with RAW files, you can just jump in Camera RAW by double-clicking the layer and tweak them there.


Leave a Comment