With the cameras getting better and better, and also the focusing systems getting better, I still think manual focusing is still the way to go. And in this post, I will try to show you why, and also how to do it, so you get the best results all the time.
Why focus manually?

The reasons are divers, so let’s take a look at them.
1. Your camera can’t read your mind
The autofocus can be as good as it gets, but it can never really know what you try to take a photo off. You can help it by choosing your focus point, or use a single one all the time, but still, it will never be 100% accurate with focusing on what you want.
2. Your camera can’t see in the dark
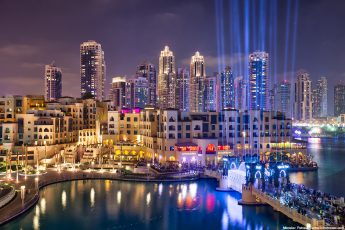
Ok, neither can you, but you really don’t have to. When focusing in dark spaces or late at night, you need just a small area with a little light in it, to be able to focus onto. A single street lamp in the distance is mostly enough to get a sharp photo.
3. Your camera can’t focus on very small objects
Each camera has only a certain number of focus points. If you taking a wast landscape, or a your scene is mostly dark, and there are only few light sources, it’s hard to tell the camera to focus exactly on one of them. Or for instance you shooting a night sky, and want to get a good focus on the stars (I found out that just focusing on infinity, never really worked for me). With manual focusing, you can just choose a bright star and focus onto that.
4. To maximize the DOF (Depth of field)
If you wan’t or need to use a bigger aperture, using manual focusing can really help you adjust your DOF. You can really select the subject and have no fear that it will be out of focus.

5. To keep the same focus
This is especially if you shot HDR, time-lapse, or have a different reason to need multiple shots to be combined. If you use manual focus, you will never have to fear, that your camera will focus on something different in the middle of a sequence.
6. You want to do focus stacking
Focus stacking is a way, where you take photos with different focus, to get a bigger DOF from a combination of them. This is just such a pain to do with autofocusing. Especially if you just need two shots, one for background and one for the foreground. With manual focusing, you can do this very quickly, just by turning the focus wheel :)
When not to focus manually?
Of course there are situations, when manual focusing it not the way to go. Mostly this is when you try to get a moving subject. It’s really hard to focus manually then. Still, with a lot of practice, one can do also that. If you can estimate the DOF, so you subject is completely in focus, you can focus manually and take all the further shots without refocusing. If you taking photos of something that is really fast changing (for instance fireworks), not having to refocus, will get you many more photos.
How to focus manually?
So now you know why you should be focus, now let’s looks how to do it.
1. Switch your lens to manual focus
This one is really important. First of all, you don’t want to damage your lens. The better (pricier) lenses can be focused manually even with the auto-focus on, but on some this would damage your focusing motor. Also you don’t want the autofocus to change your hard work.
2. Use live view
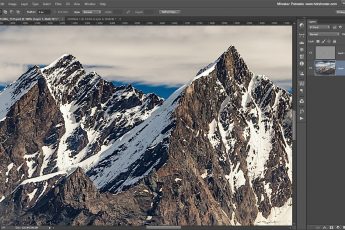
It’s really hard to use manual focusing without a live view. You can of course do it through the viewfinder, but you will never be so accurate. What you need to do is go into live view and zoom into the exact area you want to focus onto. Most cameras allow for a 10 times zoom, which grants you the ability to focus very accurately. Just be gentle when using longer lenses, as every touch will make it shake, so making the focusing harder.

Normal live view

10x zoom
3. Focus 1/3rd into the scene
This is a basic rule of DOF. If you focus on something, than 1/3rd of DOF will be in front of it, 2/3rd’s behind it. Witch this in mind, of course one needs to focus 1/3rd into the scene. You don’t have to be really exact, as long as you are not going for a very shallow DOF. With a little practice and experimenting, finding the 1/3rd spot is a madder of seconds for every scene.

4. Focus on light sources
This is mostly for late night scenes and night sky. You just need a single light source to be able to focus. You can even create your own using a flashlight. Just find the light source on your screen and focus onto it. Than try to refocus, while looking at the shape of the light source. The smaller it is, the sharper your shot will be. To say it differently, if you see a bokeh, you are not focused correctly.
To the right you have an example of a scene, where your camera would have a very hard time to fins something to focus on, but manually it’s done in seconded.
5. Remember the basic rules of DOF
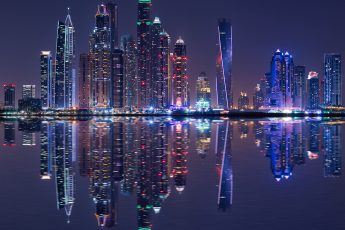
To make this easier for you, always remember the basic rules of DOF. The smaller aperture, the further away the subject and the wider the lens, the bigger DOF you will get. So especially with landscape shots, if you are using a wide angle lens, once you focus on anything just few meters away, you will get everything in focus. You don’t need to know the exact DOF for every setup, but knowing if you should expect a shallow or a deep DOF is always good.
6. Practice manual focusing
On every camera, there is a certain order of steps (button presses) to get into manual focus. With a little practice one can do those without even needing to look at the camera at all. For instance on my 5D mark II I can do this by pressing the live view, using the joystick to move the zoom square and then press zoom until I get to 10x magnification. If you doing multiple shots after each other, you don’t even need to leave the live view between shots.
Using a DOF calculator to help you focus
One way to be more exact with the focusing, is using a DOF calculator. There can be found many of them for every mobile platform. A DOF calculator, is a piece of software, that based on the focal length, aperture and focus distance, can tell you exactly, how much DOF you will get. You can use it easily, to determine the focusing distance, if your goal is a specific DOF.

DOF Calculator on Android

DOF Calculator Pro on Windows phone
I don’t think it’s that useful in the field, as it take too much time, but it’s a great tool to look at, to get better familiarized with one’s own lenses. Just enter the values, and then just change the focusing distance, to see how the DOF changes.
That’s all on Manual focusing, but feel free to ask if you have any questions.


good job :)
Thank you :)
Thank you for this, I have just started to try and focus manually. The autofocus on my camera struggles in the evening and I usually don’t notice until I get home and download the photos to the computer. Did not think about zooming in the live view!
Now I will search your site for information about light metering. I want to master the spot metering. :)
Glad I could help. Actually this was the same reason I switched to manual focusing. My old camera (the Canon 450D) was useless at night and manual focusing was a real help.
I’m actually thinking of doing another article, of how I chose the spot to meter for the exposure, but not done yet.
I am looking forward to it. My old camera did not have spot metering at all so this is lika a whole new world.
Hery Miroslav, thanks so much for the tips in this article they are very helpful. I just have a quick question, I tried taking cityscape nightshot with very long exposures (~30 seconds) using a standard zoom lens. Despite trying the manual focus on small subjects I still struggled to get the photo to be as sharp as I liked, certainly not as sharp as your amazing photos are :) Any tips on this?
Hmm… what I can think about, that you got a little bit of shake into your photo. What I would suggest, is using a sturdy tripod, cable release, and waiting a moment before taking the photo after focusing (so the camera stabilizes). You can also turn on mirror lockup, or just take the photo in live view. Also if you have Image stabilization in your lens, turn it off, as it can interfere. Other than that, it’s a little hard to say, what could cause it. The sharpness depends a lot on the particular lens and for each lens, there is also an aperture, for which the lens is sharpest (usually two stops lower than the maximum available aperture)
Oh yes, I did read about disabling image stabilization! Will have to try again :) Thanks!
Hi Miroslav,
I have a question. When you are taking landscape/cityscapes pictures it is better focus to far object or close one?
I understand, if you shoot with hyperfocal distance, that you should focus something about 1/3 of total distance – you focus more on foreground.
but since I don’t need it, in given moment (lot of light, have time for photo) is it better focus to distance – background? :)
Hi Kailen
It’s easier to just focus on something in the distance. But actually, especially if you are using a wide angle lens, there is no difference. If you look how the focusing works, once you focus on something just few meters away, you are already focused on near infinity. So there is almost no difference if you focus on something 10m away, or 100m away.