How about a small tutorial for today. Today I’m going to show you how I use Dodge & Burn to correct problems with layers masks and luminance selections.
The problem
If you use mask, you have probably noticed a situation, where they just don’t select only what you want. It’s mostly visible around the horizon line, around buildings and similar. When you start to blend, it will just create ugly halos around objects. This is because the mask does not fit the area perfectly, and you also effect a bit of the surrounded areas.
Similar, if you for instance try to select an object with a lot of empty space in between (like for instance the Eiffel tower), this also results in a lot of unwanted selections.
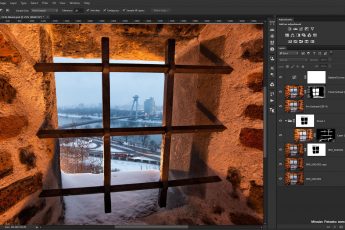
In this example screen-shot, I created a darks mask, to select the buildings. But as you can see, part of the selection are also the clouds, which I didn’t want to include. I hope it’s visible, as it is quite faint.

The solution
You can of course just take the brush and paint out the unwanted areas, or try and select just them and fill them in, but using Dodge & Burn is just quicker. First to remember, burn makes pixels darker, dodge brighter. So when correcting a layer mask, one needs to use Burn on Shadows when trying to remove parts from the mask, and Dodge on Highlights when trying to add more to the mask.
Here, I used Burn at 100% strength and just went over the sky. As it was set to Shadows, it only took the darkest areas (the sky in this instance) and made them even darker. The bright areas of the building were not effected at all, or only very gently. If I wanted to do the opposite, select the buildings more than they are, I would go with Dodge and Highlighs. They would get brighter in the selection, so selected to a bigger degree. Doing this few times, can create a very strong contrast between the selected and unselected areas, but the transition will not be the best. If you use this gently, you will keep the original transition between light and dark areas.


Leave a Comment