How the week passed quickly :) And since it’s Monday again, it’s time for another process post. This time it’s a vertorama, so get ready for a little longer one today. So let’s start with a look at the finished photo. It’s a shot of one of the churches in the Open Air museum in Bardejovske Kupele in Eastern Slovakia. I used a vertorama, as I wanted to have the whole church, without having a very strong distortion in the photo.

Overall I took 12 shots, 2 series of 6 brackets. In the end I didn’t use the brightest exposures. I took them as parts of the church were in a shadow, but I had no need for them. As always I started in Lightroom, where I removed lens distortion, vignetting and chromatic abberations.


Here you can see the original 0EV exposures


Then I continued in PTgui, where I created the blended planes (the whole process is described in this tutorial). I had few issues, as PTgui refused to blend the shots correctly. The repeating areas confused it, and it always created a bad transition. Even when I manually created more alignment points, it still was not properly blended. So in the end, using the masking in PTGUI, I removed most of the upper shot, to force the blend to be in a more diverse area. This really helped and I got my result. Here you can see a screenshot from PTGUI, with the mask applied. This also removed all the people from the finished panorama.

From there I got 5 blended planes as a result. I loaded them all into Oloneo Photoengine, to create a HDR. As usually, I only changed the strength and contrast to get to the result I wanted.


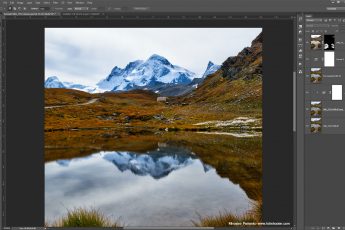
After that I continued into Photoshop. I loaded all the blended planes and the HDR into separate layers. I then cropped the empty areas out, and only left a little, which I could correct with retouching. Then I did the following edits (layers numbered from bottom up)
1. Oloneo Photoengine result
2+3+4. The sky replaced from the -1EV exposures blend. It has been brightened with an exposure layer and had saturation added to it, to fit the HDR.
5. Movement in the trees removed using the 0EV exposures
6. A merged layers, on which I removed few dust spots and corrected small missing areas, that were empty after the vertorama blending.
7. Color Efex Pro contrast filter, to get more detail and local contrast in the photo.
8+9. Color balance and Hue/Saturation to tone down the green of the grass.
10. Few more corrections from the +1Ev exposure, to tone down the colors of the walls.
11+12. More overall contrast to the whole photo
13. TK actions saturation mask, used to tone down oversaturated ares.
14. A little bit noise reduction on the photo.
Here you can see the screenshot from Photoshop, and also a screenshot of the saturation mask.


And that’s all I did with this image. To find out more on how I edit, check out the guides and before after categories on this blog, or check out my video tutorial series here:


Leave a Comment