Evening and night photos
When you do late evening and night photos, you very quickly run into the 30 second exposure time limit. For some reason camera manufacturers still insist on sticking to this stupid limit, that should have no place in modern digital cameras. But they do. So once you hit this limit, but your photo is still dark, what do you do? You have to change the aperture or the ISO. Today I will share with you my thoughts on which way to go and also possible solutions how to get around it. Please note, this is mostly for landscape and cityscape photos. Photos where you want to keep the depth of field high.
Higher ISO or bigger aperture?
So which one? Both approaches have their problems. When you use a bigger aperture (smaller F number), you loose the depth of field and sometimes also sharpness. When you use higher ISO, you are getting more noise and sometimes, when you go too high, you may loose small details completely.
I look at it this way. You can remove noise in post-processing, you can’t change a blurred area into a sharp one (OK, Topaz Sharpen AI can partially do it, but the results are not the same). As cameras are getting better and better and have less noise in higher ISO, the approach here is quite obvious.
Try different ISO settings on your camera, to determine the highest one you are still comfortable to use. I prefer not to go more than 400 to 800 ISO on my camera. I know that a higher one would still give a nice result, but I prefer to stay a bit lower. So once you can no longer use ISO 100 or lower, stick to the F stop you want to use first. Then raise your ISO until the ceiling you determined for your camera, and only after that start going to bigger apertures.

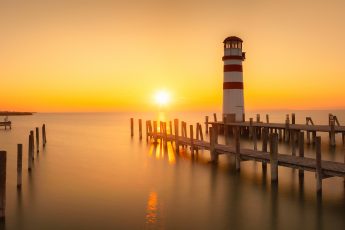
This photo was underexposed by around 3 stops when it was taken.
Different solutions
- Manual focusing. If you focus manually on exactly what you want, you can get away with using a bigger aperture, without loosing the depth of field you want. Having a look at focusing using Hyperfocal distance will also help you to maximize it.
- Underexposing a photo. A way to get over the 30s limit, is just to underexpose the photo. When you shoot in RAW, you can get few exposure stops from it. So you can take a photo that is 2 stops underexposed and then just overexpose it in post-processing. Can save you a lot of time in the field.
- Bulb timer. You can stick to your ISO and aperture, and just use a very long exposure. Some cameras have bulb timer build in, for some you need a remote. Bulb timer is a great solution if you have a lot of time to spare. But that’s often not the case. For instance, taking photos during a short blue hour. It’s just over so quickly. If every photo you take takes you 5 minutes, you take only very few.
- Focus blending. Depending on the scene you are capturing, you can try doing focus blending. Instead of one long exposure, do multiple shorter ones, with bigger aperture and different focus points. Then blend them into one in post-processing.
- Tilt-shift lens. One of the ways one can use a tilt-shift lens, is to tilt the focus plane. It’s mostly used to get a shallow depth of field, but you can also go the other way. You can use it to get a bigger depth of field, while still using a bigger aperture. Like that you can use a shorter shutter speed and lower ISO.
- Magic Lantern firmware. If you have an older Canon camera, you can use the Magic Lantern firmware on it and so remove some of the camera’s limitations. It provides a build in bulb timer and also allows for longer than 30s shots when doing bracketing. Overall, it gives so many features, that’s it’s worth a try.

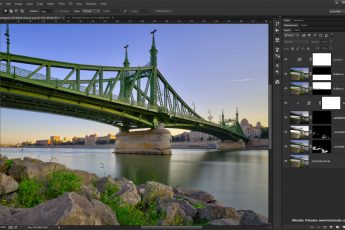
Blend of two photos with different focus points.
So these were my thought on this topic, and I hope you find them interesting and maybe helpful.


Leave a Comment