While I use a Sony camera mostly now, I also use a the Canon 5D mark II. And since the Magic Lantern firmware makes working with it so much better, today I will show you how to install Magic lantern, update and uninstall it. I will be showing all the steps on the 5D mark II, but there are same on other cameras.
Magic lantern
For why to use Magic Lantern, check out this article, on what I like the most about it.

Also, be warned, as with all unofficial software, you install Magic Lantern at your own risk (but I still have not heard about any big problems with it).

How to install Magic Lantern

Magic lantern installation is in two parts. It a change in the camera that notes that it should use the firmware on the card, and it’s the files you have to copy to the card that are used.

So to install it, you will need a computer with a card reader, a fully charged camera and a memory cart to use. I seen suggestions to reset the camera to default settings and set to Manual mode before starting, but I never did this once and never had issues, but to be safe, you may do so.

So to install you must:

  1. Download the version of Magic Lantern for the camera you need from the Magic Lantern website.
  2. Check if you camera has the correct firmware version, as required by Magic Lantern. You may need to update it first before being able to install ML firmawre
  3. Format the memory card using your camera.
  4. Turn off your camera, remove the card and connect it to the computer using the card reader
  5. Unpack the downloaded files you got into the root directory of the memory card
  6. Put the card back into the camera and turn it on
  7. Chose update firmware from the cameras menu, and wait
  8. Magic Lantern firmware
    Magic Lantern firmware
  9. Once you see a prompt to restart your camera, turn it off, wait a few seconds and turn it back on
  10. Magic Lantern firmware
    Magic Lantern firmware
  11. Now you can check the firmware version to see if its installed, and open the ML menu by pressing the trash button

If yo want to install the ML firmware on another card, just use the same steps, format the card, copy the files, put into the camera, turn on and update firmware with the new card.

How to update Magic Lantern

Updating Magic lantern is very easy, as you only need to update the files on the memory card. So you do the following:

  1. Connect the card to your computer (what you see depends on the version, but it can be like this)
  2. Remove the ML folder and all files, except the settings folder under ML folder (don’t delete the camera folders, the DCIM and MISC on Canon cameras)
  3. Extract and copy the downloaded files, same as when you are installing the firmware for the first time.
  4. Put the card into a camera that is off and turn it on. In a case that it wont turn on, turn it back off, remove the battery for few seconds and turn it back on.
  5. Magic Lantern firmwareOld version
    Magic Lantern firmwareNew version

How to uninstall Magic Lantern

Remove from camera

To uninstall the firmware from the camera, you need to have a card with the ML firmware installed in the camera and the camera turned on. Then you need to:

  1. Choose firmware in the menu
  2. Choose to update the firmware
  3. When prompted to restart the camera, do nothing. You will see a counter on the bottom of the screen, that counts down until the firmware will be uninstantiated.
  4. Magic Lantern firmware
    Magic Lantern firmware


  5. Restart your camera, but not before the timer finished. Wait for it, until its done first.

Remove from card

To just remove the firmware from the memory cards you have to:

  1. Choose to format the card inside the camera
  2. In the confirmation menu you will see a message Format card, keep ML. You need to change this to Format card, remove ML. To do so, press the button noted inside the brackets []. Picture Style in my case.
  3. Magic Lantern firmware
    Magic Lantern firmware


  4. Choose OK and confirm

And now you know how to install, update and uninstall Magic lantern firmware. For more, don’t forget to check out their official site here.

You may have noticed that some of my reviews start with a note, that I was a backer of the product on Kickstarter. For those unfamiliar, Kickstarter is a crowd-funding site, where companies and people present products they want to produce and people fund them with the start money they require for it. In reward, they usually get the product specified.

And since they are many products there specifically for photographers, I thought that today I will share few thoughts and points about Kickstarter and the campaigns there, that one should know before backing any. And if you are curious, I personally backed 19 projects so far.

1. Kickstarter is not a store
Many people who first time try Kickstarter are misinformed what it is. You are not buying a product, you are investing into a company. There is always a chance that you will get nothing. In the past, even bigger companies had problems fulfilling promises. The best is to be aware of this right from the start.

2. Delays will happen
Even good planed Kickstarter campaigns have delays. If you see that a date is promised when the product will be shipped, immediately add 2 months to it. That around the average I seen by most campaigns that delivered their products. Never ever expect that you will get your product on an exact date. Just right now, one of the projects I backed is 6 months late, and one is around 2 years.

3. Avoid big promises
Be careful when the project promises too much. Especially if its a companies first campaign. If I see a company like Peak Design, that had many successful campaigns, which delivered on time, I’m not worried. If I see a one man company promising too much, I rather stay away.

4. Bid early
If you know you want something, bid early. Most campaigns offer a so called early bird reward, where you can get the same reward for less (still, remember this is not a shop). So if you bid early, and all works as it should, you get the reward for less. And since the money is not collected right away, you still will have 30 to 60 days to cancel you pledge.

5. Look at comments and other projects
When the company has multiple campaigns on Kickstarter, is always great to check out the other ones, to see how it did. If you see that they have project with only unhappy comments and not delivered promises, you should avoid them.

6. Expect changes
Products on Kickstarter are usually still in the development process. There may be small and there may be big changes. Sometime you can even influence them if you message the developer or leave a good comment.

7. Don’t expect many updates
I’m not sure why some backers get crazy nervous when there is not an update from the company every second day. One update every month is more than enough. You don’t really need that many details, and bothering people with stupid comments when they try to work is not helping anything. If there is no update for a longer time, it can mean problems, but it can also mean nothing. Crying wolf too soon can only damage the project and can end worse for you in the end. To the same point, if a company promises and update and its 5 minutes late, please don’t start asking for it.

8. Take postage and taxes into account
This is similar to online shopping. Always take import taxes (if you are not in the country of the company) and postage into account. I skipped many projects just because the postage was same or even bigger than the product cost. Some companies get around the import taxes by posting from multiple locations, but you can’t be sure about that at the time of your pledge.

9. Check your pledge before the end
As the campaign ends, some companies offer cheaper options to drive more pledges. Also, there are always some cancellations, so you can have a chance to change you pledge for a cheaper one with the same reward.

10. Don’t pledge if you can’t take the risk
Always remember there is a risk. Don’t pledge if you can’t take it or don’t have the spare means to do it.

And to end, stats for the 19 projects I backed. On 4 I canceled my pledge, I either found a better one, or changed my mind. 2 were unsuccessful. 6 delivered, with an average of around 2 months delay. One is 2 years overdue, but that was a game, and I did not had that great of expectations. And the other 6 should deliver this year. Two were delayed, by 2 and 6 months, but now should be already on the way, and others are still in production stage.

Kickstarter is a great site with great products, but before you pledge for one, know what you can expect and what can happen. Always.

Some time ago I wrote about how to avoid people in your photos (you can check the post here), and today I thought I will show you an example of one of the techniques I mentioned here. So today I will show you how to remove people from your photos manually, using multiple exposures.

1. Taking the photos

It’s hard to say how many photos you will need. It depends a lot on the area you are trying to photograph. If the area is filled with a stream of moving people no amount of photos will be enough. But if the amount of people is more moderate, and you can see the parts of the scene you want to photograph, you can do it.

The best tactic is to first take a shot and check it, trying to remember the spots that contain people. Then without changing the camera settings or composition, wait until one of those spots is empty, and take another shot. Wait for another spot, and take another shot. Continue doing so, until you have a photo with empty space for every spot you need. Having more photos than less is usually much better.

Let’s look at an example I took in Lyon, France. The Basilica of Notre-Dame de Fourvière has quite many people going in and out during the day. At night it was easy to avoid them, but during the day, I had to do more work. I set up for a vertorama, and while a single exposure for the top image was enough (no people there :)) I had to do multiple for the bottom. For this, I took quite a lot, 18 shots in total, just to be sure I have everything.

In the end I used only 5 of these shots, just the ones I needed for the whole image. Here I had a bit of luck that all people were moving. If there are some just standing around or sitting, you may need to retouch them out in the end.

2. Blending them

So once the photos are selected, we have to load them all into layers in Photoshop. Here using the masks one can easily blend in parts of every image, to remove the people.

Let’s look again at the example. Here, you may notice I also loaded the combined vertorama (the top combined with one of the bottom images, that had the least people) as the base. This does not change much, just one has to make sure the photos are properly aligned. Other than that, it’s the same process as by a normal image. If you don’t know how to load files into layers in Photoshop, check this guide on how to do it.

The next step is to add a black layer mask (a mask that hides everything). Either choose a layer and go to Layer/Layer Mask/Hide all or hold down Alt and click on the Add layer mask button (circle inside a square in the bottom right of layers window). Once you have all the layers except the first one hidden you can continue.

Now choose a white brush, 100% opacity, 0% hardness, with a size around 100px (depends on the size of your photo). No we can start to remove people. Just choose one area you want to work with on the base photo, look through the other layers (holding down shift and clicking on the mask will temporary disable it, so you can see the photo), where the are is empty, and then start painting with white on that layers mask, over the part you want to hide. Don’t forget, that people also have reflections and shadows, so you have to remove those also.

Continue doing this for every area you need, until you have a completely empty photo (that is if you had enough source images :))

And thats all for this guide, for more, feel free to check out the guides category of the blog.

There are many ways one can combine photos into panoramas, and while Lightroom does not provide many advanced features, it’s one of the easiest and fastest ways to do so. So today I will show you how to combine panoramas in Lightroom, and what to do to get best results.

So of course you first need to find the photos you want to combine into a panorama and have them imported into Lightroom (either use the File/Import dialog, or just drag and drop them o Lightroom when in Library view, and it will open automatically). To choose multiple photos, hold down Ctrl and click them one by one, when done, switch to the Develop module.

Creating a panorama

To make the panorama blend better, we need to remove vignetting from the photos, as that is not done automatically, and if kept, it can cause uneven color, and shadows, mostly in the sky. To do so, scroll down on the right side until you get to Lens Corrections, and check by Enable Profile correction. In case your lens is not automatically recognized (for instance, like me, you are using a reduction on your camera), you have to choose the profile manually. So choose Profile under Lens corrections, and there, choose the maker and type of you camera. I would suggest also checking Remove Chromatic Aberrations at the same time.

Panoramas in Lightroom

Btw. if you photos are crocked, don’t bother correcting this here. Lightroom will use the whole photo for the blend anyway.

Once this correction is applied, we need to synchronize it to all other used photos. Hit the Sync button in the bottom right, make sure that all values are checked, and than hit Synchronize. Now the photos are ready to be merged. Right click on one of them, either the big preview, or in the bottom photo strip (or you can go under Photo/Photomerge), choose Photomerge and choose Panorama.

Panoramas in Lightroom

The Panorama Merge Preview dialog will open. Here you can choose what kind of projections you would like (auto works mostly fine), if you would like to crop the result, and if you would like to apply Boundary warp. We will take a look at these in a moment. Once done, choose Merge.

The finished panorama will be loaded back into Lightroom, right next to the last of your selected photos (in few cases, I seen it appearing at the end of the photo strip). You now can select it, and continue with the edit.

Panoramas in Lightroom

There is one great thing about this result, and that it is still in RAW format (dng to be exact). So you still have all the dynamic range as you had in your files from the camera, you still can change the white balance, and so on. So you don’t really have to bother with doing any edits, except for the few corrections, on separated photos, and you can do it all on the finished panorama.

Please note, that this is not the best solution for HDR panoramas. In my experience, if I try to merge a set of brackets, lets say the 0EV series, and then another set, let say the +1EV series, the results will not line up perfectly, and you can’t use them as the source for tonemapping. For that, you can have a look at how to do it in PTgui or Autopano Giga.

Settings

Let’s go back to the settings in the Panorama Merge dialog. First you can choose the Auto select projection. This works fine most of the time, but not always. So better solution, is to choose the projection yourself. The selection is based on what photos you are trying to merge. The spherical projections, will try to put the photos on the inside of a sphere. This is best if you did a multi-row panorama, where you moved horizontally and also vertically while taking photos. The Cylindrical projection is best for one row panoramas, where you moved only in one direction. It will try to project the panorama on the inside of a cylinder. The Perspective projection is a special one, where it will only do perspective corrections on all the photos and so will try to put them together. The Perspective projection will sometime produce no result and you will be prompted to choose a different one.

This is and example, where exactly the Perspective projection works the best. From the two photos combined here, the bottom one was taken leveled, so without a perspective distortion. The top one was taken while looking up, so with huge perspective distortion. Ligtroom, will correct the top one, and so it’s able to merge them together.

Panoramas in Lightroom

Auto Crop will crop the picture so there is no white space around it. You can use it, or you don’t have to. Even if you use it, you still can open the crop tool later in Lightroom, and re-crop the image, as either way, it saves the whole image, not just the cropped part.

The last point is the Boundary warp slider, but since I wrote about that one recently, you can find more in this Boundary warp article.

Especially in HDR photography, and also on my blog, you may have seen EV being used quite often. And today, together we will look at what EV means, and how you use it.

EV – Exposure value

In the first part of this series, I talked about Exposure. As I explained, exposure is about how much light you let into your camera. Exposure value (EV) is any combination of shutter speed, aperture and ISO (some don’t include ISO, but I think it should be included) that yields the same exposure for a specific fixed amount of light.

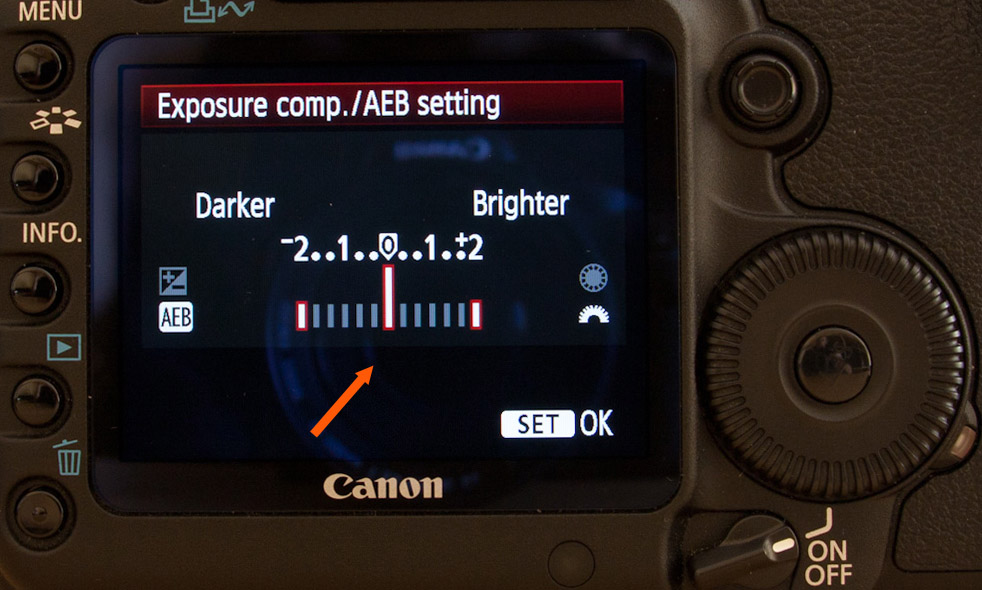
On your camera, you will see a scale with 0 in the middle, mostly going from -2 to 2 or from -3 to 3. This shows the current EV value.

Bracket settingsIf the value is shown as 0EV, this means, that the set settings for shutter speed, aperture and ISO together allow for an exposure, that is correct based on the cameras own metering of the current scene. If the EV is a negative number, that means that the resulting photo will be underexposed, if it’s a positive number, it will be overexposed. There are no specific settings for 0EV, as it changes based on available light, camera mode, lens and what from the three values you have changed yourself.

When you take 0EV as the amount of light you need the capture for proper exposure, than +1EV is double the light, +2EV is four times the light and so on. -1EV is half the light captured, -2EV is quarter and so on. So the amount always doubles or half’s, based on which way you go. EV can also be set in fractions, like 1/3rd, 2/3rd’s. On some cameras you can switch this to use half’s.

To double the light, so going one stop up, you either double the time, double the ISO or double the aperture. This is easy to count for shutter speed and ISO, where you just double the number. For aperture, this is not so straightforward and an aperture table is needed. For instance to double F8 you go to F5.6, to double F5.6 you go to F4 and so on. But since every-time you change any of these values on your camera, they change by 1/3rd EV. So if you change the value three times, it will change by 1EV.

For instance, if you shoot in the Aperture priority mode, and you have a scene where f2.8, ISO 100 and 1/10s will result in correct exposure, that is 0EV, than also f2.8, ISO 200 and 1/20s will give the same result, f.4, iso 100, 1/5s, and so on. Each time you change one value, one of the other two has to change to compensate, for the EV to stay at 0.

Exposure compensation

First use for EV and their understanding is Exposure compensation. It probably happened to you, that you have been shooting in a certain conditions (snow covered landscape is a perfect example here) and all you photos came out too bright or too dark. Thats because your camera has problem determining the correct exposure. In this case you can compensate for this, by forcing the camera to take a positive or negative value EV instead of the 0 one.

So for instance, the mentioned snow example, cameras tend to underexpose in those situations. So by setting the exposure compensation to +1/3EV or higher, you will force the camera to overexpose every photo, so compensating for the problem.

Using exposure compensation is different on every camera, but mostly there is a wheel you turn to do so in the menu, or there is a specific wheel with EV markings on it. These have no effect in the Manual mode, as there you have to compensate manually by changing the aperture, shutter speed and ISO values.

Exposure bracketing

Exposure bracketing, is taking (or setting the camera to take) multiple photos with different EV values. For instance you can take a series of 5 photos, at -2EV, -1EV, 0EV, +1EV and +2EV.

This is for instances, where you know, that not everything will be exposed in the 0EV photo properly. Again, a typical example would be having a bright sky on half of the picture. Either your scenery, or your sky is properly exposed, but usually not both. Having multiple photos with different exposures, will endure you, that you have one with properly exposed sky and one with scenery. With those, you can then continue as you need, blend them, use HDR or similar.


And advance mode would be just to manually bracket for the EV values you need, and not even do the whole series.

You can take a look at my article about taking brackets for HDR, where I also included a video that shows exposure bracketing.

All the exact exposure values can be also calculated using mathematical equations, but I don’t think you will ever need it in the field. When taking photos the camera doest that for you :)

Page 9 of 26« First ...89101120... Last »
FREE EBOOK!!!
Subscribe to my newsletter and get a free Capturing fireworks ebook. 
Subscribe