Few days ago I posted a photo where I created a reflection of a cityscape, and I thought I would show you how one creates one of those (or better said how I do it). I like to keep it simple, and not overdo it. Especially in the scene I used it, night cityscapes, putting too much detail and distortion in the reflection, makes it looking more fake than real.
So I presume that you know at least a little on how to work in Photoshop, and I will do this whole thing in fewer steps, not going the long way around. So lets start (the step number will correspond to the screen-shots in the same order).
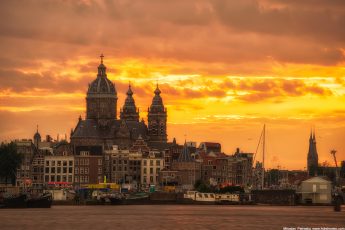
1. So let’s start with nice night cityscape, that is perfect for this. You can get the photo from here, if you want to follow along with the steps.
2. Fist step, is to expand the photo so it can accommodate the reflection. To do this, choose the crop tool, and then move your cursor over the small marking in the bottom center of the crop overlay. Your cursor should change into a double-sided arrow. Once there, start dragging the point down, until the center of the crop overlay is on the same line as the horizontal line. Let go, and confirm by pressing Enter.
 1. starting photo
 2. expand canvas
3. Now we have to copy the cityscape. Choose the Marque tool, and select the part of the photo from top to the horizontal line. Then, while still having the Marque tool selected, right click anywhere inside the selection and from the menu choose layer via copy. This will duplicate this selection into a new layer for you.
4. Select the new layer now and press Ctrl+T (or Edit/Free Transform if you like the slower way of doing things :)). Right click inside the selected area and choose Flip vertical from the context menu. Hit Enter to confirm.
 3. create copy
 4. flip copy
5. Now choose the move tool, hold down shift (so you move in a straight line) and drag the flipped copy down, until you get it to the bottom border of the image. This will finish the basic reflection.
6. Now to add a little bit of movement into the reflection. As I said before, I don’t like adding too much, just a little blur and motion. So go under Filter/Blur/Motion blur and choose 0 for Angle, and 10-30 pixels for the Distance (around 10 pixels for every 1000 of the photo width). You may need to experiment a little to see what works best for your photo. Click on OK to confirm.
 5. move copy
 6. create blur
7. To make it a little more interesting, let’s add few small waves to it. To do so, lets first crate a new layer (the second button in the bottom right), fill it with white (simplest way, is to press Shift+Backspace and chose White in the Use selection). Then add noise to this layer, by choosing Filter/Noise/Add Noise. Use 400%, Gaussian and Monochrome.
8. Now lets add some motion blur to this layers. Go under Filter/Blur/Motion blur and choose angle 0 and Distance of about 4 times the one you used before (around 40 in my case)
 7. new layer with noise
 8. add blur
9. We have to add more contrast to this layer, so only some of the waves are visible. To do so, go under Image/Adjustments/Levels (Ctrl+L for short) and in the levels dialog, push the three sliders around, until you have something similar to my result. All should be close to each other, around the 3/4th of the scale. Confirm this adjustment.
10. Still to make the waves a little better, let’s make the ones closer a little bigger. To do so, with the waves layers selected, press Ctrl+T to go into Free transform again, right click on the selection and choose Perspective. Then grab the bottom right corner of the selection and drag it to the right. This will affect both corners and you get a result as on the screen-shot. Once done, confirm with Enter.
 9. add contrast
 10. perspective distortion
11. Now to finish, we need the waves to be only on the bottom part of the image. The simples way is to create a clipping mask. To do so, with the waves layer selected, go under Layer/Create clipping mask. The layer will now have the same size as the one under it. Now just change the blending mode to Soft light and the opacity to something around 5-10%, and your done.

And for those who want to see this as video, here it is :)
Feel free to ask if something is not explained enough in this tutorial, and I hope you like it :)


Leave a Comment