Luminosity selections and masks
Last week, I shared with you, what are luminosity selections and masks, and how to create them in Photoshop. Today, I will show you, how to use them when you are editing photos. There will be another post about this topic, where I will show you how to use them to blend images.
But before you get into today’s guide, I suggest checking out this post on understanding masks in Photoshop here, and the post explaining luminosity selections and masks here.
Editing photos using luminosity selections
Let’s start with a photo in the state we left in the last post. Go into the channels window, and create the Bright 1, Bright 2, Bright 3 and Dark 1, Dark 2 and Dark 3 channels. Each time from now on, when we need to select a certain one, just go back to selections and Ctrl+click on the one you want to select.

There are two ways we can approach editing from here on. Either we want to effect the whole selection, or just paint in a part of it, exactly where we need it. The process is a bit different for both of these, so let’s look at them now.
Global edits on whole selection
When you want to effect the whole selections, the two steps you have to do are:
- Select the luminosity selection you want to use – Go into the channels window, and Ctrl+click on the selection you want to use. Go back to the layers window afterwards
- Add the edit you want to use – Create new fill or adjustment layer, by using the button (circle icon, half white, half black) in the bottom right. You can use any adjustment you need. The selection will be automatically added a layer mask to the new layer and you can then edit your adjustment.
Let’s look at an example to understand this. For this photo, I want to brighten the shadow areas and I want to darken the highlights. Let’s start with the shadows.
- Go into the channels, and select a Dark selection. The more restrictive selection you choose, the less efect your edit will have. So if you go to Dark 3, or even 4,5 and higher, you effect only the very dark areas in the photo. For this example, let’s choose Dark 2. Ctrl+click on the channel with that selection
- Go into layers and add a Brightness/Contrast adjustment layer (one can use also other adjustments, like curves or levels to get the same effect). A new layer will be created with the mask applied to it.
- Now in the properties of that layer, adjust brightness to make the shadow areas brighter. You will see, that the bright areas of the photo are not effected at all and only the shadows are brightened.


Going to the second edit, darkening the highlights, just do the same, just change the selection and the adjustment. For instance, select a Bright 2 selection, create a Brightness/Contrast adjustment layer and lower the brightness. And you have darkened the highlights of the photo.


Don’t limit yourself to just darkening and brightening a certain area. You can use this to change the color balance, saturation, detail, white balance and much more. Just use the adjustment layer you need. Also, one note about changing the brightness. Each time you brighten a dark area or darken a bright area, you photo looses contrast. A good practice is then, that every time you do this, to add a bit of contrast to the same area. If you use Brightness/contrast, add a bit of contrast, in levels, move the mid-tones a bit, in curves, create a S curve. Like this, your edits will look natural and photos will not become grey and flat.
Local edits by painting in the effect
If you don’t want to use the whole selection, the process is a bit different. The steps you have to follow then are:
- Create an adjustment layer – In the layers window, create the adjustment layer you need, and set it to parameters you need. It will effect the whole image, but that is OK for now.
- Add a black mask to it – We need to hide this layer for now. So click on the white mask next to this layer, and press Ctrl+I to invert it to a black mask
- Make a luminosity selection in the Channels window – as before Ctrl+click on the Bright or Dark channel that closely matches the part of the image you want to edit. This will create a selection for you.
- Paint in the edit – now go back to the layers window, choose the Brush tool, white, 0% hardness. Select the black mask you inverted before and start painting in the areas you want the edit to have effect. If the marching ants of the selection are distracting or in the way, you can hide them by pressing Ctrl+H. The selection will limit where you can paint, so you will only effect the area you need to.
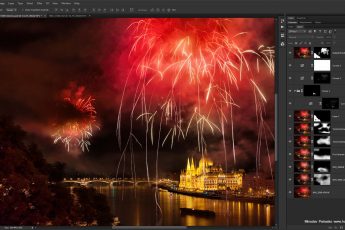
Let’s go back to our example. Let’s say I still want to brighten the shadows, but not everywhere. I want to just brighten them around the buildings in the middle of the photo. I will use levels in this example


- create and edit a new adjustment layer – With the button in the bottom right of the layers window, create a new levels adjustment layer. Brighten the photo by moving the white triangle to the left
- invert the mask – Select it’s mask, and press Ctrl+I to invert it. Now the adjustment layer will have no effect on the image
- create your selection – Go into channels and let’s select the Dark 2 one by Ctrl+click on it
- paint in the effect – go back to the mask, hide the selection with Ctrl+H, and with the white brush start painting around the are you want to brighter. The more times you paint over a spot, the stronger effect the adjustment will have on it. But it’s all limited by the selection, so for instance the bright castle in the middle will not be effected at all.


If you ever add to much, just switch your brush to black color, and paint over the same spot. By switching back and forth between white and black, you can add or remove the effect until you are satisfied with your result. If you see that you selection is too narrow or broad, delete the layer and start again. Don’t forget you can use this with any other adjustment. You can paint in saturation, detail, colors, brightness, contrast and anything else you can put on a layer.
That’s all for today, next time I will share with you how to use these same selection to blend multiple exposures together.


Leave a Comment