If you ever created a HDR image, you probably seen this problem in your photos. It’s actually also the biggest thing I don’t like about Oloneo Photoengine. But there is a simple solution :)
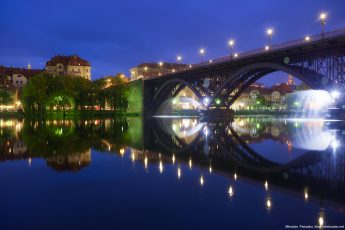
What I am talking about, is a visible border around the areas, where the dark and bright parts of the images are merged. There is a small darker border around the dark area, and small brighter border around the bright area. Usually this is around the horizon, where the sky ends. This may be not so visible, but once you resize and sharpen, this may become very noticeable. Here you can see how it looks, and how we will correct this in this guide.

Not everyone is bothered by this, but I am :) I like when my photos look good also when seen big. So today, I will show you how to easily get rid of this problem in few minutes.
The first thing that comes to mind, how to remove this, is just to use the Clone Stamp tool, and just carefully go around the borders, and paint them over. This works, but it’s very hard to do quickly and without errors. To make this much easier, we will use the blending modes that Photoshop allows for. This works for most cases, there just needs to be a brightness difference between the areas (if you sky is darker than the ground, this will not work that great).
1. Find the area that needs to be corrected (I will explain it on this example). Choose the Clone Stamp tool, choose a soft brush, 100% opacity and Darken blend mode. Now Alt+Click on a close part of the sky to choose the source, and start painting over the bright border. You will notice, that the bright part is painted over, but nothing else. Keep doing this, and also changing the source point, until you paint over the whole bright line.

2. Once the bright border is gone, we still need to get rid of the darker border under it. To do this, changes the blending mode to lighten, choose a source spot in the dark area, and start painting over the border again. Now, only the darker border is affected, and you will get rid of it very quickly.

3. And you end up with a photo without any outlines at all. One note, be carefull when removing the bright part around lights, as the darken mode will also darken them. Either use a smaller brush, and go slowly around it, or add a mask to your finished edit, and mask out the area of the light.

And for those lazy to read through this post (or who didn’t understood the technique completely :)) you can watch the process also in this short video I made.
Feel free to ask any questions, if something is hard to understand :)


Excellent, thank you
Your welcome :)
It helped me a lot, thank you!