Same as probably many photographers, I get a lot of questions about my photos. And a lot of times it’s all about: What ISO did you use? What aperture? What exposure time? .. and so on. But does knowing this really help you?

I remember, that when I started taking photos, I also looked at EXIF data quite often. That’s why I actually also started adding them to every of my blog posts (not that I really see a need for it anymore :)). It was sometimes interesting to see what other people use, but I don’t remember it being so useful. And once one gets to the point that one understands what everything effects, what change of aperture does, what ISO does, and all the other, all this data looses any importance it once had. Of course as with everything, there are few exceptions, but we will take a look at those.

So lets take a look at the usual EXIF info you get, and some HDR specific stuff that I mention by my photos. Of course all the parameters are connected to each other, so one effect all the others. I will go through them separately, but will mention the connection from time to time. In few cases I simplify things, to keep this post to a manageable length.
On the pier

Number of brackets used

This one is really HDR specific (not really EXIF, but I include it anyway). One gets this question all the time, and the best answer is always, how many are needed. The number of brackets needed varies very greatly by a camera and the situation. After years of shooting with my camera, I came to the conclusion, that 5 exposures is enough for me 95% of the time. The only time that I take more, is when I shoot directly into the sun or a different strong light source. But even in that situation, there is a huge chance, I will not use all of them.

If one takes RAW files into account and the dynamic range they contain, I could even get most of my photos only with 3, sometimes even only 2 exposures. I just take more to be safe.

So does knowing how many exposures someone used for a particular photo help you to get a better HDR? Simply, no.

Aperture used

Knowing the Aperture can, but does not have to be useful. Aperture effect your DOF (depth of field), sharpness and light stars. Of course all of this is also affected by other parameters (lens, sensor size, focal length..) but Aperture is the main part here.

So what can you learn? Almost nothing about the DOF. As you usually don’t know the distance between the camera and the subject, the aperture on its own wont help you. With the basic rules of bigger aperture -> smaller DOF & closer to the subject -> smaller DOF covering almost all the situations, this is all you need to know.

Sharpness is very depending on the lens, and what post-processing was done. So if you see a RAW file at 100% you can judge if a certain aperture is better on that lens. Each lens has a sweet spot, and Aperture where it’s sharpest, so this can help you sometime. Still, looking at a edited photo and trying to determine this is pointless. Btw. if you leave something out of focus in your photo, make everything else look much more sharper :)

The last light stars, the effect when a light source creates a star in your photo, is very depended on the Aperture. But it’s also very dependent on the light source and the distance to that source. Again the simple rule smaller aperture -> more visible light stars is enough for one to know.

So does knowing what aperture was used help you? Usually not.
Marina reflection

Exposure time

This is one that can be interesting. Especially in very short and very long exposure photography. Think about it this way, the difference between a 1s photo and a 2s photo is usually negligible. But the difference between 1s a 100s photo is already quite different. There are also few kinds of photography where you have to be very careful about the exposure time. For instance star photography. You have to limit the exposure time to avoid star trails (of course taking into account aperture and focal length). Also times you need to get nice light streaks from cars, or completely blurred people could be interesting. On the other side, the very short exposure are interesting when you goal is a complete freeze of motion in a subject. A good example is flowing water or waterfalls, or maybe fireworks.

So does knowing the exposure time can be useful to you? Sometime.

ISO used

As one usually changes the ISO only when it’s really needed, especially when a shorter exposure is needed, knowing what ISO was used is almost always really useless. The only time that I can think of that this would be an interesting thing, is when you want to buy a new camera and want to know the performance. But even in these case, if you don’t see the RAW file at 100%, you can’t get a good image of the performance.

So does knowing the ISO help you? I don’t think so.

Focal length

In my opinion this is the most interesting attribute you can find in a EXIF. The look of the photo, especially the perspective compression is very dependent. I you are searching for photo locations, knowing what focal length is being used can help you a lot with your preparations. Of course small differences are not important, but knowing if its wide-angle shot or zoomed in can give one a lot of help. With practice one can guess the focal length from the photo, but having a number there is easier.

So does knowing the focal length help you? I think it can.

So can one learn?

Not really. It can be interesting sometime, but not really that helpful. Much better approach is to learn what these parameters change in a photo and experiment with them. Just leaving the Auto and the P modes behind and switching to Av or M will help you more with understanding the photos than looking at all the EXIF on this blog :)

This will be a little rant, as I’m quite fed up with some people and few things need to be said. I think most of the photographers can relate to this.

As every photographer I get quite a lot of requests for photo usage from companies. As you know, all my photos are shared under the Creative commons licence, so that all who don’t profit from them can use them for free. But if a company uses them commercially, then they should buy it, as they use it to try to get more clients for themselves.

Of course the reality is different. A lot of companies contact me, and other photographers to ask if they can use the photos for free. Of course when you reply that for commercial use they have to buy the rights, usually they don’t respond to that at all, say that they will find someone else who would work for free, throw the non-profit organization in your face or promise you exposure. But let’s take a look at this.

Above Paris

1. Why don’t you work for free? – Let’s translate this into what it is. Work for free equals “I think your work is worthless, and so you should give it away. I don’t care how much time and money you spent to learn your skill, to buy your equipment, to get to the location. I don’t care how many nights you didn’t sleep to get up early to get your photo. I don’t care how many times you spent hours in the freezing cold to get a nice shot. I just don’t care. I’m paid for browsing the internet and writing insulting e-mails, so why should I care?”

2. We don’t even ask how much a photo cost – They just expect it to be free. What if my prices are reasonable, and they can afford it without problems? They don’t care, it’s free or nothing.

3. We can find someone who will give it for free – This is a sad truth. With the internet, they can search and search and sooner or later they will find someone who will give them the photo for free. Usually photographers who just started recently, don’t value their work so much, so they give it for free. But other photographers should teach them, and they should learn never to do that.

4. We are a non-profit organisation – Yes, they love this excuse. But do they know what that means, or should a photographer explain that to them? For those of you who don’t know, a non-profit organisation is a normal organisation, it just doesn’t generate any profit. They just spend the money. They have budgets, the people working there get paid and so on. In many countries their budget even has to be public, so you can check it out on their webpage. So what they say with saying that they are non-profit is “Everyone working here gets paid, but you are a stupid photographer and you should work for free. We really really think your work is worthless”.

Birmingham bus

5. You get free exposure – Another excuse companies love. But you know what, exposure does not pay bills. You just can’t live from it. And think about it. How many people have to see your photo for you to make a sale? 100? 1000? 10 000? It’s sometimes even more. You know there is a saying (I think it’s more fitting in Slovak, but the translation is also ok) “A bird in the hand is worth two in the bush” and it fits perfectly here. And you know what? If they pay me, I can buy all the exposure I want. You can buy promos on Facebook, Google and many more. But I decide if I want that, not them.

6. It cost’s you nothing, you just have to press the shutter – This one is as insulting as it gets. By this logic, a driver should work for free, as he just turns a wheel, an accountant should work for free, as he just fills out forms, a hairdresser should work for free as he just has to cut with scissors and so on and on. By this logic, everyone should work for free, no? But lets take a look at my costs. First of all, it costs my time. It’s not just the second I take the photo, but I have to prepare for the shot, get to the location, take the shot, get home, upload the photos and edit the photo. It can take up to hours for a single photo. I also had to buy the camera, lens, tripod, memory card, computer to edit on and countless software tools.  And still I haven’t put a price on my skills that took me years to learn and I spent a lot of money to learn. And that’s of course the cheapest scenario. If I take photos in other than my city, I have to pay for the travel there, pay for the hotel, and so on and on and on. Compared to these expenses, a price for one photo is usually nothing.

7. There is no budget for the photos – Interesting. So you have a budget for everything else, just not for what you need? Again a popular excuse that means nothing, or in the most, the company does not know how to create budget’s. Just think about it. They made a budget for their website (magazine, booklet, flyer… whatever) and they forgot to include a budget for the PHOTOS? I also made a budget and I forgot to include my new car, please send me a free one :)

Sunrise at the bridge

Let’s take an example here. Let’s say a company wants to make a booklet to promote their work. So they ask you for photos, and they ask you to give them for free just for the exposure. So what does that really mean?

  • the person contacting the photographer gets paid, as she/he is doing her/his work
  • the person creating the text for the booklet gets paid, as she/he usually works for the company
  • the person creating the booklet in Photoshop gets paid
  • the company that prints the booklet gets paid
  • the company that distributes the booklet gets paid

Just the photographer, whose photos are the main part of the booklet, should work for free? They don’t expect any of the other people to work for free. They should try making the booklet without the photos, let’s see if it’s usable then. It really feels like an insult to me, and my work.

So that brings me to the original question. Is my work worthless? People like those think it is, but I have to disagree. You know, I gave away few photos, when I was a stupid beginner and I didn’t know better. But I learned, and so should every photographer. If you think about it, by giving photos for free, you not only show these people that your work is worthless. You also make it harder and take away work from professional photographers, who are depended on the income from their work.

There is one kind of organisation I don’t mind giving my photos for free. And that is a charity. But again, if everyone working for the charity gets paid for their work, it’s not a charity, its a normal commercial organisation, and either everyone should get paid, or no one.

It’s nice to see that there are still companies who understand how much work a photo is and it’s a pleasure to work with those. Too bad that the trend is going towards the bad ones.

If I can suggest anything to every photographer, don’t give your photos for free. Even if you think you are just an amateur. If they make money from your photos, so should you. You are not a charity, and the companies don’t need a handout. If you want to help people who really need your help, there are many other ways to do it.

Feel free to share this further and let me know your thoughts.

Flares are one of those things that can add to a photo, but usually you don’t want them. Especially if you are doing a nice landscape shot, flares can completely destroy your photo. There are multiple ways of avoiding them and removing them, so lets take a look at those.

Behind the camera Just a shot of my camera :)

Avoiding lens flares

The best approach is to avoid lens flares in the start. This is not always possible, but few simple steps will help you.

1. Use a lens hood – even if you think you don’t need it. Lens hoods are specially designed to block stray light getting into you lens. And that’s exactly the light you need to avoid. Also when you are doing night photography, a lens hood can help you avoid stray light from street lamps and similar sources.

2. Be aware of the suns position – when shooting landscapes, you should always take into account where the sun is. If its anywhere else than behind you, check for lens flares. You will not see them through the viewfinder, but they will be visible in live view. You can even take a test shot, to check for them.

3. Don’t use filters you don’t need – this is especially true for UV filter. These filters can create much more flares, than you would have without them

4. Get a better lens – I know this is not cheap, and should not be your first approach, but better lenses catch much fewer lens flares than the budget ones. They have special coatings that prevent this.

Removing them using Photoshop tools

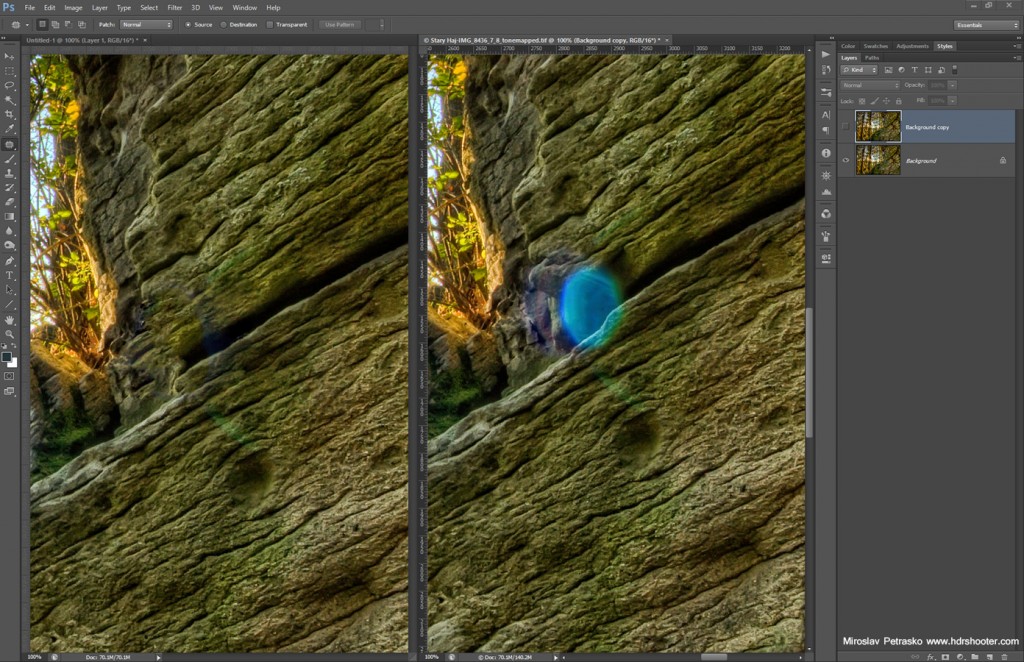
flare-photoshop

If you didn’t managed to avoid them, and you don’t like to have them in your photo, you can remove them in Photoshop. Photoshop has many tools for photo retouching and some of them can also work on Lens flares. The most useful are Patch tool, Healing brush tool and Content aware fill. In a way, they all work the same, you just select the area you want to replaced and then either move it over a clean area (Patch tool), Fill it using content aware fill (Shift + Backspace and select content aware fill) or you paint over using the Healing brush. This works well only in some cases, having a flare over a very detailed part of the image can cause problems in retouching.

Here you see an example of this. I used the Patch tool to select the flare and drag it over the area to the right. Don’t worry, you don’t have to be absolutely accurate, because with the size of photos, any error you leave will be only visible at 100%, so not even if you print the photo.

Blocking the sun

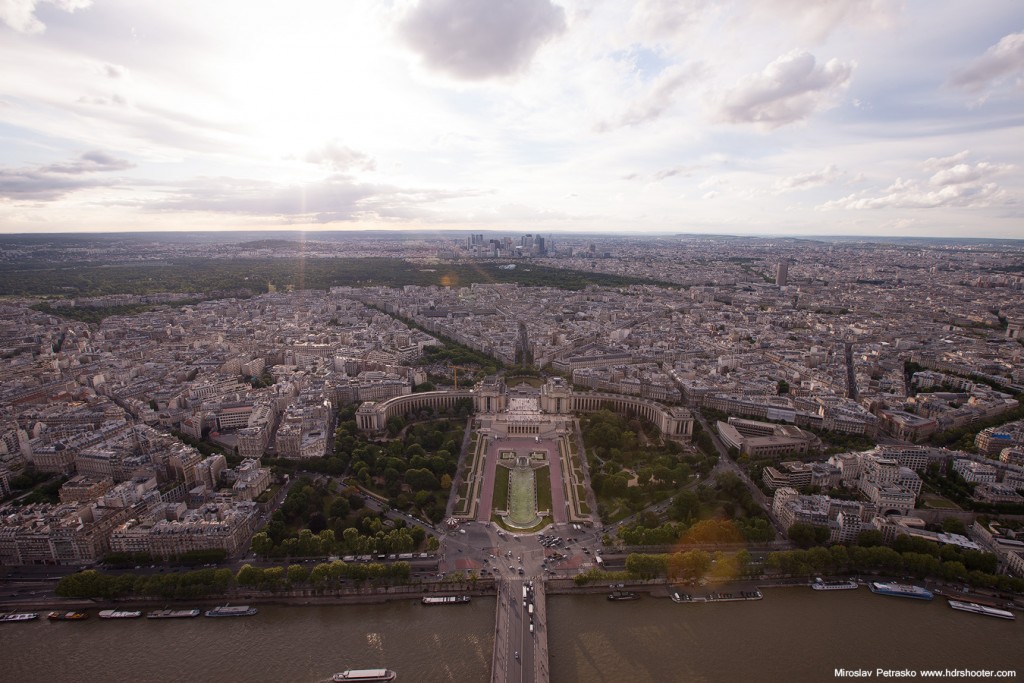
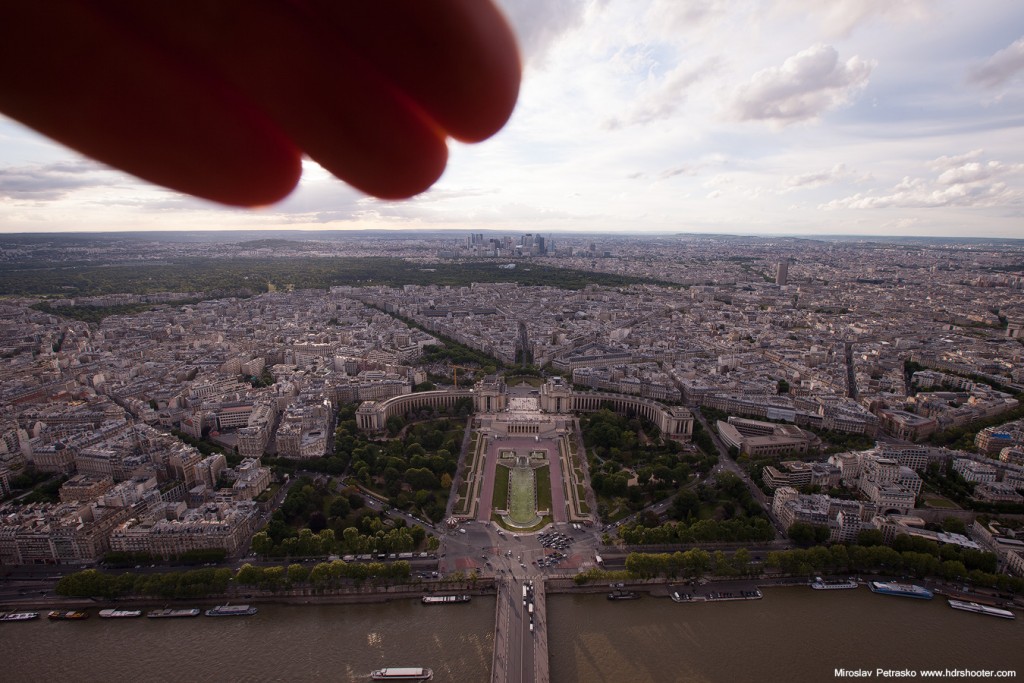
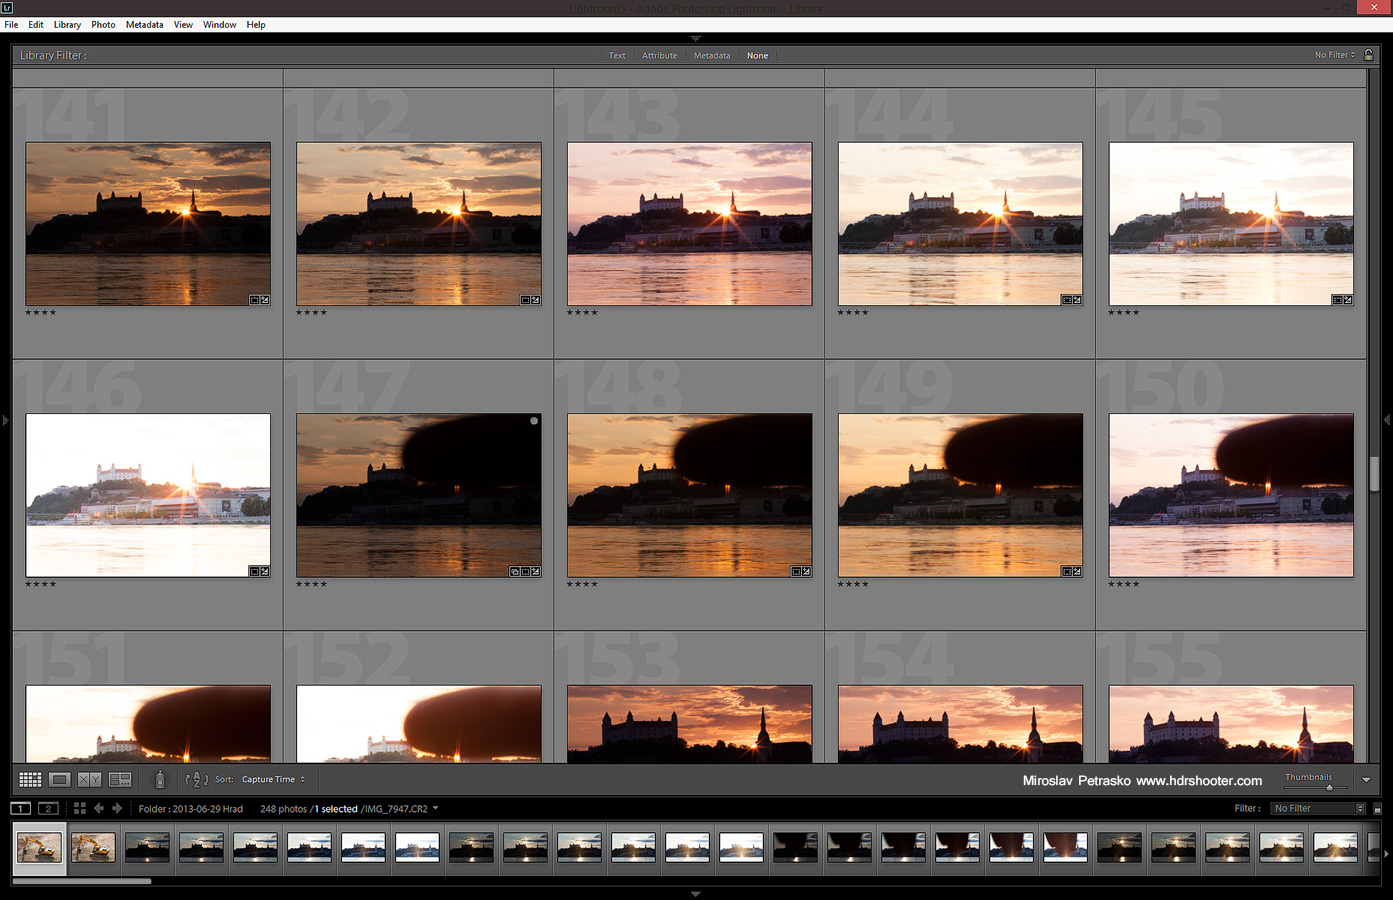
An advanced approach to dealing with lens flares, is to prepare for their removal right during the photo shot. This works for photos taken from a tripod, not so well for handheld shots. What you need to do, is shade the sun with your hand (or something dark) if its to the side of you camera, while taking the shot. If the sun is in your shot, than take two shots, one normal and one with your hand in front of the sun. This two should have the same settings, as you will need to merge them later. This works best if you are in Manual mode. Here you see an example of two such shots:

flare-example-1
flare-example-2

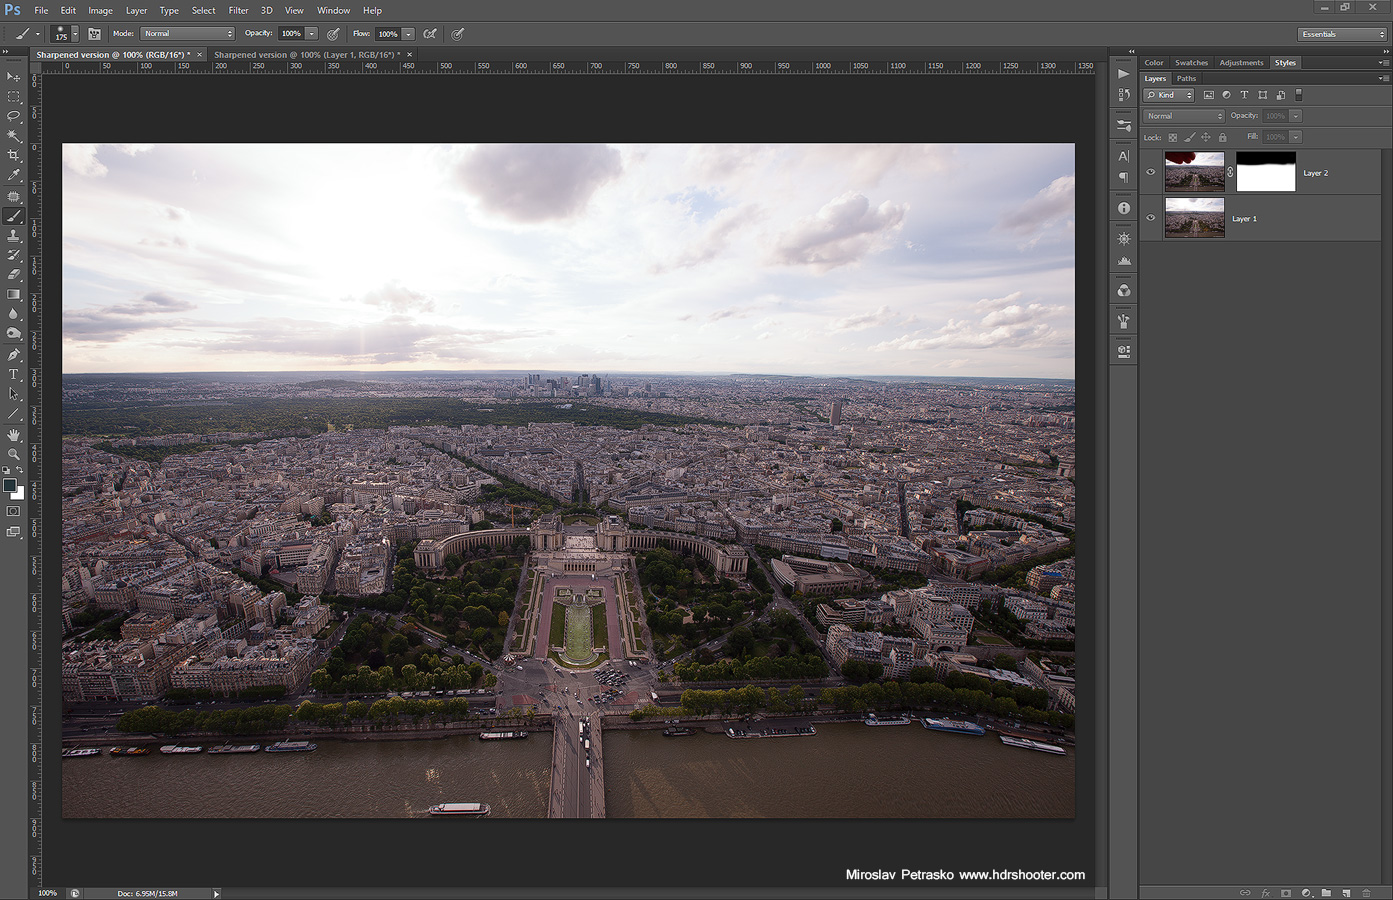
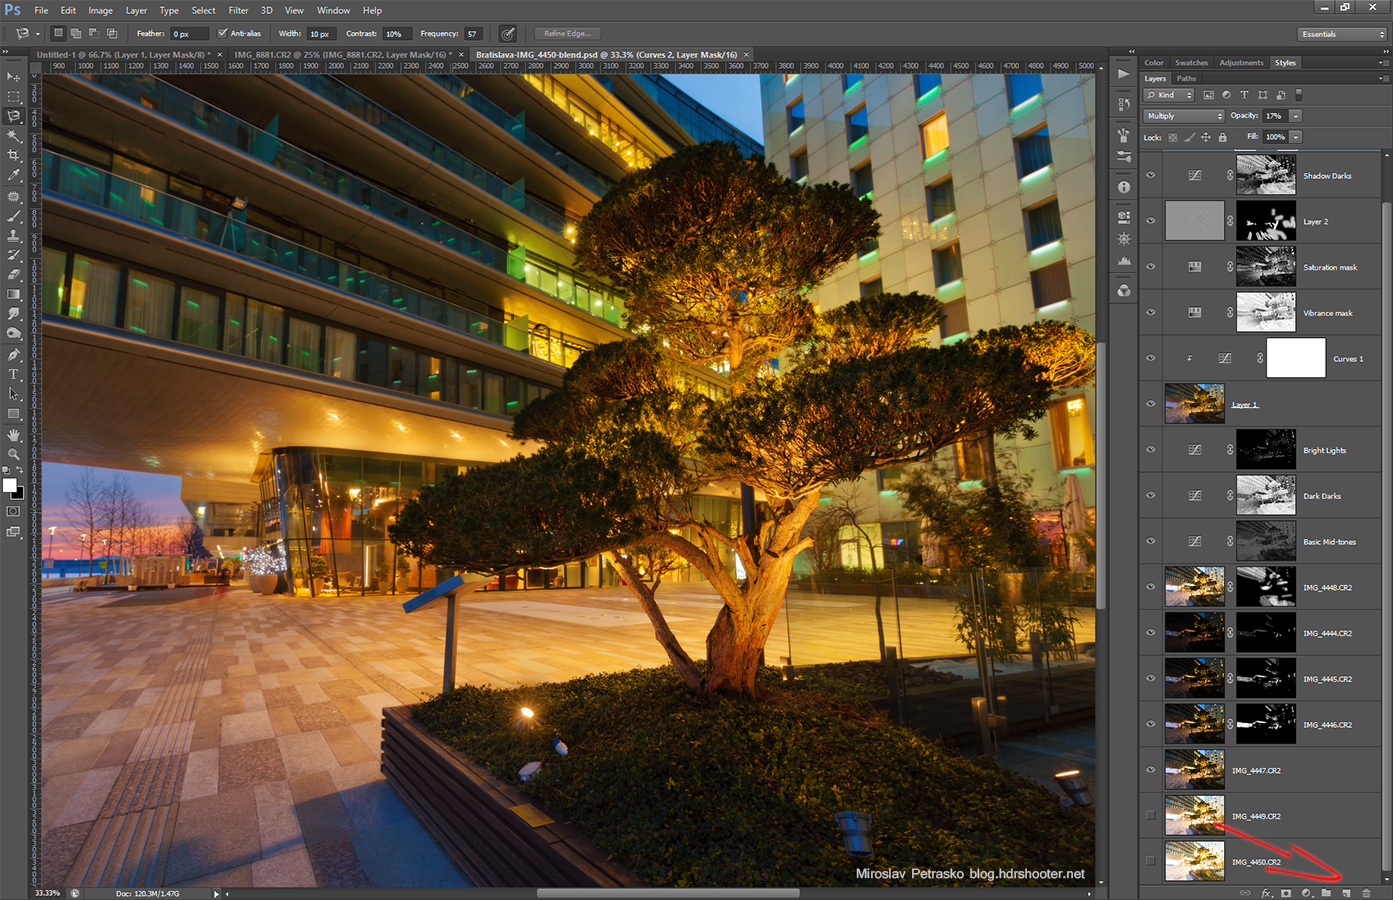
These you can then load into separate layers into Photoshop and easily using layer mask (check my tutorial on those here) correct the problem. Be careful with the color cast, as the shaded photo can be a little colder than the one with the sun. This can happen even if both photos have the same white balance and it  has to be corrected.
flare-blend

If you are doing a HDR bracket series, you do the same, you just take one series normally and one series with your hand in front of the lens. You usually need only one photo with the shaded sun, It just hared to say which one, so its better to take the whole series. Here you can see a sample series of this:
flare-set

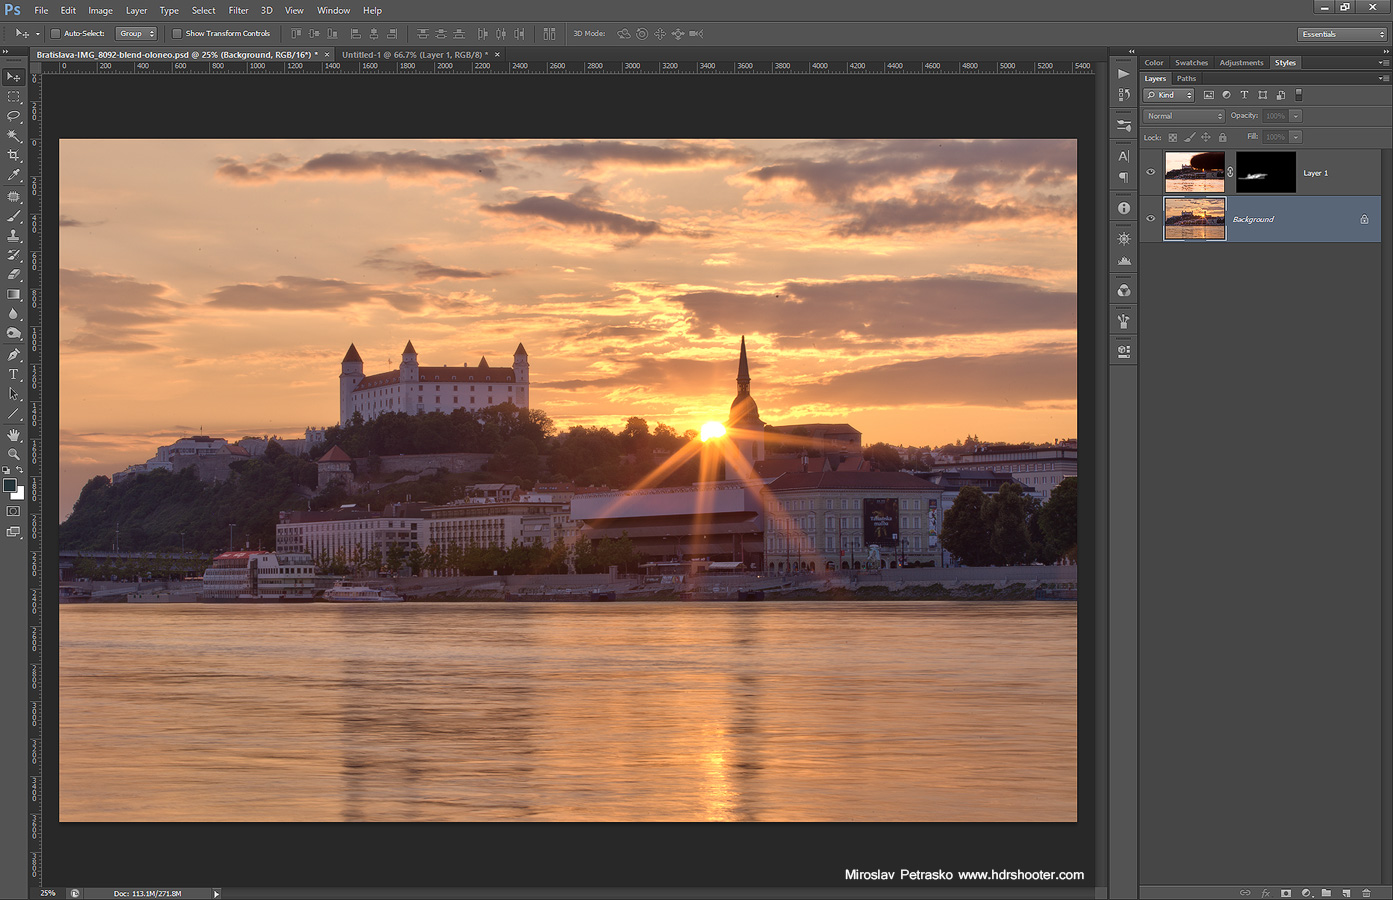
After that you continue as before, jut merge the normal exposures as you want (Oloneo, Photomatix, Manual blending) and then repair the lens flares from the shaded shot.
flare-blend-2

And here you can see the finished photo, nice and flare free :)
The setting sun in Bratislava

I prefer the third method, which gets all my photos flare free. I hope you find this guide useful, and if you have any questions, feel free to ask.

And here you have a video where I go through all of this together in one spot :)

On one of my recent posts, I got a question from Per Kaer why a lot of my photos use a big aperture (just to clarify, small number means big aperture, big number means small aperture), and since this is something I seen in many photography tutorials and books, I thought I clarify this in detail.

If you read any landscape photography tutorial, you will usually find that you should use an aperture of f11-f13 or even smaller, just to get everything sharp and in focus. But if you think about it, and learn how DOF (depth of field) works, you can get a good sharp photo even on a f2.8. And if you shoot a lot of evening and night shots, as I do, shooting at f11 just takes horrible amounts of time and the good light fades always really quickly.

So here are few points about sharpness and DOF, you have to think about when shooting:

1. Try out manual focusing. You can have the best camera out there, but it will never be able to focus in all situations. For instance in total dark, if there is at least a single light source in the scene, you still will be able to focus manually, by using a live view and zooming in onto the light. Also you know what you are taking photo of, not your camera

Rainy evening in Ljubljana

2. Focus 1/3 into the scene. That means that everything in focus, will be split into 1/3 in front of what you focused on and 2/3 behind. This gets some time to use to, but after some practice it will be natural for you.

3. The further something is from you, the bigger DOF you will have. So if you shoot a landscape that is far away, you can use f2.8 and it still will be in focus. For instance in the photo on the left, the city is quite far away from me, so apperture f4 was still enough to get everything in focus.

Franciscan Church in Maribor4. The wider the lens you use, the bigger the DOF will be. So if you use anything under 24mm (this is on a full frame camera, if your has a cropped sensor, please multiply yours by the cameras crop factor), you will get a reasonable DOF on f5.6 or bigger. For instance most of my indoor shots (like the one yesterday) are at f5.6 or f6.3 and I still have the whole room in focus. For instance in the photo on the right, apperture f6.3, but a wide angle used, so the whole church is in focus.

5. Most lenses are sharpest around 2-3 stops bellow there maximal aperture. That means a lens that is f2.8 at the maximum, will be sharpest between f5.6 – f8. For instance I know with my Canon 16-35 F2.8 that if I use f5.6, the photo is much sharper, than if I use f11.

6. Go for a small aperture only if you really need it. I can think of two situations here. One is you want to create stars from all the lights in your shots. So the smaller the aperture, the more distinct they will be. The second situation is when you have something close to you and you want it to be as sharp as objects far from you (I personally go with focus blending here, but just using small aperture is easier). But still think about it first, as small apertures introduce defractions and you gain a bigger DOF, but overall you will loose sharpness.

7. Smaller aperture means longer exposure time. And if you don’t use a custom firmware, it can also mean higher iso, as you have to compensate for the very long times. I almost never go higher than ISO 200 and rather go for a bigger aperture. Also I hate waiting for minutes for a single series to finish and if you use 5 or 7 brackets it can get into minutes very quickly.

There is one time when you have no choice but to use a smaller aperture, and that is when there is a lot of light available. In that case, you have no other choice, as the minimum time for a shot is limited by the camera hardware (usually something around 1/4000s).

Feel free to ask if you have any questions to this :)

You can’t start doing anything with Luminance masks without first understanding masks in general. The concept of masks is very simple, but can give you problems, when you are only starting with them. So lets take a look at them.

Photoshop layers

Lets go from the start. Everything you do in Photoshop, you should do in layers. This means that all you modifications are stacked up onto each other and you are looking on them from top, seeing just whats on the top.

In Photoshop you can see your layers on the right side (by default), and there you can also find the new layer button in the bottom right.
photoshop-masks-01
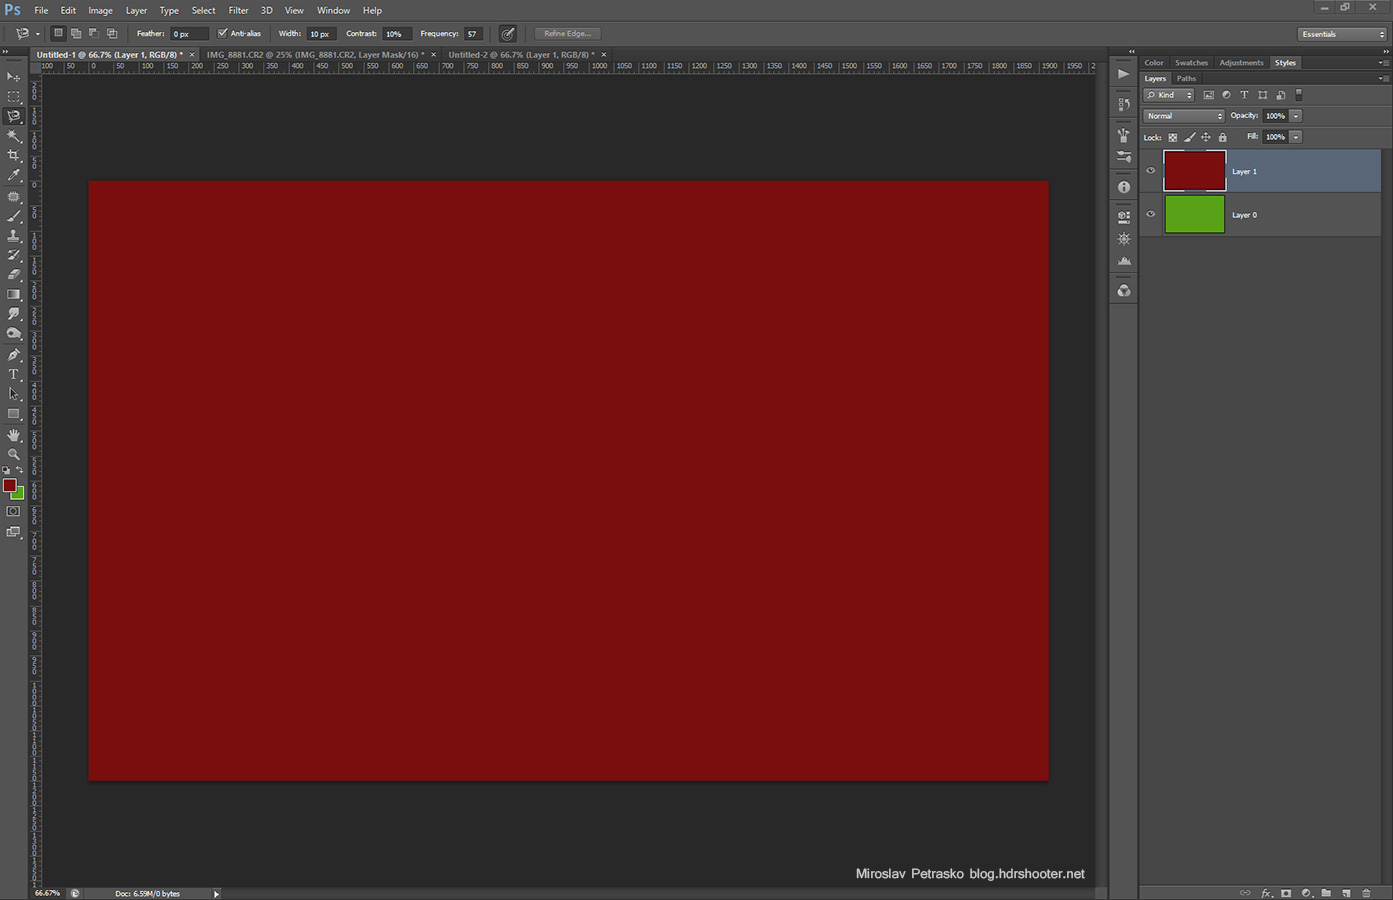
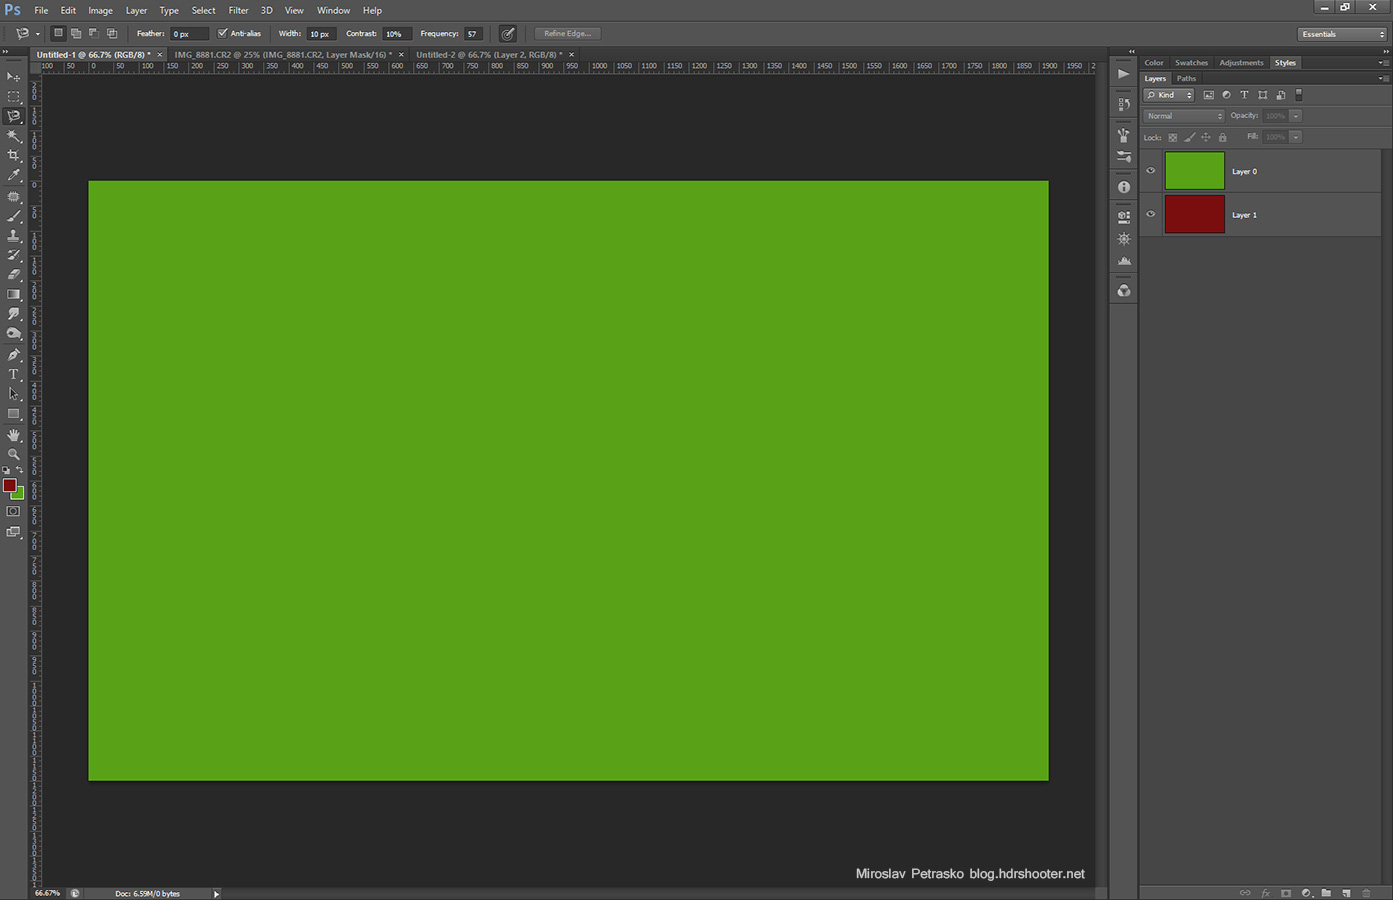
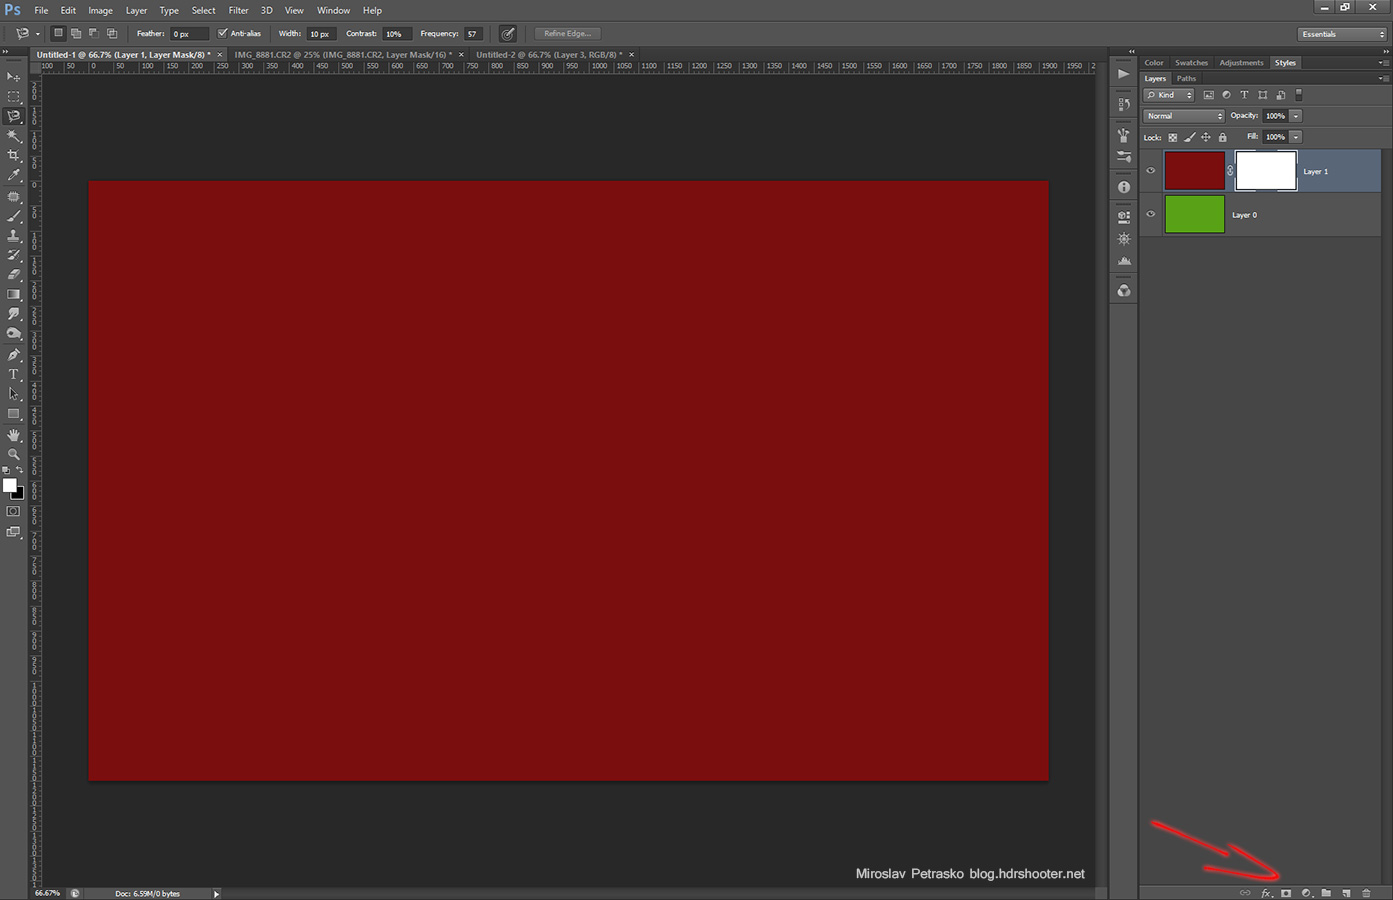
Let’t see how they work. If we create two layers, one filled with green and one with red, we will see that the image wee see is just the top layer, with the bottom one being completely hidden.
photoshop-masks-02
You can also move the layers around, and you will see that you always just see the top one (you can’t move the background layer, but if you double click on it, and confirm the dialog that opens, it will be changed into a normal layer).
photoshop-masks-03

Layer masks

Sometimes you need to see more than just the top layer. And this is where the mask comes in. You can imagine them as templates, showing where the layers should be cut out. Lets add a mask to the top layer using the add mask button in the bottom right.
photoshop-masks-04
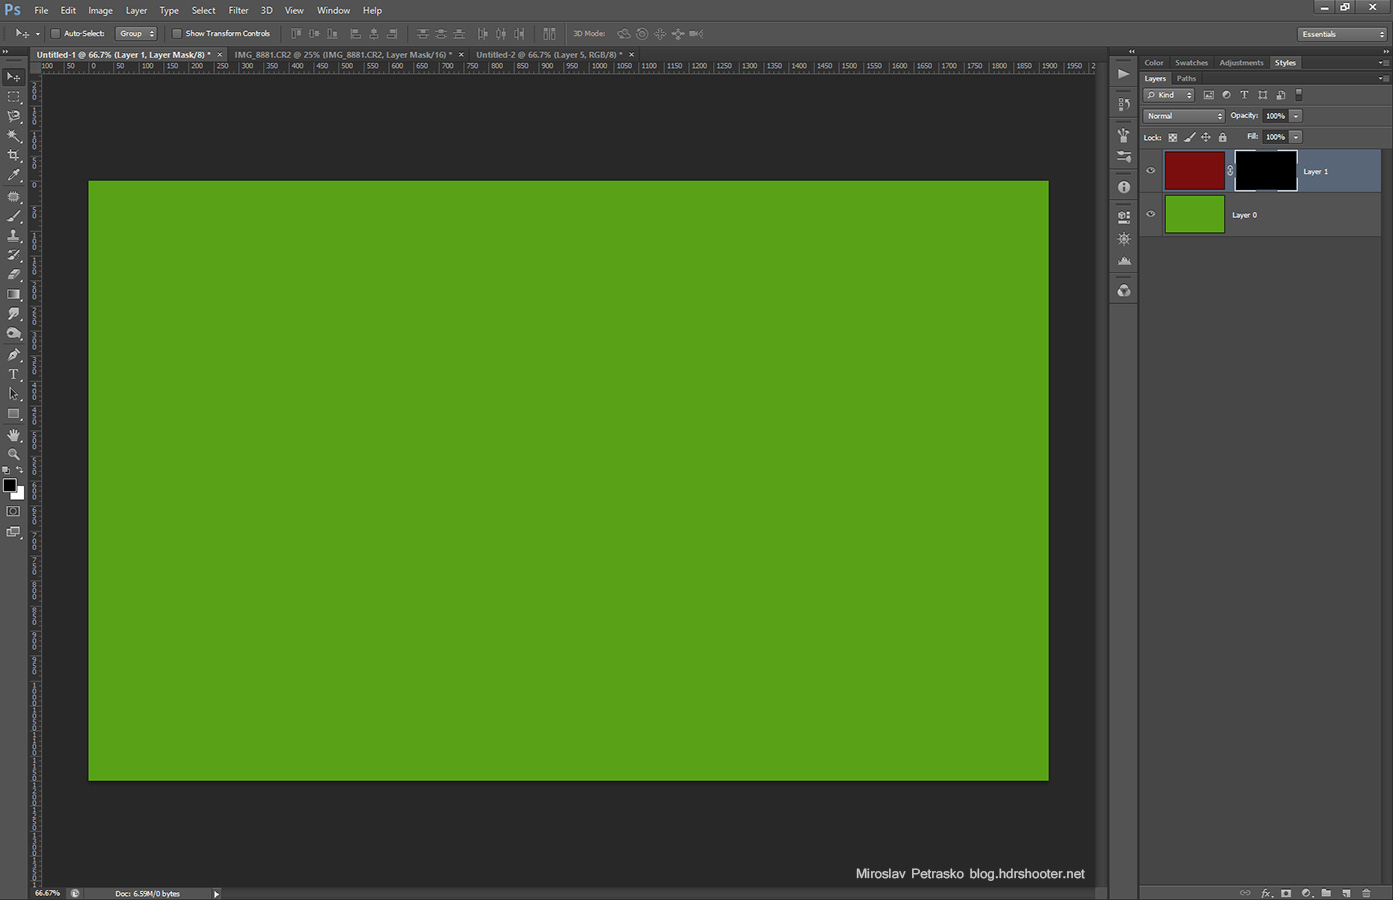
And as you can see, nothing changed. This is because the the mask is white. White means that it’s empty. If we stick to the cutting template, white means – nothing cut, black means – hole. If we make the mask completely black, we wont see the layer at all, as we cut out everything. To make your workflow quicker in the future, you can remember that if you hold Alt while clicking the add mask button, the new mask will be filled with black.
photoshop-masks-05

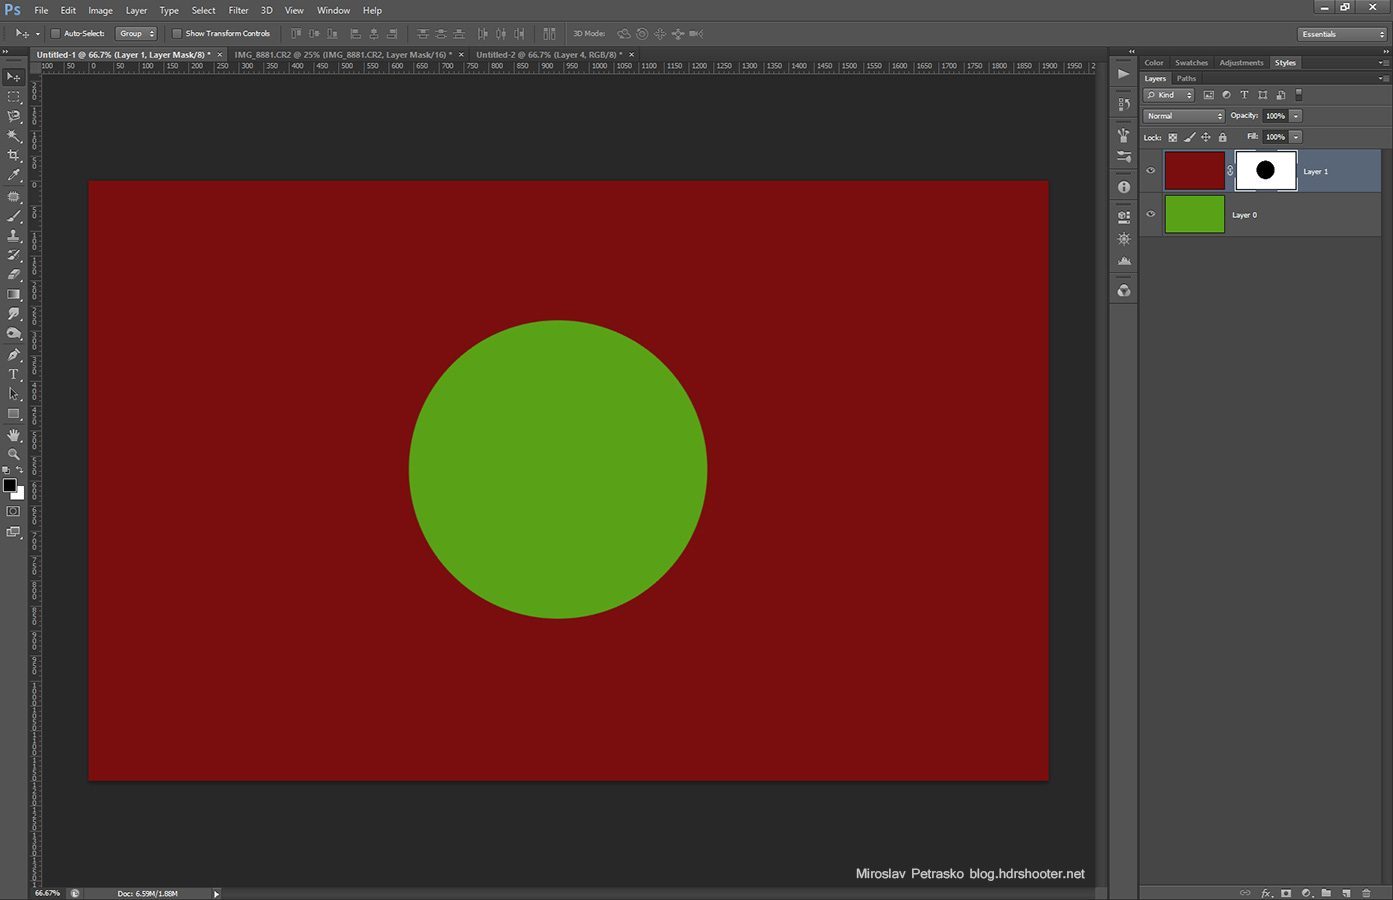
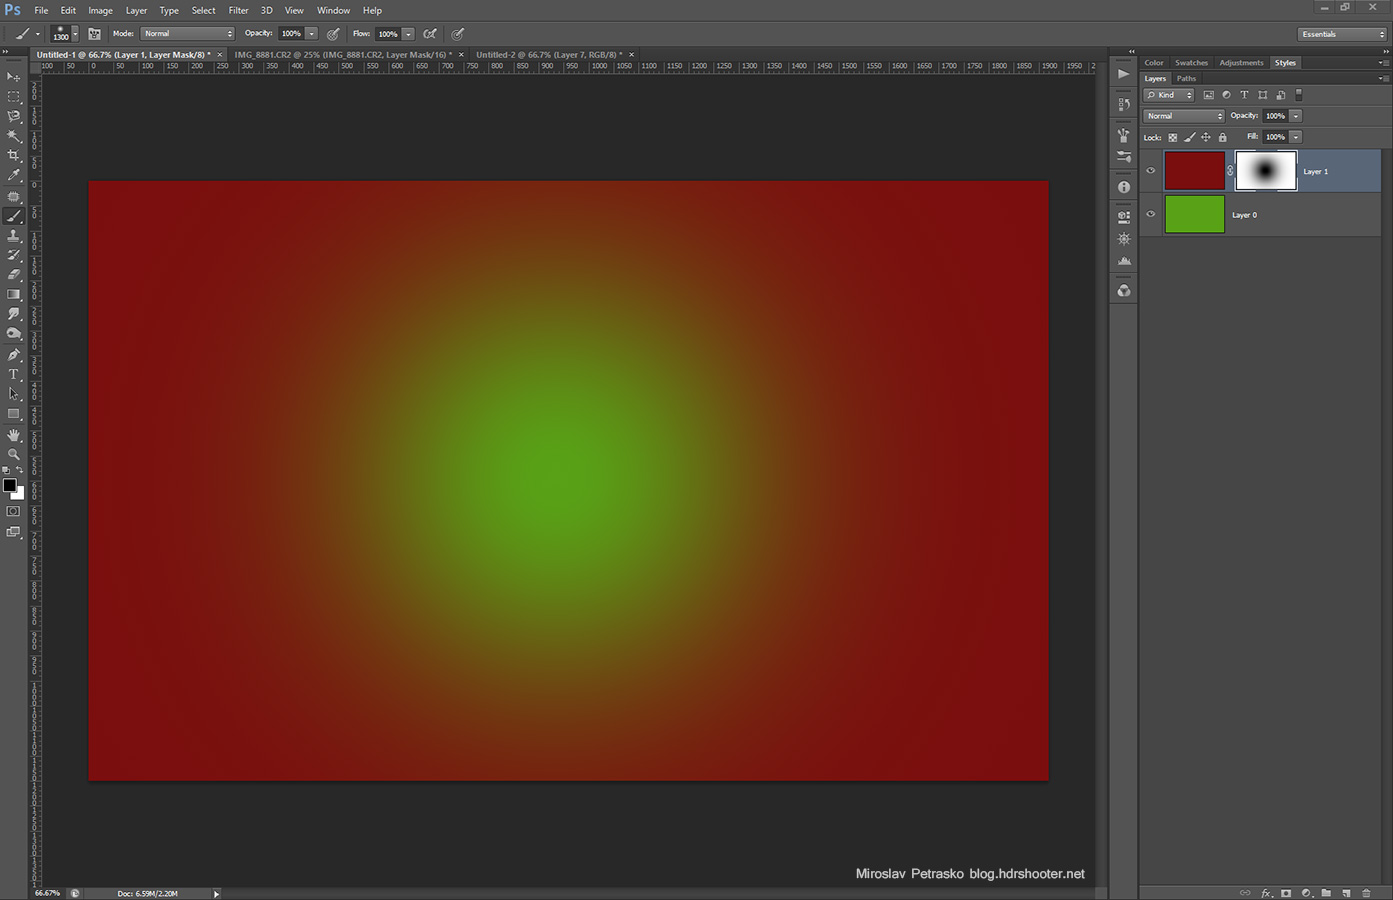
You can work on the masks the same way as on a normal layers. All the tools work there. When we take a brush and just make a big black dot in the middle, we will just see through the area that is black, and for everything else there is just the top layer. So it looks like we cut out a big hole in the top layer.
photoshop-masks-06

A little side tip. If you just want to see the mask, hold the Alt key and click on it. If you want to disable the mask, hold the Shift key and click on it. If you just want to select it, just click on it. A selection rectangle will be shown around it.

Gradual masks

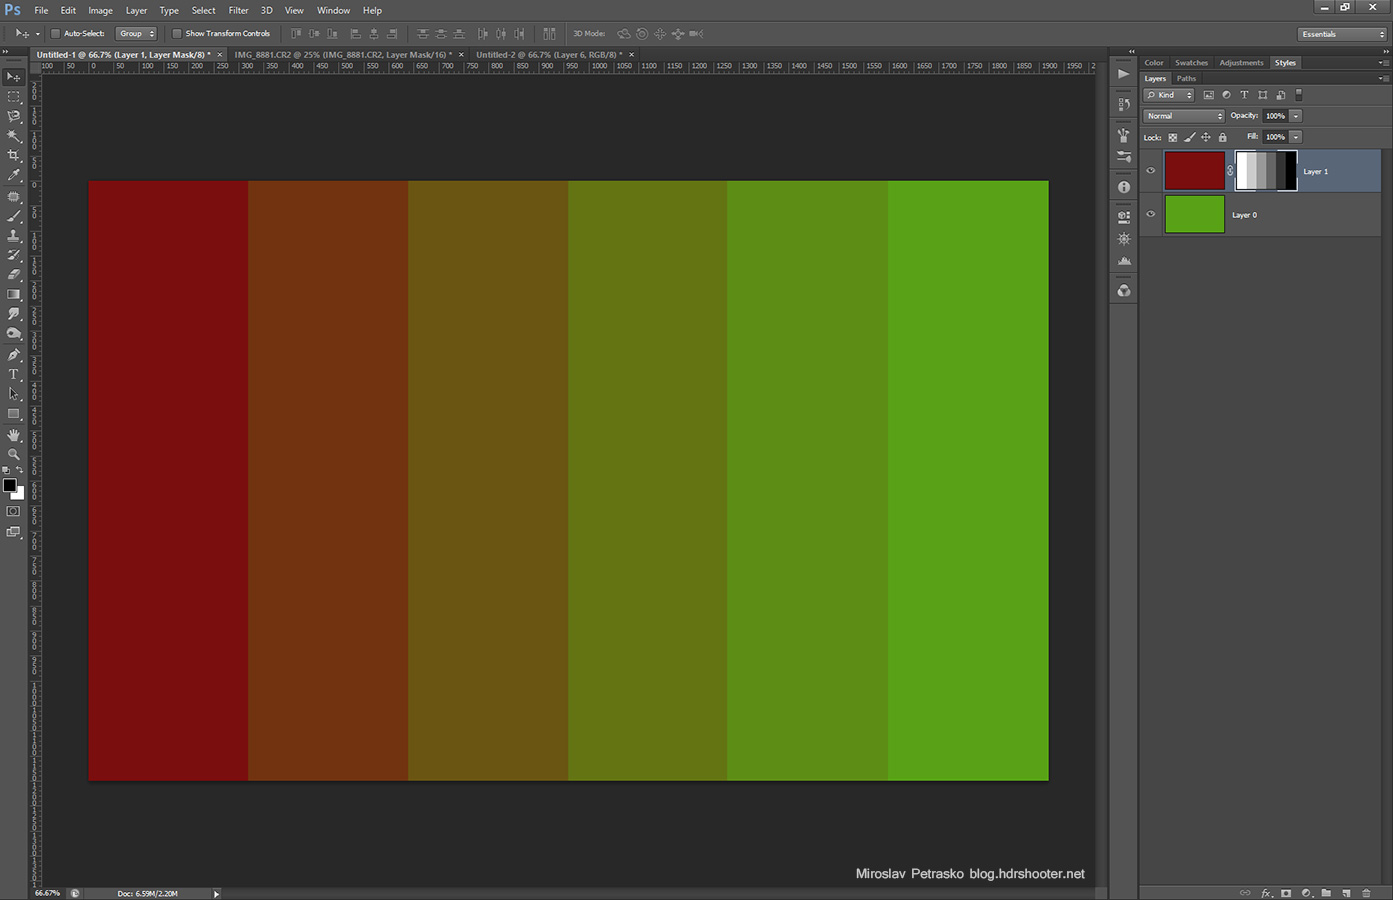
Until now we only used a white and black masks. But what happens if we used a shade of grey? The top layer will be added to the bottom one, based on the brightness of the grey we used. The darker the grey, the less will be added, the brighter the more. You can also think of it like this. The closer the grey is to white, the less its see through, the more it is to black, the more it’s see through.

Here you can see the effect of white, different shades of grey and black. The darker the color, the more of the bottom layer you see.
photoshop-masks-07

This graduation is great, when you need a soft transition between two layers. Using a gradient, or a soft brush here, will make the transition soft, more natural looking.
photoshop-masks-08

Image blending

Even with these basic masks, you still can blend you images. It works great for photos where you only need to replace a specific part, like the sky and don’t have any complicated structures.

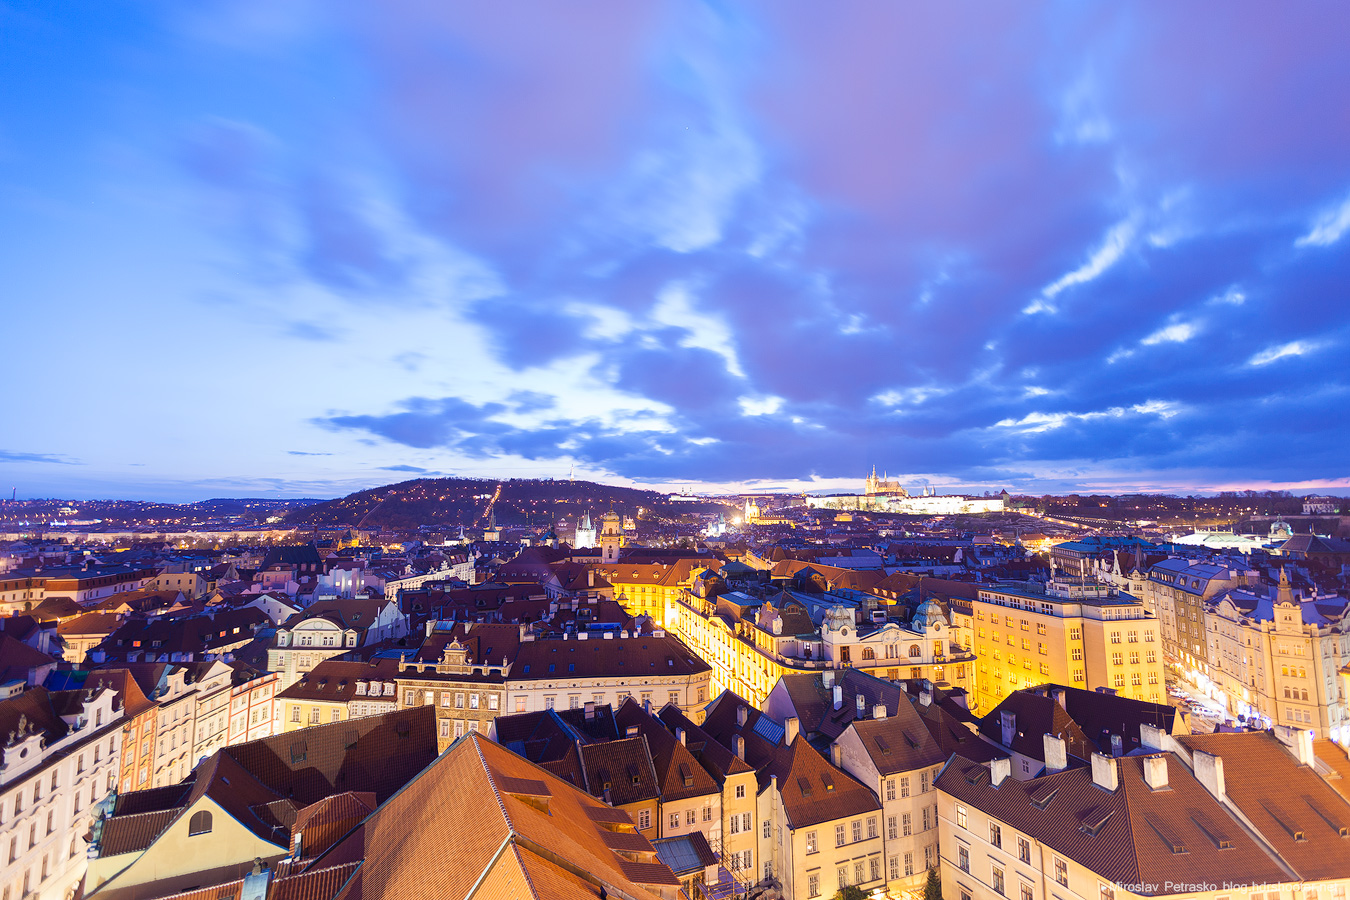
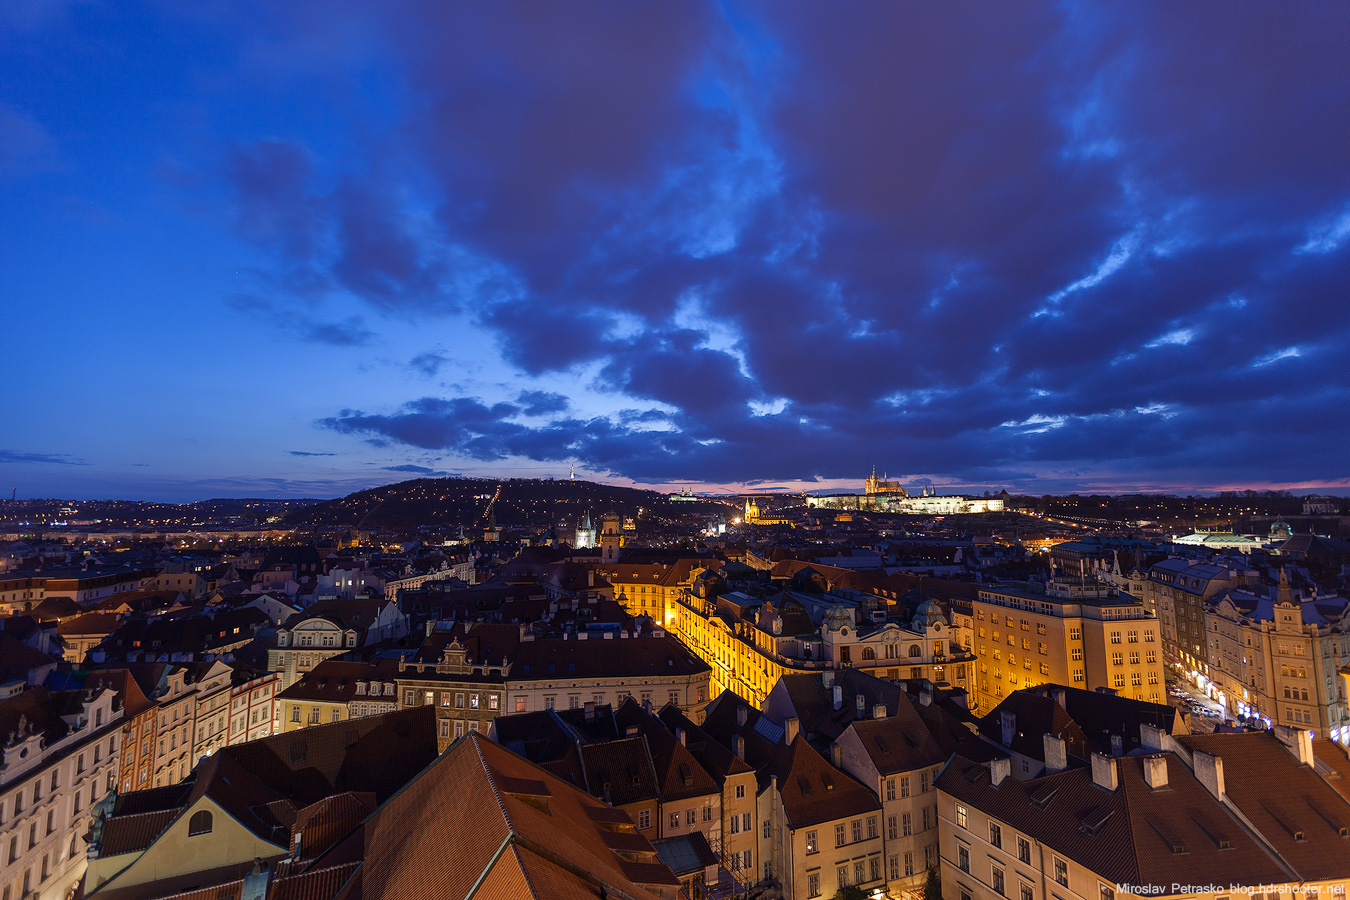
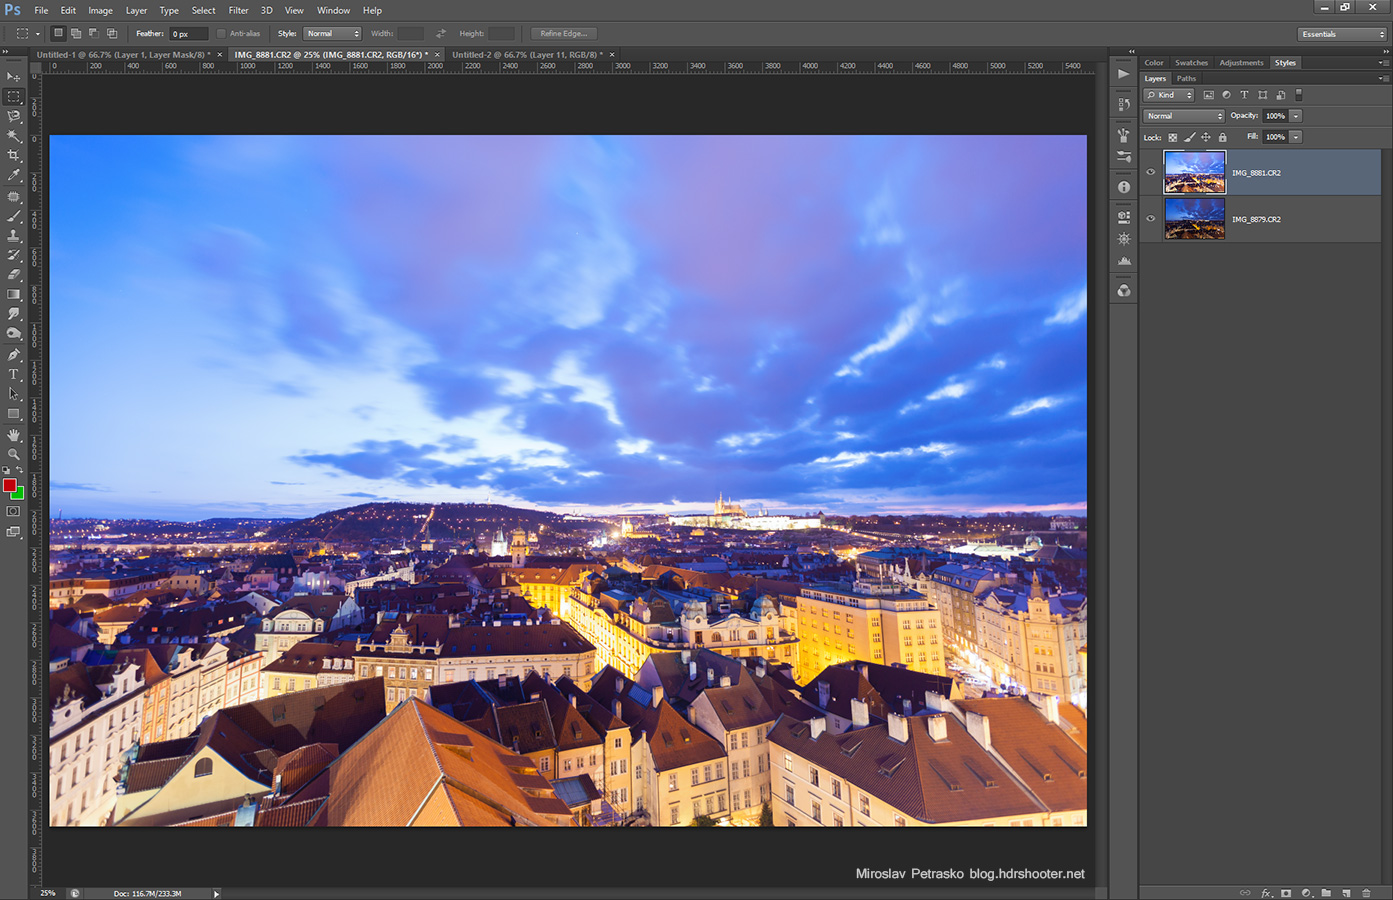
So let’t take these two photos as an example. Let’s say I like the sky from the darker shot and the buildings in the lighter shot.

photoshop-masks-09 photoshop-masks-10

What I can do, is to load these two images into Photoshop, and move one into other, so I have them both in two separate layers.
photoshop-masks-11

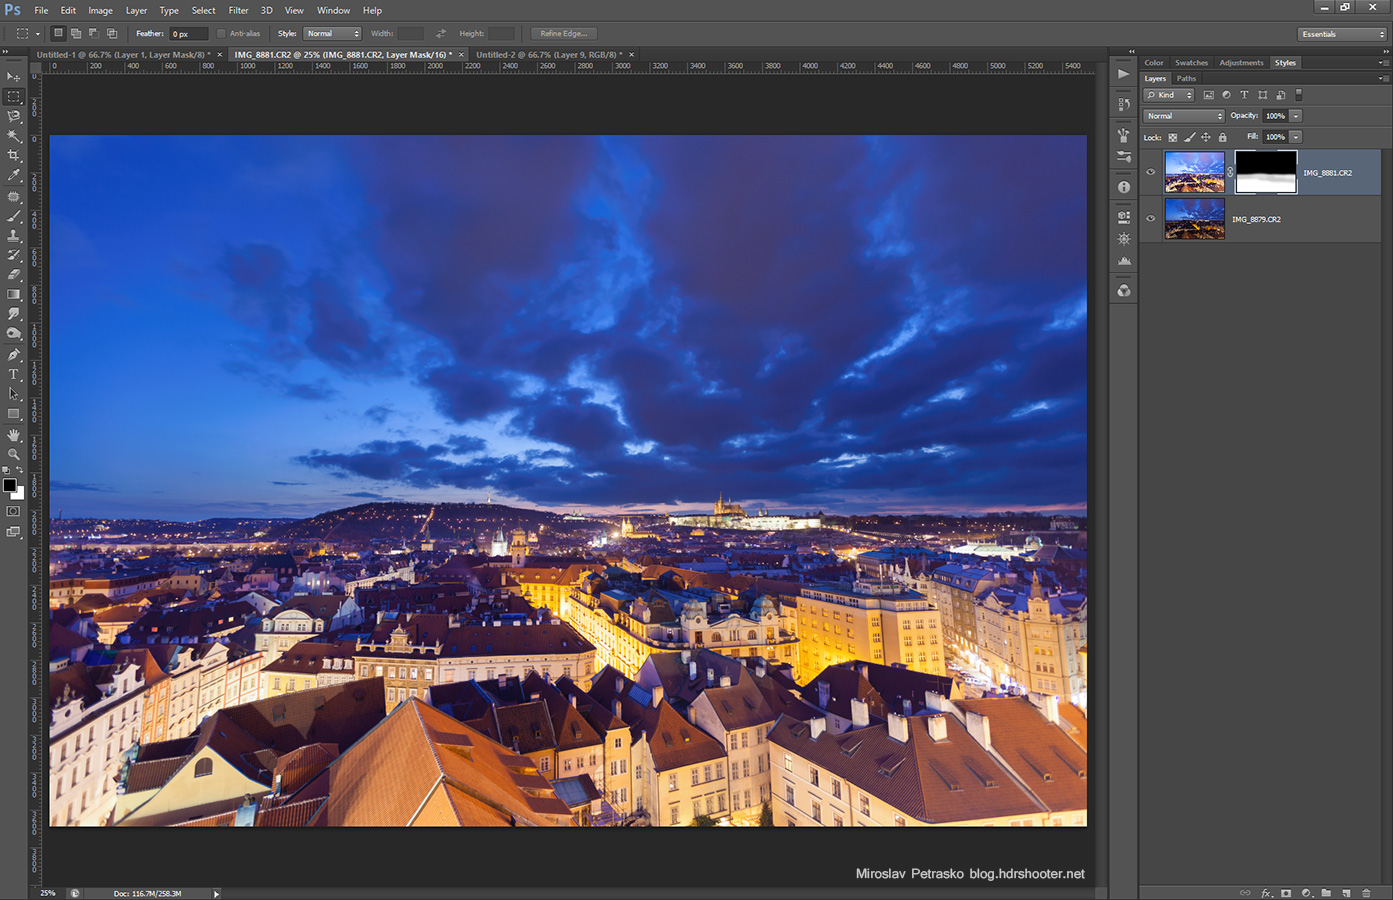
Now if I add a layer mask to the top one, and start painting in it, revealing the bottom one. And since the horizon is quite straight, I can get a quite even blend here. If I go to much, I just switch the brush to white and remove parts of what I painted. Or I can change the transparency of the brush, to make it softer.
photoshop-masks-12

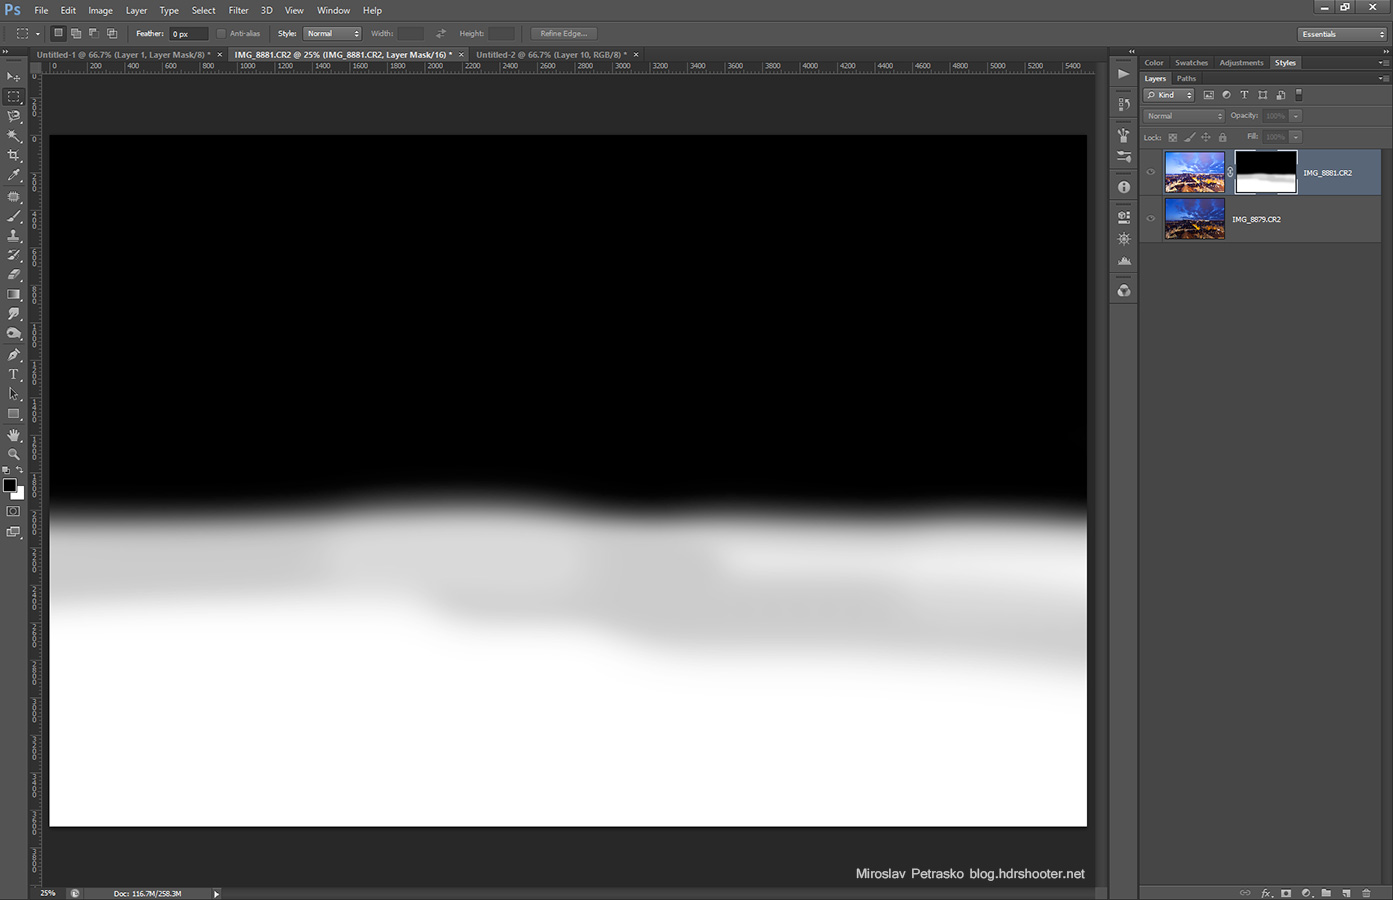
And here you can see the mask I used
photoshop-masks-13

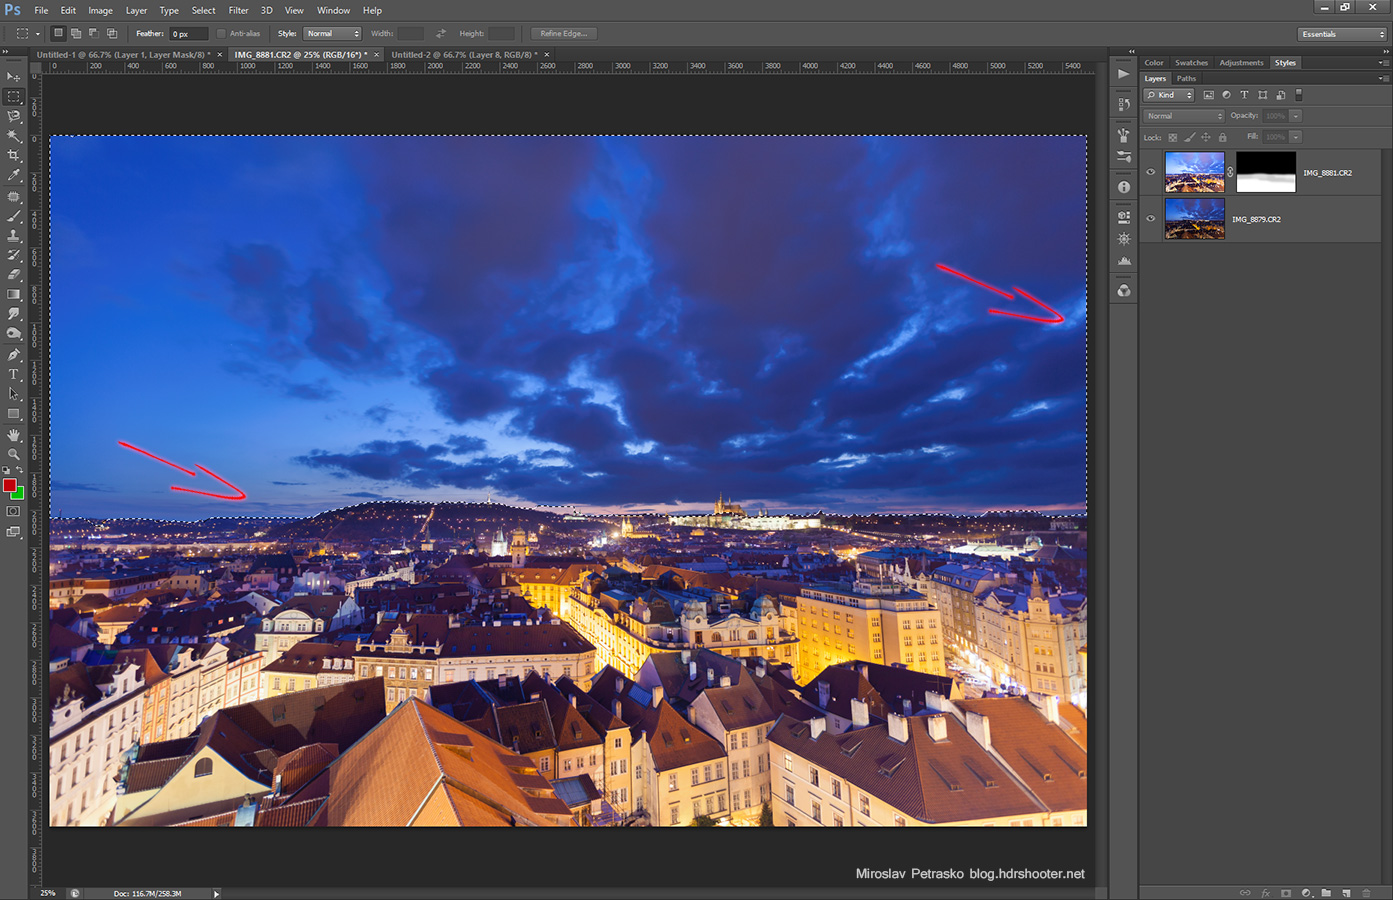
You can also create a selection using any of the selection tools (lasso, magic want …) to limit where you paint. For instance here I could have selected the sky with the magnetic lasso tool, and paint after that, so I know I won’t paint over the buildings. Lumiance masks are an advanced way of getting these selections, and in the next part I will show you how to create them.
photoshop-masks-14

And that’s all about masks. I hope this made sense and if you have any questions, feel free to ask.

Page 24 of 26« First ...102023242526
FREE EBOOK!!!
Subscribe to my newsletter and get a free Capturing fireworks ebook. 
Subscribe