Taking panoramas without a panoramic head

I have been posting and also taking quite a few more panoramas recently, so today’s post will be about those. To be exact about if you really need a panoramic head, and if you do when. Also, how to take panoramic shots without one.

What is panoramic head?

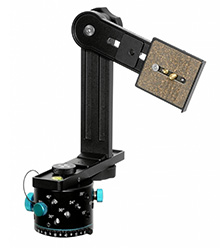
A panoramic head, is quite a big tripod head, that has two main functions. First is to move the sensor back from the center of rotation, so you avoid paralax shift (will explain in a moment what it is). The second is to allow you to rotate the camera horizontally and vertically in exact increments.

With it, you can get a perfectly shot panorama, with every photo in exact increments from each other. For big and multi-row panoramas you just have to have one. The photos will align perfectly every time if you use one.

I do have one, but use it rarely. It’s just to big and heavy to carry around all the time.

What is a paralax shift?

If you ever moved you camera, you have seen it. When you move your camera horizontally, the objects that you see move also horizontally. But you may have noticed, that things that are closer to you move much more than the ones further from you. Like this, their relative position towards each other changes.

So what effect this has? If you take two photos for a panorama, but he positions between objects in the photos changes, they will not blend nicely or at all. The reason for this is, that you are rotating your camera at the spot where the sensor is. To avoid this, you would need to rotate the camera around the spot in the lens, where the light bends (nodal point). There is a mark on most of the lenses to identify where this is. If you rotate the camera around this spot, there will be no paralax shift at all.

When do you need a panoramic head?

So since the panoramic head can help you remove the paralax shift, you need it in situations when that is a problem. These are:
– when you have something very close to the camera. The closer, the more paralax shift you get
– when you are shooting with a very wide or a fisheye lens. Both of these types of lenses (mostly anything under 20mm) add to the depth of a scene, and with this add to the paralax shift.
– when you are doing a too big of a panorama. If you are doing a very huge panorama, it’s easy to miss a spot or just forget where you started. A panoramic head will help you to get all the shots you need without problems.

For this photo I used a panoramic head, as it’s a huge 9 shot panorama and it made it easy to get all the shots properly.
Taking panoramas without a panoramic head

When you don’t need one?

So you don’t need one in all other situations. Especially if what you are taking a panorama from, is further from you. There will be a small paralax shift, but it will not effect the final photo at all. Here are few tips for taking panoramas without a panoramic head:

– zoom in. Shoot at least at 20mm or more. I you zoom out, it can happen that the panorama will not blend.
– use manual mode. Getting all the shots with the same settings is important. Meter the scene to get you camera settings, and then use manual mode to get all the shots.
– use manual focus. You don’t want the focus to change in between shots.
– use a tripod. This is a must. You can get panoramas handheld, but they will never be the same as from a solid tripod.
– either do bracketing, or set exposure based on some average spot from your scene. If the panorama goes from bright area to a dark, it’s best to set the exposure based on something in between them.
– turn on the build in leveling in your camera. If it shows up on the camera screen, it’s easier to move the camera horizontally without moving it up or down.
– do multiple panoramas. Never do just one shot, do multiple. Bigger chance you get one right.

This panorama was taken without a panoramic head. There was nothing close to me, so it was not a problem.
Taking panoramas without a panoramic head

If have, you can also use a tilt-shift lens to create panoramas, and you can read more about here.

Photos on Instagram

I always hated how hard is to show bigger photos on Instagram. The limitations there on aspect and size are quite big, and a lot of my photos just don’t fit. It’s just hard to show them off in the best way. So recently I started cropping my photos into multiple versions and sharing those on Instagram, so today I will show you how I do that in Photoshoop. It is possible directly on a phone, but I feel like the results are not as good.

Cropping photos for Instagram

The maximum size of a photo on Instagram is 1080x1350px. I like to have the photos as big as possible, so I use this resolution for them. It also works quite well on modern smartphones.

I create three versions:
Cover photo – a crop from the full photos, showcasing the most interesting part, as a single image in 1080x1350px resolution
Full photo – a crop where I add white space around the photo, so full photo can be showcased
Split version – a crop into multiple photos, that shows the full photo and visitors can slide between the parts to see it.

Cropping photos for Instagram

Like this I think I get the best options of sharing the photo. Those who only scroll by will see the cover photo mostly, those who are interested can swipe through the other and see more.

Cover photo

This one is simple. Choose the crop tool, put 1080×1350 into the ratio box in the top left (or 4 to 5, as it’s the same ratio). Then just move and resize the crop box as you need for your photo and hit enter. Now you just need to resize the result to 1080×1350 and maybe apply some sharpening. I like to do this with TK actions, but any way is fine.

Cropping photos for Instagram

Full photo

Go back to the original photo. Before cropping, change the background color selection to white. This is so after we crop, Photoshop fill the background with white. Just hid the D key to reset the colors. Choose crop with the same ratio as before. Now hold down ALT key and drag on one of the corners of the crop box to make it bigger. Do so until the sides of the crop box snap onto the sides of the photo. Hit enter to confirm. Now resize to 1080×1350, sharpen and save.

Cropping photos for Instagram

Split version

This one is a bit more complicated. First you have to decide into how many parts you want to split the photo. It really depends on the photo. A normal non-panorama shot works best when split into 2 parts. For a panorama you would need more. But it’s easy to just try out different option.

Return to original image. Choose the crop tool, and for the ratio calculate your width based on the number of slices. So if you want 2 slices it would be 2160×1350 (or 8×5), for 3 slices 3240×1350 (or 12×5) and so on. Just look at the crop box and choose one that best fits your image. Confirm with enter when you chosen.

Cropping photos for Instagram

Now we will add guides to the photo, to see where we need to slice it. Go under View/New guide layout and in the window that opens choose Columns and then write in the number of slices you want. The guide lines will show up. If you don’t see them, go into the menu under View/Extras or hit Ctrl+H to toggle visibility.

There are multiple option how to save the slices now, and I will show you two. First one is using the crop tool. Choose it, set the ration back to 1080×1350 (or 4×5) and move the crop box until it aligns wit the first slice. It will snap to the guide lines automatically. Now crop, resize and sharpen and once you save, undo it all with the history window, until you are back to the guide lines. Then just repeat for every slice.

Cropping photos for Instagram

The second option is the slice tool. If you hold down the left mouse button on the crop tool selection, it will give you the option to choose slice tool. Then just create slices by using the guide lines. Each time you create one, there will be a little number in the top left corner of it. One you you have all, resize the photo so it’s 1350px in height and sharpen it afterwards. Choose File/Export/Save for web and once confirmed, it will save every slice as a separate photo.

Cropping photos for Instagram

Now you can post everything to Instagram. Check my profile to see how I do it here. While this is a bit of work, one can do it quite quickly. And if one makes big photos (as I do) this makes them look much better on Instagram :)

Removing lens flares

I did an article a long time ago, about removing lens flares. There I suggest two options. Removing them using Photoshop tools, or by creating a second photo where you shade the sun and then blend them together. But sometimes one forgets, or you just don’t notice the flare until you load the shots into your computer. So what to do then? Today I will show you something I do in those cases from time to time.

Removing lens flares using multiple photos

So this was my situation. I did not notice the flare in this photo. The sun was a bit to the left here, and with no clouds in the sky, it was so bright, I could see nothing on the camera screen. But as you can see there few are big flares and on spots that are not easy to correct in Photoshop. So what to do?

Removing lens flares using multiple photos

What I did was use a photo, that I took from the same location, but with different settings, that did not have flares on the same spots. As long as you did not move too much between the two photos, you can align them, even if you zoomed out or in. All you need is that the same area is in both photos. You can try to align manually, but Photoshop align layers function can work very well here.

Removing lens flares using multiple photos

Here I used a much wider shot, and while this one also has flares, they are on different spots. I loaded both photos into Photoshop. The one I wanted to fix placed on bottom. Then I locked the layer (choose layer and click the lock icon above the layer list). Now I could align them without distorting the one I want to fix. I just chosen both layers (holding down CTRL and clicking on each layer) and aligned them using Edit/Auto-Align Layers and choosing the Auto projection.

Removing lens flares using multiple photos

This was the result. I cropped the layer now, to get rid of the extra part I did not need (CTRL+click on the bottom layer thumbnail, and then Image/Crop to crop based on selection). Now by using a mask, I just hid the top layer with all black mask. Using the brush I painted with white in it, where the lens flares were. There is one more thing to fix, and that is to match the brightness and the color of the corrected areas. Her I used brightness/contrast to brighten the area and color balance to make it a bit warmer. You have to use the adjustment layers as clipping masks, so they affect only the layer under them (Alt+Ctrl+G with the layer selected, or Layer/Create Clipping mask).

Removing lens flares using multiple photos

And with the lens flares fixed, one can continue with further edits.

Double processing

With yesterday’s photo I mentioned that I used double processing, where I edited the photo twice and then blended the results. And I thought I show more about that. So today I will show you how exactly I edited that photo. So here goes.

First since it is a panorama I combined the shots together in Lightroom. As you can see the result, the photo is a bit bland. That normal, as it’s an undeveloped RAW file. They tend to be quite bland.

Double processing

I started with the first edit. Changed the white balance to make a more warmer photo, opened the shadows, darkened the highlights and added more vibrance. As you can see, the result was already quite nice. But since the lighthouse is white, the tweaks to highlights and shadows made it look dirty and too dark.

Double processing

So here where the second edit comes in. First I exported this one into Photoshop of course. For the second one I focused only on how the lighthouse looks. I removed the highlights and shadow tweaks, and I added exposure until the lighthouse was as bright I as I wanted it to be. As you can see this edit is really overexposed in most areas, but that’s not a problem as it will be blended into the first one.

Double processing

So when I had both, I opened both in layers, hidden the brighter one, used the want tool to select the sky, inverted the selection and painted over the lighthouse. Then I finished it with tweaking the opacity of the second layer, so it nicely matches the background.

Double processing

You can see the resulting photo in this post.

And that’s it :) You can do as many edits of a photo you want and then just blend them like this afterwards. In HDR this is used when doing a single RAW HDR, when you create multiple version of the same photo by under and over exposing it, so creating the other brackets needed. But that a quite ineffective approach. Rather edit the shot by focusing on the result you already want, but in just a selection of it.

Selective edits in Color Efex

Color Efex is still one of the best photo editing plugins you can get for Photoshop, and with the recent DxO update, we hopefully will also get new features in it soon. But what I noticed is, that many times it’s filters are being used on the whole photo, where it’s very easy to be much more selective and use the filters only when there are needed. And you don’t have to do it with Photoshop with layers, but right inside Color Efex. So let’s have a look at it today.

Control Points

Each time you add a filter, you will see the control points under the filter settings. There are two options, + or -. You choose the one you want, and place it where you want it. If you choose the plus one, the filter opacity will be changed to 0% and only affect where the control point is. If you add a minus one, the filter opacity will be set to 100% and it will be removed where the control point selects.

On each control point you can change it’s size and opacity of filter. You will notice, it does not effect the whole selected area the same. This is because it works differently. It samples the area under the center point of the selection and then only affects all similar areas inside the selection. This works similarly as the wand selection in Photoshop.

Selective edits in Color Efex

If you click on the little triangle next to the Control points text, few more options will open. First you will see all the applied control points and you can turn them on and off. You see what size of the filter they apply, and if you click on the little square next to that, you will see the selection they effect.

There is also an opacity slider. This is the opacity of the filter effect overall, on spots that have no control points. The plus and minus actually adds or subtracts from this opacity. It’s actually easier to use just plus or minus, not both at the same time. Makes it less confusing. Just set the overall photo you want, and then just remove where it is too much. I do it that most of the time.

Selective edits in Color Efex

You can add multiple points quickly, just by holding down the Alt key and dragging a point. That will duplicate it with all it’s settings. You can also group points, that when you modify the fist one, all are changed.

When to use them?

There are many cases when to use this functionality. For instance, you want to use the polarization filter but it adds color to more things than the sky. Just use it, and then add the plus control points on the sky only. Like this that will limit the effect.

Or you want to add a lot of local contrast to one area, but not to other. Like in this photo of fireworks, I wanted more detail in them, but nothing else. So I used tonal contrast filter with high settings and using a plus point, I added it only on the fireworks.

Selective edits in Color Efex

There are many other situations, and I think you will find them yourself quite quickly. Btw. in the screenshots you can see which filters I set to be in my Favorites, that means I use them the most :)

Page 6 of 26« First ...56781020... Last »
FREE EBOOK!!!
Subscribe to my newsletter and get a free Capturing fireworks ebook. 
Subscribe