This is a little teaser for those who still haven’t gotten my eBook on how to take fireworks shots. This are the first 4 pages of the book (it’s 26 in total) an it free for everyone. To get it, you just have to sign up for my newsletter, and in the confirmation email you get a link for download. And you don’t even have to be scared that you get a huge number of emails, as I usually post one only every 1-2 months :)

So check out these pages, and if you would like to read further, head over to the newsletter page to subscribe :) (or it can be done in the right sidebar).

Capturing Fireworks
Capturing Fireworks
Capturing Fireworks
Capturing Fireworks

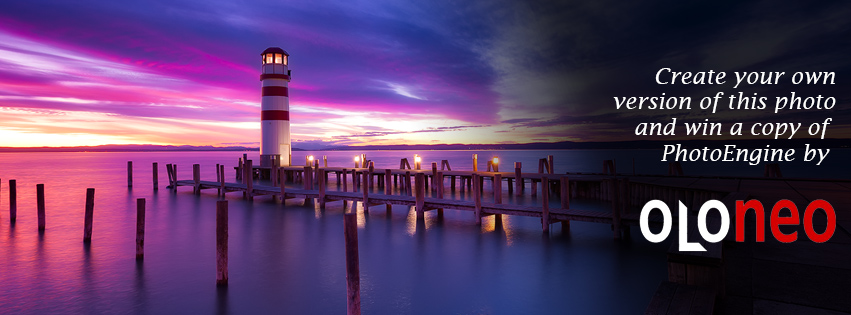
And don’t forget about the contest, still 8 days to join :)

The time to submit a version has ended, and the voting is in progress in this Facebook gallery. For those who missed the deadline to post your entry, please keep an eye on the blog, there will be another round sooner or later :) 


Thanks to Oloneo software I have for you another round of my editing contest. Again you get a chance to win a copy of their great HDR editing program Oloneo PhotoEngine. If you don’t know PhotoEngine, I really suggest you try it out, as it’s one of the simplest and best HDR editing programs available. You can also see in a lot of my recent photos, that I used it to create the initial blended images, as it creates a very natural look.

You can find all the information on Oloneo and their products here: http://www.oloneo.com/en/page/home.html
and you can find a trial version you can try right away here: http://www.oloneo.com/en/page/download_form.html?product_id=pe1&type=trial
(there is no Mac version available, but you can run it in a virtual machine)

I will also provide two copies of my Master Exposure Blending tutorial as prizes.

So when you are done playing with it, here is how you can enter the contest. For those who joined already one of my other contests, the rules will be very familiar, as they are the same.

contest-cover-r4

How to join the contest

1. read the complete rules first :)
2. download the provided series of brackets showing a nice sunset at the Neusiedler see in Austria here from Dropbox
3. edit them into a final HDR photo (you can use any software and any technique, tone-mapping, blending, exposure fusion, black&white version)
4. join the contest event here https://www.facebook.com/events/1447780392128154/ and post your photo into the event or send the final edit to me, under miroslav.petrasko@gmail.com with the subject “HDRshooter contest”

Only one entry per person is permitted. Please don’t use parts of any other than the provided photos. If you post your photo to the event page, you can delete your submission and upload a new one. If there is more than one from a person, the last one is entered, all other will be deleted. If you are one of the winners from the last rounds, you are not eligible to win.

contest-brackets-r4

Winners

The winners of Oloneo PhotoEngnine will be choosen by:

1st one by a jury of great HDR photographers, Elia Locardi from BlameTheMonkey, Beboy from BeboyPhotography and Dave Morrow from DaveMorrowPhotography

2nd will be selected by fans on Facebook, where everyone can vote for their favorites, once all the entries have been submitted. This voting is not in the event.  Sharing of your entries further to promote them is permitted, but entries with fake likes will be disqualified.

In both cases the person who places 2nd will receive a copy of the Master Exposure Blending video tutorial.

The latest time to submit you entry is 18th May 2014 at midnight. The voting on the winner will be held during the week from 19th to 25th May 2014 on the HDRshooter facebook page. The winners will be announced on the Monday 26th

I hope you will all have fun editing and good luck to you all :)

I reserve the right to change or amend the competition rules at any time without prior notice. By entering the competition, entrants agree to be bound by these rules. All participants can’t use the final photo for any commercial use and have to give credit to me as the original author, also I will not use their versions for any purposes other than promotion of this competition. Participants can share the photo on their FB, blog, flickr or other accounts, but still have to give me credit as the author and link back to the contest.


How about a process post today? Again I chosen a little more complicated photo, a vertorama. It’s only from two shots, but it nicely shows the whole process. So to get to this photo from Bardejovske Kupele, I did the following:
Spring is here

As always I started with loading all the files into Lightroom. There were 10 of them in total, but I could go with fewer of them anyway. I just took 5 different exposures to be sure I have enough.
Original

I corrected lens distortion and white balance and exported all as 16-bit tiff files. Those I loaded into PTGui, to create the vertorama blends. (this is explained in detail in the HDR panoramas tutorial)
PTgui

From where I ended with 5 vertoramas, which I then loaded in Oloneo Photoengine. There simply by changing the strength and contrast I got this result:
PTgui result

Continuing, I loaded all the vertoramas and also the Photoengine result into Photoshop, where I did the following edits (numbered from bottom up):

1. Oloneo Photoengine result
2+3+4+5. This is the vertorama created from the 0EV expsurs, modified for color and exposure and then blended into the Oloneo result. I needed to replace the sky, as there was ghosting from the moving clouds.
6. -2EV to darken few small parts
7. +2EV to brighten few ares
8. desaturated the grass and it looked too radioactive
9. Color efex Pro contrast used on the image to get more detail.
10+11. Added glow to the photo.
12. More contrast to the photo, but not on the darker parts of the building
13. desaturated oversaturated colors
14. nose reduction using Imagenomic Noiseware
15. little bit more contrast to the whole image

I also corrected the perspective using perspective crop, and cropped the image to remove the black areas.

Process

And that’s all I did with this image. To find out more on how I edit, check out the guides and before after categories on this blog, or check out my video tutorial series here:
banner-master

Haven’t posted a before/after post in a very long time, so I hope you will like this new one. I chosen one a little more complicated from the ones I took in Dubai, so let’s go :)

I took this image from the top of Burj Khalifa. This was the final image I had:
Through the glass wall

I started by taking two exposure series of 4 shots, from -2EV to +1EV. I usually take also the +2EV, but it was just not needed here, and it take a long time anyway. For the two series, once I focused manually onto the city and second time onto the glass wall in front of me. Here are the two 0EV exposures:
Original 2
Original 1

As always I started by loading all the shots into Lightroom, where I removed the lens distortion, chrome aberrations, a little noise and corrected the white balance.I also corrected the horizon line.
Lightroom

I then exported all the files into 16-bit Tiffs and created two HDRs with the same settings in Oloneo Photoengine. From there I got this two images:
Original 2
Oloneo 1

Then I loaded this two files, together with the original images into Photoshop and did the following edits (layers numbered from bottom up)

1. the HDR from the photos focused on the city
2. HDR created from the photos focused on the glass with a manually painted mask to blend in the top and bottom part, and most of the sky
3+4+5. 0EV focused on the city, with a saturation and brightness modifier, from with I painted in parts of the roads, that had movement in them. The saturation and brightness were needed to adjust the look to fit into the HDR.
6. -2EV focused on the city to darken few bright spots
7. just a merged copy which I needed to be able to use Color Efex pro
8. Color Efex Pro contrast filter, but used a mask to remove it from few bright areas where it overexposed them too much.
9. Color Efex Glamour glow filter. I use this one when the photo has too many sharp details, and I want to soften them a little.
10. Added contrast to the whole image using curves
11. De-saturated magenta colors on a part of the image, where it was too distracting.
12. More contrast to the middle part
13. Played a little with the brightness
14. And once more a little more contrast to the whole image
15. Corrected the overall colors of the image, made it more cooler and greener.

Process

And that’s all I did with this image. To find out more on how I edit, check out the guides and before after categories on this blog, or check out my video tutorial series here:
banner-master

For today’s process post, I chosen this shot, just taken one sleepless night from the balcony of my flat :)

Armageddon

So lets take a look at it :) I started by taking 84 exposures for the star trails. That all looked like this:
Armageddon

That I first loaded into Lightroom, where I corrected the lens distortion, vignetting and white balance.
Armageddon

Then I exported them and loaded all into layers in Photoshop, that I set to Lighten mode to get this:
Armageddon

Then I followed with these edits (layers numbered from bottom up)
1. The combined image from all 84 exposures
2. Recovered the buildings from one of the exposures (I didn’t liked the lights the merging created)
3. Color Efex pro contrast on the sky to add more contrast and detail to it.
4. Added more contrast to the sky
5. Removed noise from the buildings
6. Added detail using High pass filter
7. Color balance to cool down the buildings
8. Added more contrast overall
9. Merged layer with few passing planes removed from the sky
10+11. Added glow to the photo

Armageddon

And that’s all :)

FREE EBOOK!!!
Subscribe to my newsletter and get a free Capturing fireworks ebook. 
Subscribe