Last day of the giveaway
Tomorrow is the last day you can join my Oloneo Photoengine giveaway, so if you have not yet joined, this is your last chance. You can find it on the contest page. It’s also the last day to vote for you favorites in the editing contest, so head over to the contest album and give a like to your favorites.
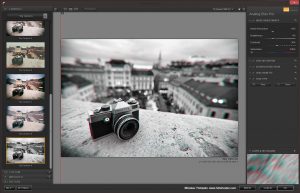
Nik Analog Efex Review
To continue my additions of reviews to this blog, there is a new review of the Nik Analog Efex Pro plugin. This is the latest addition to the Nik plugin collection, and one to give you that popular vintage look.
Castle an the bridge
The Bratislava castle is a very dominant landmark in Bratislava. You can see it from so many spots. But it also is hard to come up with a new view, I haven’t used before. But this time I found one. I went to the Port bridge, and took a photo with my longest lens. I was hoping for a nice reflection of the bridge in the Danube, but as it was a quite windy day, I had no luck with that. But that only means that I will have to revisit the spot :)
This is a HDR created in Oloneo Photoengine, then blended with original exposures.