Free HDR video tutorial

Free HDR video tutorial

MASTER EXPOSURE BLENDING

Find the best ones

Find the best ones

TOP PHOTOGRAPHY SPOTS

Free wallpapers

Free wallpapers

HIGH-RESOLUTION WALLPAPERS

povkit10

POV kit review

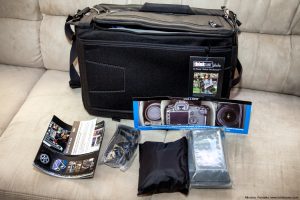
I added reviews for almost all the gear from Peak Design I have, and few days ago I added the last one. This time its a review of the POV kit, an addition to the Capture clip. Find out more about it in the review.

More Power Xtreme

As I mentioned yesterday, I really need some new photos. So for today, I again looked back into my photo library, and chosen to edit a photo from late 2011. It’s hard to think that it is already more than two years ago :) But still, even two years later, this is one of my favorite rides. I love how it gives the feeling of weightlessness for a moment. To bad I haven’t been on one for such a long time. Who knows, maybe this year :)

This is a manual blend from 4 exposures. I used parts from two different bracket series, as I took two with the same settings.
More Power Xtreme

The Photographer’s Ephemeris

Some time ago I mentioned tablet/phone app’s that I use to determine the sun position. And today I noticed that The Photographer’s Ephemeris also has a desktop version, and it’s totally free. So if you are looking for a way to determine the sun/moon position, you can give it a try. It can be downloaded on the The Photographer’s Ephemeris page.

Under the green light

I so need to plan another photo trip. And really soon. I’m running out of photos that I could edit. Of course I still have a lot of photos I haven’t posted, but not many of them I want to post. They are just not good enough. And then there are some that are great, but are similar to photo I already posted. So I also don’t want to post those :)

So wish me better weather than it is now, or a really long trip soon :) For today another older photo of the Old bridge in Bratislava. This is a HDR created in Oloneo Photoengine and finished in Photoshop.
Under the green light

hoya-1

Hoya ND400 filter – review

For those interested in a neutral density filter, I have put together a short review of the one I use, the Hoya ND400 9-stop ND filter. You can find the review here, or you can find all my reviews on the Reviews page.

Winter’s day in Bojnice

Where is the snow? That I was in Bojnice in December, was just a coincidence, as we stopped there on the way back to Bratislava. But if there was snow, this could look so as from a fairy tale. Like in Frozen :)

Still this photo is a little less colorful than my other photos, but every time I added more saturation, it felt fake. I try to give a photo a look of what I have seen, and it just didn’t feel right. This is a manual blend in Photoshop from 5 exposures, using luminance and painted masks.
Winter's day in Bojnice

New blog address

Maybe some of you already notices, but from yesterday the address of this blog is no longer blog.hdrshooter.net, but a new one, www.hdrshooter.com. I planed this change for a long time, and I hope it makes the address easier to type and also easier to remember :)

Of course the old address will continue to work, it will just forward you to the new one.
.com

In the metro

I’m still feeling sick, so another quick edit today. This time it’s a photo from Prague metro. I used a stronger noise reduction as usual on this one, as I wanted to get rid of the smaller details, to give it a more cleaner look.

This is a HDR created from 2 exposures in Oloneo Photoengine and then blended with one of the exposures in Photoshop.
In the metro

For this weeks process post, I have for you something a little different. In this one I will show you how to create this blurred effect in Photoshop. It quite simple, and it can create a really interesting result.

So to get a result like this:

Faded away

I started with this photo as the base. It’s one of my older HDR, and this effect also looks best on scenes with trees.

Original

So the first thing I did was to duplicate the layer. On this new layer I used the Motion blur (Filter -> Blur -> Motion blur) and played around with the values until I got the look I wanted.

Blur

Next I added a mask to the blurred layer, and using a black soft brush at 100% I brushed over the parts where I wanted the original photo to show through. Then I changed the opacity to 30% and softened the transition.

Masking

That actually makes the whole effect. But I also suggest running a filter like Color Efex Pro contrast, as the blurred version will be lacking in the contrast area.

Contrast

And that’s it. If you give it a try, and create an interesting result, feel free to share your results in the comments :)

FREE EBOOK!!!
Subscribe to my newsletter and get a free Capturing fireworks ebook. 
Subscribe