My favorite lenses

Every photographer has their favorite lenses they prefer to use. And it’s not different for me. So today, I will share with you that which three lenses are the favorite from the ones I use. Feel free to share in the comments which ones are you favorite :)

Canon 17mm f4 TSE lens

The Canon 17mm f4 TSE lens is quite an unusual one. Tilt shift lenses, while quite popular with architecture photographers, are not that widely used by other ones. But they are just so great. Not only you can correct perspective distortion in your photos, but you can get views that are normally just not possible. I personally just love to do vertoramas with it, especially of tall buiding while standing really close to them (you seen many photos of the Eiffel tower like that on the blog :))

One of the points I think about, while taking photos, is to take a unique photo, that nobody did before. It’s not really easy if you do landscape and architecture. And using a less used lens, can help you with that, buy giving you a bit different view. That also a reason that I like to do so many panoramas and vertoramas.

Here is one of the many vertoramas I took with this lens.

Canon 24-70mm f2.8 lens

This is my basic go to lens. It could have been a different lens, like a 24-105 or any other with a similar range. It’s just something you grab when you don’t know what you need. The range is good for 90% situations and it just works well. Also making panoramas with this lens without a panoramic head works perfectly.

There is a so called lens trinity in photography. A wide angle (16-35mm or 14-24mm lens) a normal lens (24-70mm) and a zoom lens (70-200mm). With this combination, you will cover a very huge range. But do you need them all? Probably not. It all depends on what type of photos you do.

Let me give you an example. I have a 70-200mm lens. I carry it with me only about 10% of the time, only when I’m sure I will need it. If I need to zoom in, I have the 24-70mm lens, and since my camera is 30Mpix, I can easily crop quite a lot. So If I zoom into 70mm and crop down to 15Mpix, it’s the same as having a 140mm lens with me. This is of course not enough in all cases, but it works well most times.

Here is one of the many panoramas I took with this lens.

Laowa 12mm f2.8 lens

The last of these three is the Laowa 12mm f2.8 lens. It’s the latest lens I bought so the one I have been using for the shortest time. I love doing wide angle photos. And the wider you can go, the better. It’s quite common with architecture and city photos, that you just can’t move further back from something. There is just no place to go. And where sometime a tilt shift lens works better, it’s not all the time.

This ultra wide view of the world is just so different to what most of other lenses and cameras capture. And the more
different it is, the more I like it.

Here is one of the photos I took with this lens.

So these are currently my favorite lenses, and if I go out taking photos, these three are mostly in my bag. Which ones you carry with you?

It has been 6 years since I poublished the Top photography spots in Bratislava page. So it’s time for a bit of an update.

I have spend many hours taking really a lot of photos around the city and so here are my favorite spot. As you will see I prefer spots a little away from the main center and including my two favorite subjects, bridges and reflection :) You will notice the Bratislava Castle is in a lot of the photos. It a very dominant part of the city center.

To see all my photos from Bratislava, check out the Bratislava category

Don’t forget to check out other available lists:

Top of the SNP bridge

If you can go to only one place in Bratislava, go here. The view of the city is just stunning, there are no windows blocking your shots and after sundown you can have the place completely for yourself :) You have to pay an entrance fee (7.40 euro currently), but I think it’s worth it. Parts of the bridge are currently under reconstruction, but the top is still accessible.

Bratislava city center
The stunning view

Bratislava Castle Fortifications

The opposite place to the previous spot. From here you have a great view of the SNP Bridge (New Bridge). If you didn’t know, the New Bridge is the smallest tower in the World Federation of Great Towers :) . Too bad the view of the city is obstructed by trees, but the view of the Danube is great.

Night Bridge
White Castle

Tyrsovo Nabrezie (Waterfront)

I love this place, as I can get a very nice reflection of the castle, when the Danube is calm. Great place during the sunset and blue hour. The whole path between the New and Old bridge gives you hundreds of different compositions you can try. Also there is a docket ship, which you can enter (there is a sign No Entry, but as long as there is no festival or something similar on the waterfront, nobody will stop you, but please be careful :) ), and get a unobstructed view. I noted the ship on the map.

Night colors

Under the SNP bridge

All the bridge here give you nice views. Under the SNP bridge are steps, and you can get down completely to the water. I really like to do panoramas here, including the bridge and the castle. And if the water is a bit calmer, even a reflection.

Night colors

Town Hall tower

If you want a nice view of the main square, that definitively go up the Town hall tower. To get there, go inside the museum that is in the town hall, and buy the ticket just for the tower. It’s around 3 euros. You can take a tripod up there without any issues.

The best time to take photos from there is during the Christmas market, as then the square is full with colorful stands and lights.

Christmas market in Bratislava


Michael’s Gate tower

Another tower you can go up into is the Michael’s gate. It’s not as tall, but still gives a nice view. It’s a museum, so you will have to pay for entrance. You can’t use a tripod inside, but on the balcony it’s allowed. They close quite early, so if you want a sunset shot, it can be done only in winter.

Apollo Bridge

A little further away from the center, but worth it. You can just walk here from the new Old bridge or from the Eurovea Shopping center. Really great for blue hour shots. Also the view from the bridge is very nice.

On the new Old bridge

The Old bridge in Bratislava was taken down few years back and there is a new bridge there now. It gives you a great view of the center, and also is great for long exposures with the passing trams. It shakes from them a bit, so be ready for that.

Under the new Old bridge

And to get a nice photo of the bridge, go under it. I prefer the view opposite from the city, as one can use the bridge to frame the old town and the castle under it.

Also if you manage to be in Bratislava during the White night event, there are usually some cool lights on this bridge.

Kuchajda Lake

This place is just about reflection. The lake is usually very calm, and the sun usually sets behind the two Millennium towers, so you can have the whole sunset twice. Also once a year they have fireworks above this lake (usually at the start of June).  As reflections go, this place is never disappointing.

Port bridge view

Ok, this bridge is quite far from the center. It shakes really a lot, as it’s a highway bridge and even trains pass through it. But if you go there in the right time when the sun sets above the Danube, and you have a long lens, you will get a coll shot of the bridges and Bratislava castle. I would not walk there from the center. Find a connection that goes to the bus stop Pristav (Port) and walk from there. It’s still about 1km away from there, but that the closest you can get.

Castle and the bridge

Other available lists:

Taking panoramas without a panoramic head

I have been posting and also taking quite a few more panoramas recently, so today’s post will be about those. To be exact about if you really need a panoramic head, and if you do when. Also, how to take panoramic shots without one.

What is panoramic head?

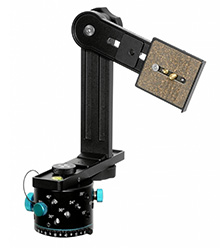
A panoramic head, is quite a big tripod head, that has two main functions. First is to move the sensor back from the center of rotation, so you avoid paralax shift (will explain in a moment what it is). The second is to allow you to rotate the camera horizontally and vertically in exact increments.

With it, you can get a perfectly shot panorama, with every photo in exact increments from each other. For big and multi-row panoramas you just have to have one. The photos will align perfectly every time if you use one.

I do have one, but use it rarely. It’s just to big and heavy to carry around all the time.

What is a paralax shift?

If you ever moved you camera, you have seen it. When you move your camera horizontally, the objects that you see move also horizontally. But you may have noticed, that things that are closer to you move much more than the ones further from you. Like this, their relative position towards each other changes.

So what effect this has? If you take two photos for a panorama, but he positions between objects in the photos changes, they will not blend nicely or at all. The reason for this is, that you are rotating your camera at the spot where the sensor is. To avoid this, you would need to rotate the camera around the spot in the lens, where the light bends (nodal point). There is a mark on most of the lenses to identify where this is. If you rotate the camera around this spot, there will be no paralax shift at all.

When do you need a panoramic head?

So since the panoramic head can help you remove the paralax shift, you need it in situations when that is a problem. These are:
– when you have something very close to the camera. The closer, the more paralax shift you get
– when you are shooting with a very wide or a fisheye lens. Both of these types of lenses (mostly anything under 20mm) add to the depth of a scene, and with this add to the paralax shift.
– when you are doing a too big of a panorama. If you are doing a very huge panorama, it’s easy to miss a spot or just forget where you started. A panoramic head will help you to get all the shots you need without problems.

For this photo I used a panoramic head, as it’s a huge 9 shot panorama and it made it easy to get all the shots properly.
Taking panoramas without a panoramic head

When you don’t need one?

So you don’t need one in all other situations. Especially if what you are taking a panorama from, is further from you. There will be a small paralax shift, but it will not effect the final photo at all. Here are few tips for taking panoramas without a panoramic head:

– zoom in. Shoot at least at 20mm or more. I you zoom out, it can happen that the panorama will not blend.
– use manual mode. Getting all the shots with the same settings is important. Meter the scene to get you camera settings, and then use manual mode to get all the shots.
– use manual focus. You don’t want the focus to change in between shots.
– use a tripod. This is a must. You can get panoramas handheld, but they will never be the same as from a solid tripod.
– either do bracketing, or set exposure based on some average spot from your scene. If the panorama goes from bright area to a dark, it’s best to set the exposure based on something in between them.
– turn on the build in leveling in your camera. If it shows up on the camera screen, it’s easier to move the camera horizontally without moving it up or down.
– do multiple panoramas. Never do just one shot, do multiple. Bigger chance you get one right.

This panorama was taken without a panoramic head. There was nothing close to me, so it was not a problem.
Taking panoramas without a panoramic head

If have, you can also use a tilt-shift lens to create panoramas, and you can read more about here.

Photos on Instagram

I always hated how hard is to show bigger photos on Instagram. The limitations there on aspect and size are quite big, and a lot of my photos just don’t fit. It’s just hard to show them off in the best way. So recently I started cropping my photos into multiple versions and sharing those on Instagram, so today I will show you how I do that in Photoshoop. It is possible directly on a phone, but I feel like the results are not as good.

Cropping photos for Instagram

The maximum size of a photo on Instagram is 1080x1350px. I like to have the photos as big as possible, so I use this resolution for them. It also works quite well on modern smartphones.

I create three versions:
Cover photo – a crop from the full photos, showcasing the most interesting part, as a single image in 1080x1350px resolution
Full photo – a crop where I add white space around the photo, so full photo can be showcased
Split version – a crop into multiple photos, that shows the full photo and visitors can slide between the parts to see it.

Cropping photos for Instagram

Like this I think I get the best options of sharing the photo. Those who only scroll by will see the cover photo mostly, those who are interested can swipe through the other and see more.

Cover photo

This one is simple. Choose the crop tool, put 1080×1350 into the ratio box in the top left (or 4 to 5, as it’s the same ratio). Then just move and resize the crop box as you need for your photo and hit enter. Now you just need to resize the result to 1080×1350 and maybe apply some sharpening. I like to do this with TK actions, but any way is fine.

Cropping photos for Instagram

Full photo

Go back to the original photo. Before cropping, change the background color selection to white. This is so after we crop, Photoshop fill the background with white. Just hid the D key to reset the colors. Choose crop with the same ratio as before. Now hold down ALT key and drag on one of the corners of the crop box to make it bigger. Do so until the sides of the crop box snap onto the sides of the photo. Hit enter to confirm. Now resize to 1080×1350, sharpen and save.

Cropping photos for Instagram

Split version

This one is a bit more complicated. First you have to decide into how many parts you want to split the photo. It really depends on the photo. A normal non-panorama shot works best when split into 2 parts. For a panorama you would need more. But it’s easy to just try out different option.

Return to original image. Choose the crop tool, and for the ratio calculate your width based on the number of slices. So if you want 2 slices it would be 2160×1350 (or 8×5), for 3 slices 3240×1350 (or 12×5) and so on. Just look at the crop box and choose one that best fits your image. Confirm with enter when you chosen.

Cropping photos for Instagram

Now we will add guides to the photo, to see where we need to slice it. Go under View/New guide layout and in the window that opens choose Columns and then write in the number of slices you want. The guide lines will show up. If you don’t see them, go into the menu under View/Extras or hit Ctrl+H to toggle visibility.

There are multiple option how to save the slices now, and I will show you two. First one is using the crop tool. Choose it, set the ration back to 1080×1350 (or 4×5) and move the crop box until it aligns wit the first slice. It will snap to the guide lines automatically. Now crop, resize and sharpen and once you save, undo it all with the history window, until you are back to the guide lines. Then just repeat for every slice.

Cropping photos for Instagram

The second option is the slice tool. If you hold down the left mouse button on the crop tool selection, it will give you the option to choose slice tool. Then just create slices by using the guide lines. Each time you create one, there will be a little number in the top left corner of it. One you you have all, resize the photo so it’s 1350px in height and sharpen it afterwards. Choose File/Export/Save for web and once confirmed, it will save every slice as a separate photo.

Cropping photos for Instagram

Now you can post everything to Instagram. Check my profile to see how I do it here. While this is a bit of work, one can do it quite quickly. And if one makes big photos (as I do) this makes them look much better on Instagram :)

Removing lens flares

I did an article a long time ago, about removing lens flares. There I suggest two options. Removing them using Photoshop tools, or by creating a second photo where you shade the sun and then blend them together. But sometimes one forgets, or you just don’t notice the flare until you load the shots into your computer. So what to do then? Today I will show you something I do in those cases from time to time.

Removing lens flares using multiple photos

So this was my situation. I did not notice the flare in this photo. The sun was a bit to the left here, and with no clouds in the sky, it was so bright, I could see nothing on the camera screen. But as you can see there few are big flares and on spots that are not easy to correct in Photoshop. So what to do?

Removing lens flares using multiple photos

What I did was use a photo, that I took from the same location, but with different settings, that did not have flares on the same spots. As long as you did not move too much between the two photos, you can align them, even if you zoomed out or in. All you need is that the same area is in both photos. You can try to align manually, but Photoshop align layers function can work very well here.

Removing lens flares using multiple photos

Here I used a much wider shot, and while this one also has flares, they are on different spots. I loaded both photos into Photoshop. The one I wanted to fix placed on bottom. Then I locked the layer (choose layer and click the lock icon above the layer list). Now I could align them without distorting the one I want to fix. I just chosen both layers (holding down CTRL and clicking on each layer) and aligned them using Edit/Auto-Align Layers and choosing the Auto projection.

Removing lens flares using multiple photos

This was the result. I cropped the layer now, to get rid of the extra part I did not need (CTRL+click on the bottom layer thumbnail, and then Image/Crop to crop based on selection). Now by using a mask, I just hid the top layer with all black mask. Using the brush I painted with white in it, where the lens flares were. There is one more thing to fix, and that is to match the brightness and the color of the corrected areas. Her I used brightness/contrast to brighten the area and color balance to make it a bit warmer. You have to use the adjustment layers as clipping masks, so they affect only the layer under them (Alt+Ctrl+G with the layer selected, or Layer/Create Clipping mask).

Removing lens flares using multiple photos

And with the lens flares fixed, one can continue with further edits.

FREE EBOOK!!!
Subscribe to my newsletter and get a free Capturing fireworks ebook. 
Subscribe